anonym.plus Benutzerhandbuch
Übersicht
anonym.plus Desktop ist eine sichere Dokumentanonymisierungsanwendung, die persönlich identifizierbare Informationen (PII) aus Dokumenten und Bildern erkennt und entfernt. Sie verwendet ein lokales PII-Erkennungsmodul (Presidio) und einen verschlüsselten Tresor für sichere Speicherung.
Sehen Sie es in Aktion: Schauen Sie sich unsere 36 Video-Anleitungen an, die alle Funktionen in 4 Sprachen abdecken.
Wichtigste Vorteile
- Lokales PII-Erkennungsmodul — keine Cloud für die Analyse erforderlich
- Militärische Verschlüsselung (AES-256-GCM) für gespeicherte Daten
- Reversible Verschlüsselung — verschlüsseln Sie PII, teilen Sie Dokumente, entschlüsseln Sie später
- Unterstützung für PDF, DOCX, XLSX, TXT, CSV, JSON, XML und Bilder (PNG, JPG, BMP, TIFF)
- 200+ PII-Entitätstypen in allen globalen Regionen
- 121 integrierte Erkennungsvorgaben (DSGVO, HIPAA, Finanzen, Regional, etc.)
- Benutzerdefinierte Entitätserkennung über Regex-Muster
- 48 unterstützte Sprachen
- Batch-Verarbeitung mit paralleler Dateiverarbeitung
- Plattformübergreifend: Windows, macOS, Linux
Systemanforderungen
| Plattform | Anforderung |
|---|---|
| Windows | Windows 10 oder später (x64) |
| macOS | macOS 10.15 (Catalina) oder später |
| Linux | Ubuntu 20.04+, Debian 11+ oder äquivalent |
| Speicher | 4 GB RAM Minimum, 8 GB empfohlen |
| Speicher | 500 MB für Installation |
Installation
Windows
| Format | Anleitung |
|---|---|
| .exe (NSIS) | Laden Sie das .exe-Setup herunter und führen Sie es für die Standardinstallation aus |
| .msi | Laden Sie das .msi-Installationsprogramm für die Unternehmensbereitstellung herunter und führen Sie es aus |
| .zip (Portable) | Laden Sie die tragbare .zip herunter und entpacken Sie sie — keine Installation erforderlich |
macOS
Laden Sie die .dmg-Datei herunter, öffnen Sie sie und ziehen Sie die App in den Ordner Programme.
Linux
| Format | Anleitung |
|---|---|
| .deb | sudo dpkg -i anonym.plus_*.deb |
| .AppImage | Make executable: chmod +x, then run |
Erste Inbetriebnahme
Wenn Sie anonym.plus zum ersten Mal öffnen, führt Sie ein geführter Einrichtungsassistent durch fünf Schritte: Auswahl des Startvorgangs, Erstellung Ihres sicheren Tresors, PIN-Einrichtung, Lizenzaktivierung und Auswahl eines Ausgabeordners. Jeder Schritt wird unten mit Screenshots erläutert.
Schritt 1: Willkommensbildschirm
Der Willkommensbildschirm bietet drei Optionen für den Einstieg:
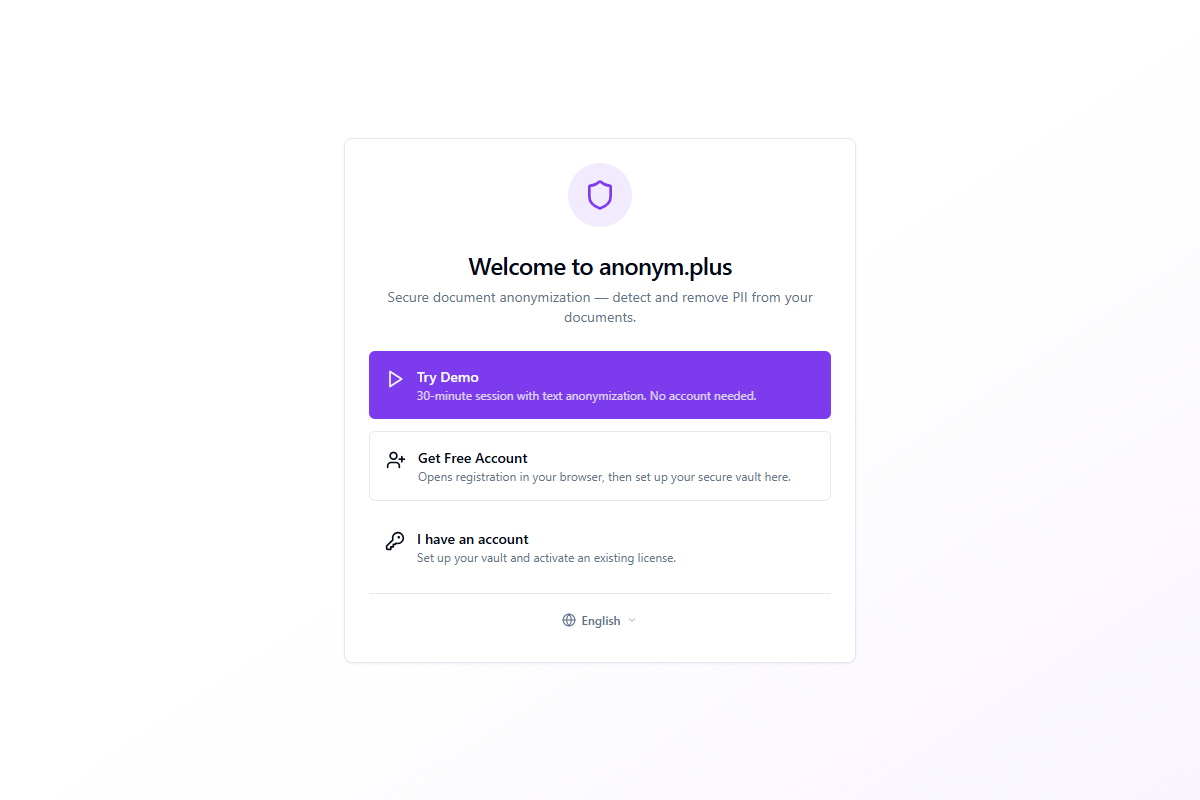
| Option | Beschreibung |
|---|---|
| Demo versuchen | Start a 30-minute demo session with text anonymization. No account needed — great for a quick test drive. |
| Kostenloses Konto erstellen | Öffnet die Registrierung in Ihrem Browser und kehrt dann zurück, um Ihren sicheren Tresor einzurichten. |
| Ich habe ein Konto | Richten Sie Ihren Tresor ein und aktivieren Sie eine vorhandene Lizenz. |
Ein Sprachwahlschalter am unteren Rand ermöglicht es Ihnen, die UI-Sprache vor dem Fortfahren zu ändern. 48 Sprachen sind verfügbar.
Step 2: Wiederherstellungsphrase & Vault Creation
After choosing "Kostenloses Konto erstellen" or "Ich habe ein Konto," the app generates a secure vault protected by a 24-word BIP39 recovery phrase. This phrase is the master key to your vault.
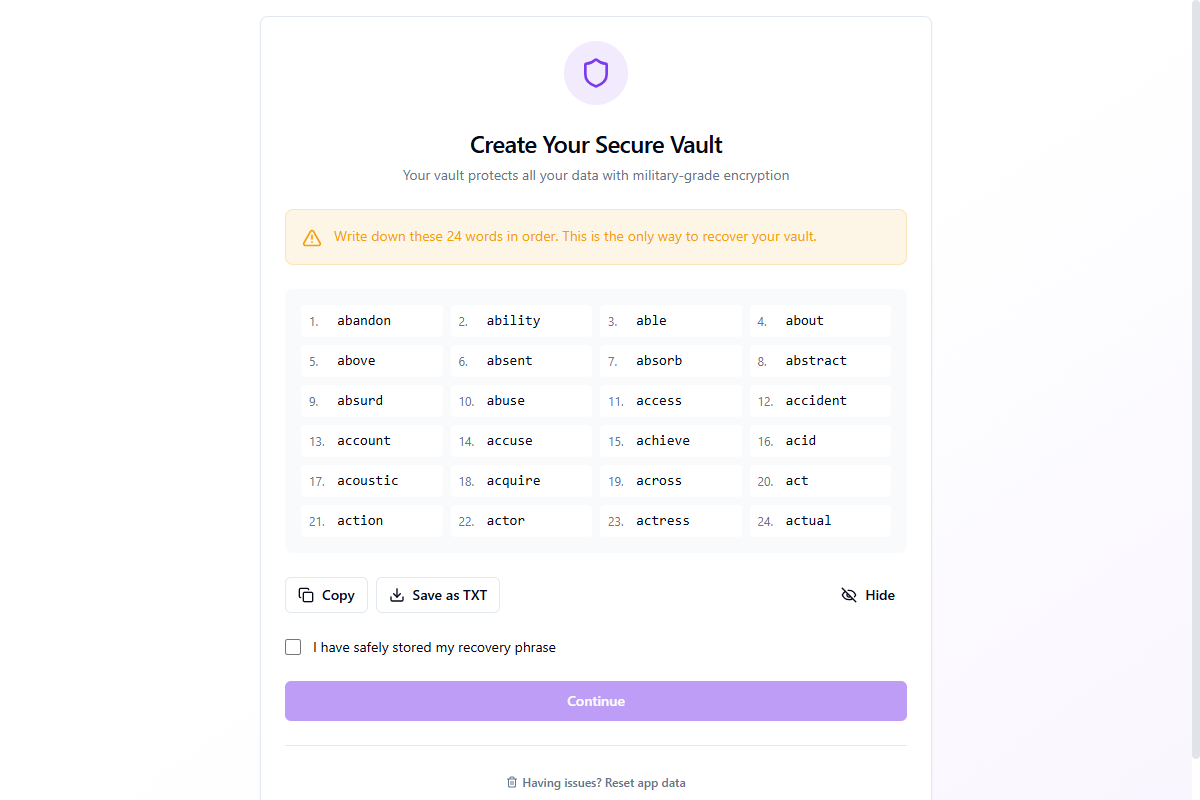
You can Kopieren the phrase to clipboard (auto-cleared after 30 seconds) or Als TXT speichern to a file. Click Ausblenden to blur the words for privacy. You must check "I have safely stored my recovery phrase" before continuing.
Überprüfen Sie Ihre Phrase
Um zu bestätigen, dass Sie die Phrase korrekt gespeichert haben, fordert Sie die App auf, 3 zufällig ausgewählte Wörter anhand ihrer Positionsnummer einzugeben.
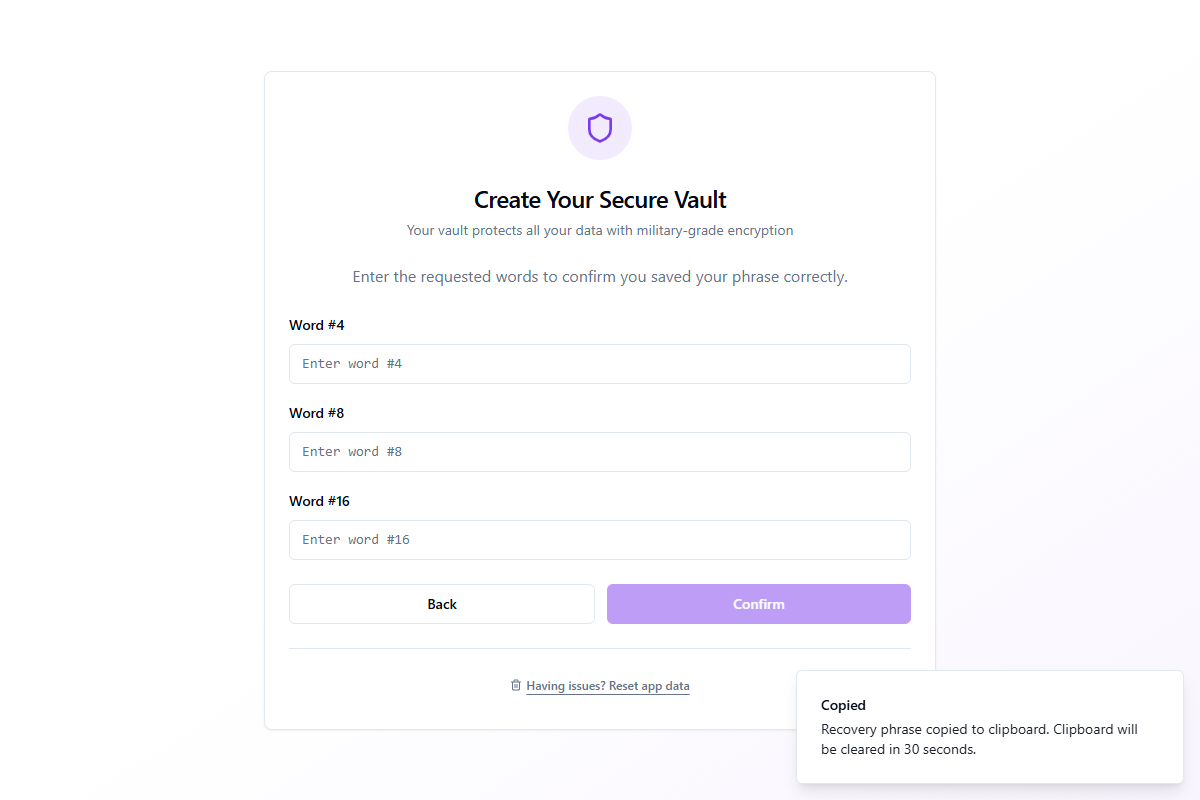
Type the correct words and click Confirm. If any word is wrong, you'll be prompted to try again. Once verified, the vault is created and you proceed to PIN setup.
Schritt 3: PIN-Einrichtung
After vault creation, you can set a 4–8 digit PIN for quick daily access. The PIN lets you unlock the app without typing all 24 words each time.
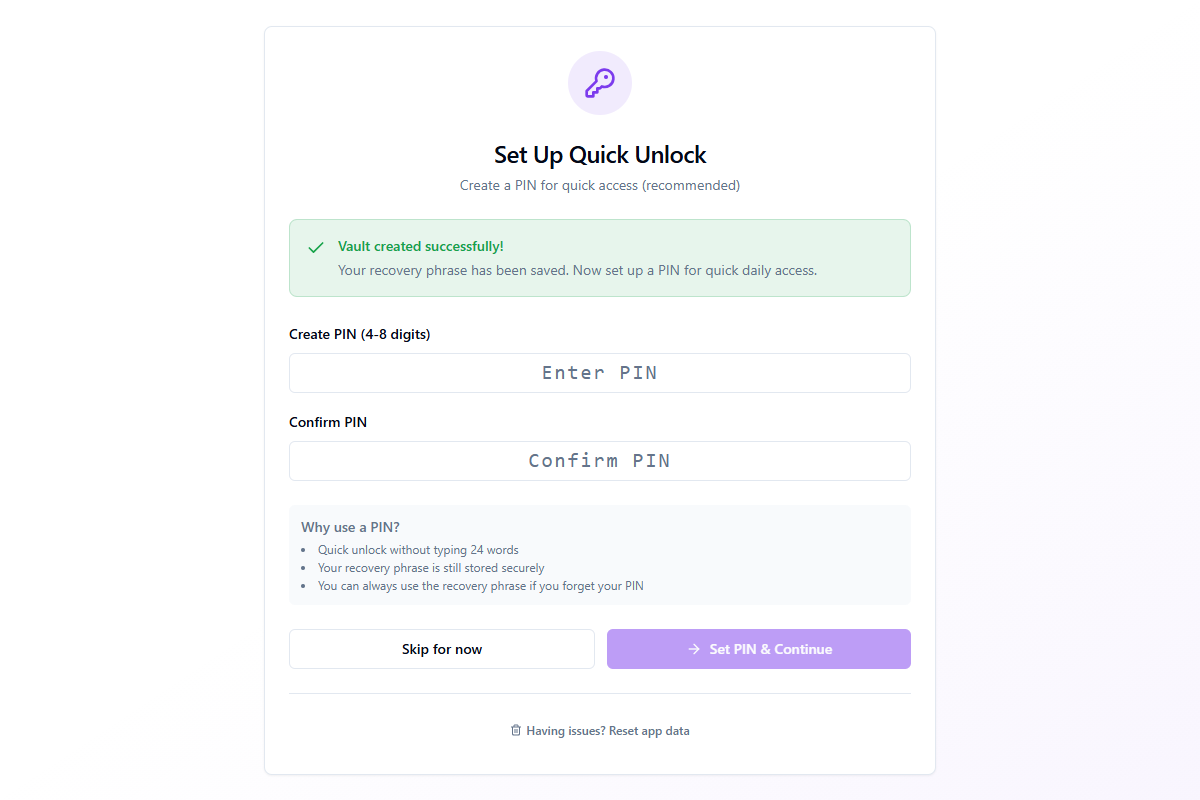
- Quick unlock without typing your full 24-word recovery phrase
- Your recovery phrase remains stored securely in the vault
- You can always use the recovery phrase if you forget your PIN
Enter your PIN in both fields and click Set PIN & Continue. You can also click Skip for now to set a PIN later in Einstellungen → Sicherheit.
Step 4: Lizenzaktivierung
With your vault ready, the final security step is activating your anonym.plus license to unlock all features.
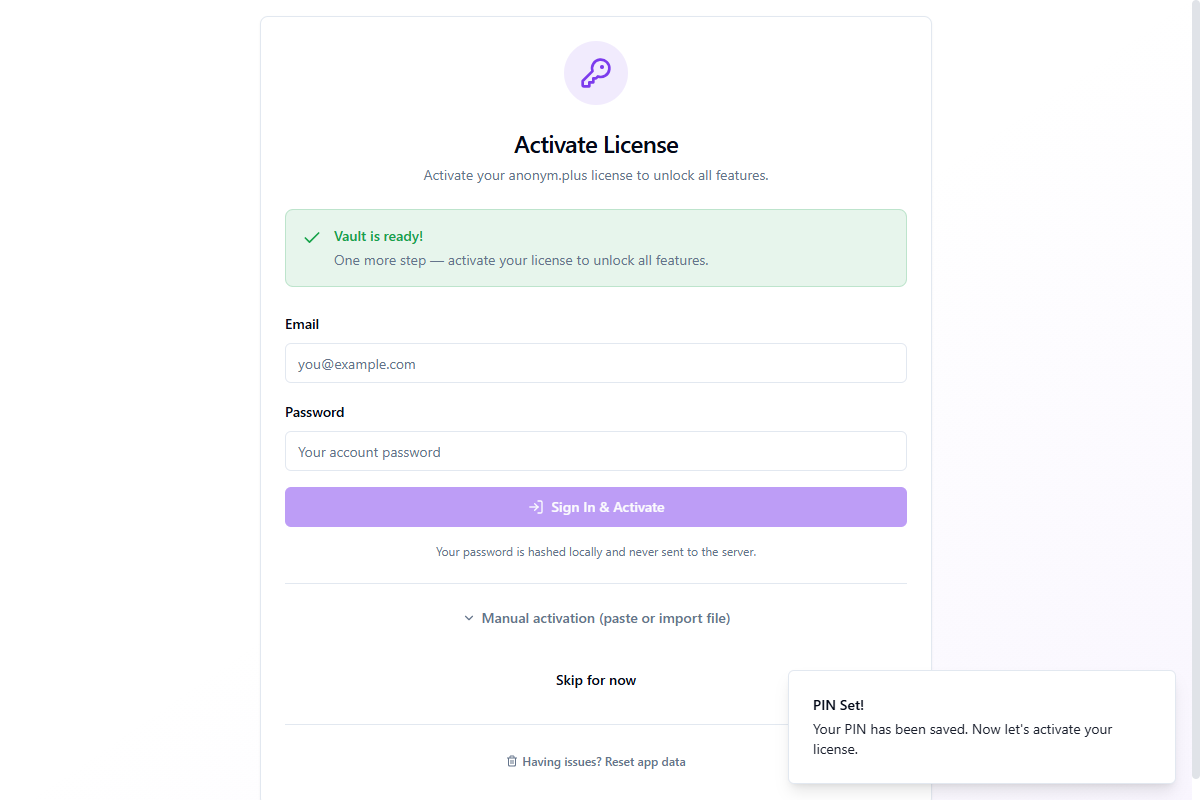
Enter your email and password, then click Sign In & Activate. Your password is hashed locally and never sent to the server in plain text.
Manual Activation
If sign-in doesn't work (e.g., behind a corporate firewall), expand Manual activation (paste or import file) for alternative methods:
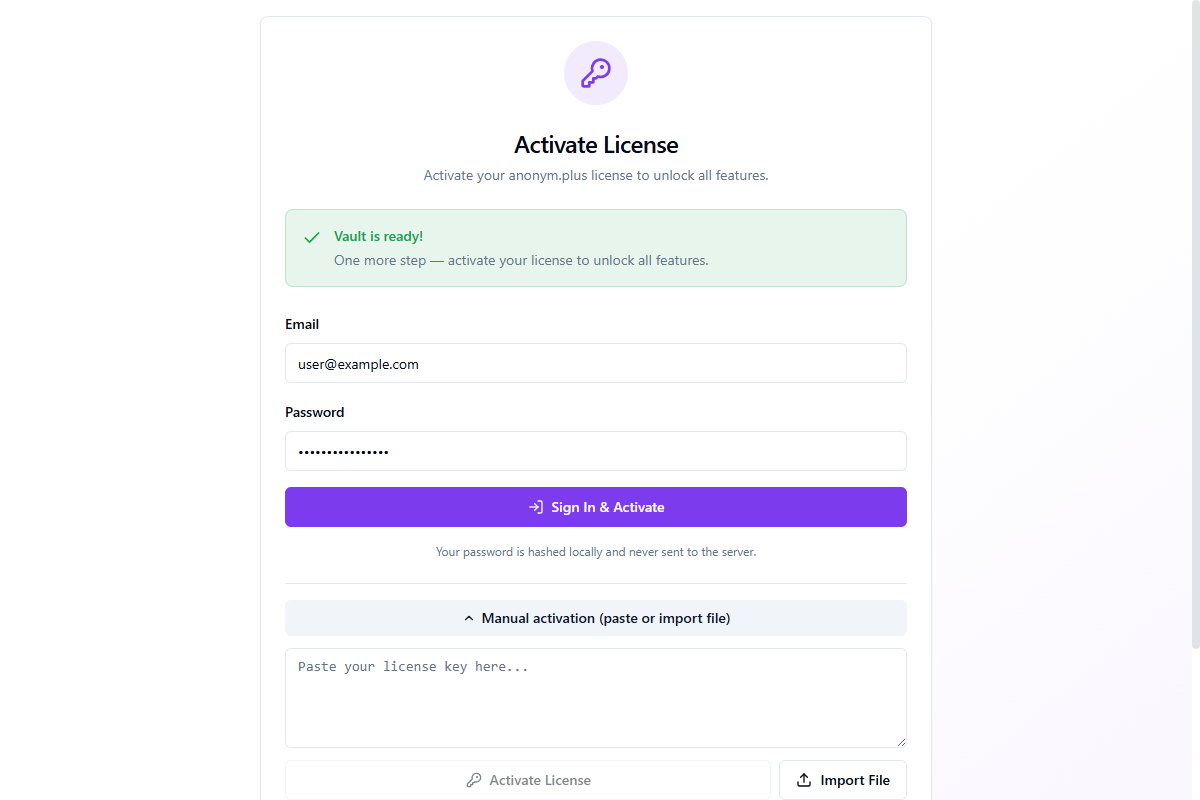
- Paste license key — paste the JSON license key from your account page
- Import File — import a
.jsonlicense file downloaded from your account
You can also click Skip for now to activate later via Einstellungen → Konto.
Step 5: Ausgabeordner
The last step lets you choose where anonymized documents will be saved.

The default folder is Documents/CloakBusiness. Click Browse... to select a different location. You can change this later in Einstellungen → Preferences.
Click Finish Setup to complete the wizard and enter the main application.
Hauptoberfläche Übersicht
After setup, the main interface is organized into several key areas:
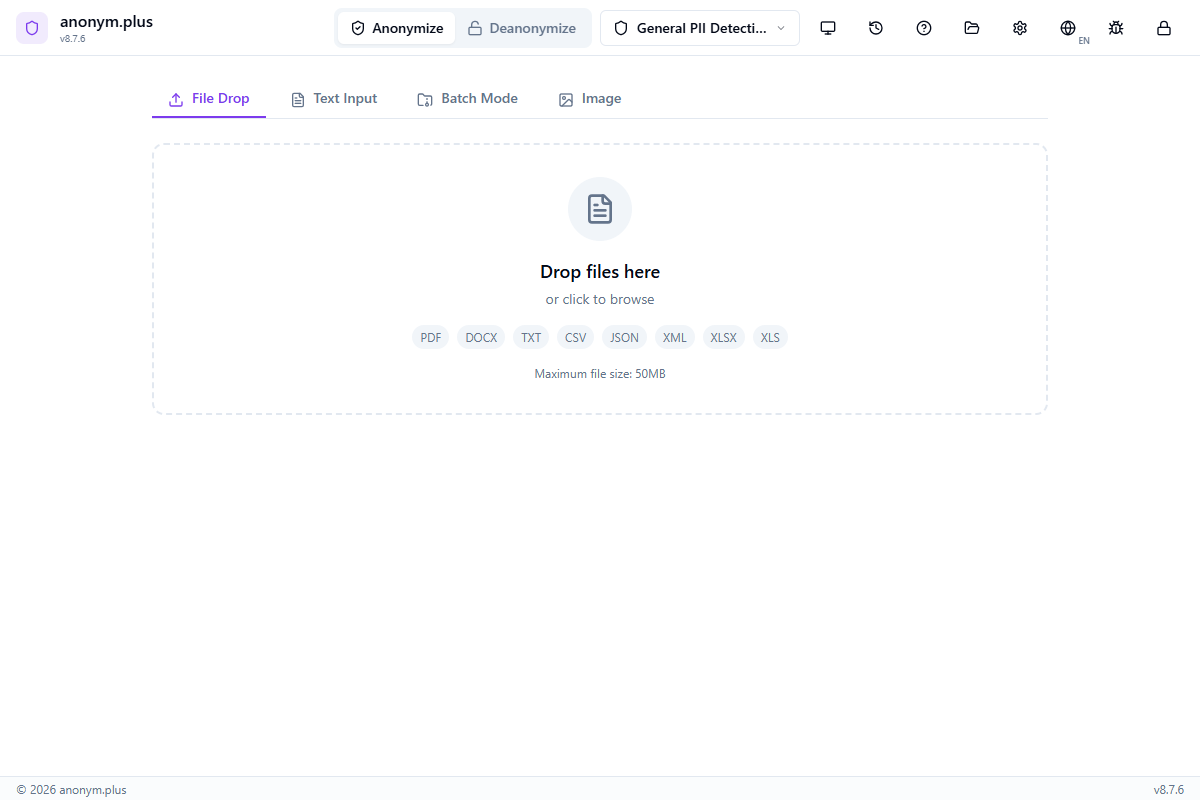
Header Bar
- Mode Toggle — switch between Anonymize and Deanonymize modes
- Preset Selector — quick-switch between detection presets
- History — open the processing history panel
- Einstellungen — access app settings (Ctrl + ,)
- Help — open the in-app help panel (F1)
- Bug Report — submit feedback with diagnostic info
Processing Area
- Datei-Dropzone — drag and drop files or click to browse. Unterstützungs single files and batch uploads.
- Document / Image Tab — toggle between document text anonymization and image redaction modes
- Results Panel — shows detected entities grouped by type with accept/reject controls
- Output Options — choose output format and save location
Status Bar
The bottom of the window shows engine status (running/stopped) and the currently active encryption key.
Dokumentanonymisierung
The core feature — detect and anonymize personal information in documents.
Workflow
Drag and drop files onto the dropzone or click to browse
Choose a detection preset that matches your use case (GDPR, HIPAA, Financial, etc.)
Click 'Start Analysis' to extract text and detect entities
Review detected entities grouped by type (names, emails, phones, etc.)
Select output format (same, PDF, DOCX, TXT) and save option
Click 'Save as New File' or 'Replace Original' to complete
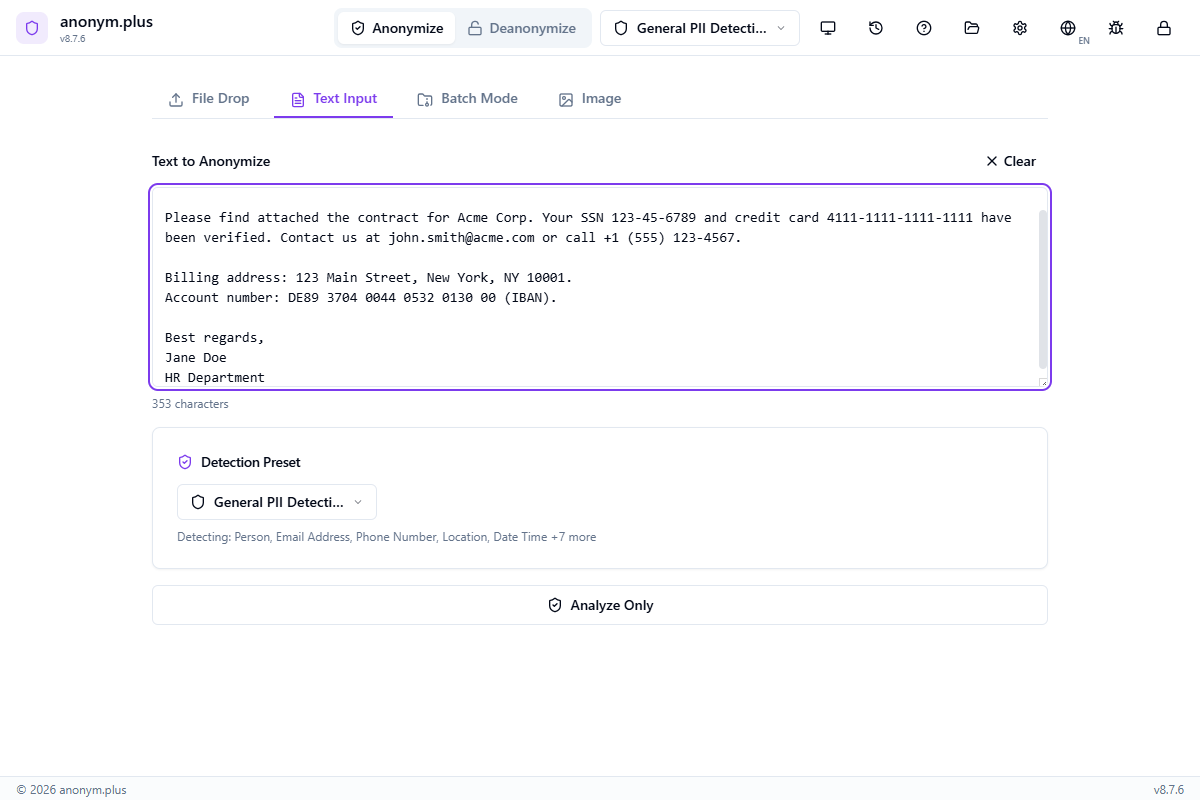
Schritt für Schritt: Text Anonymization with Replace
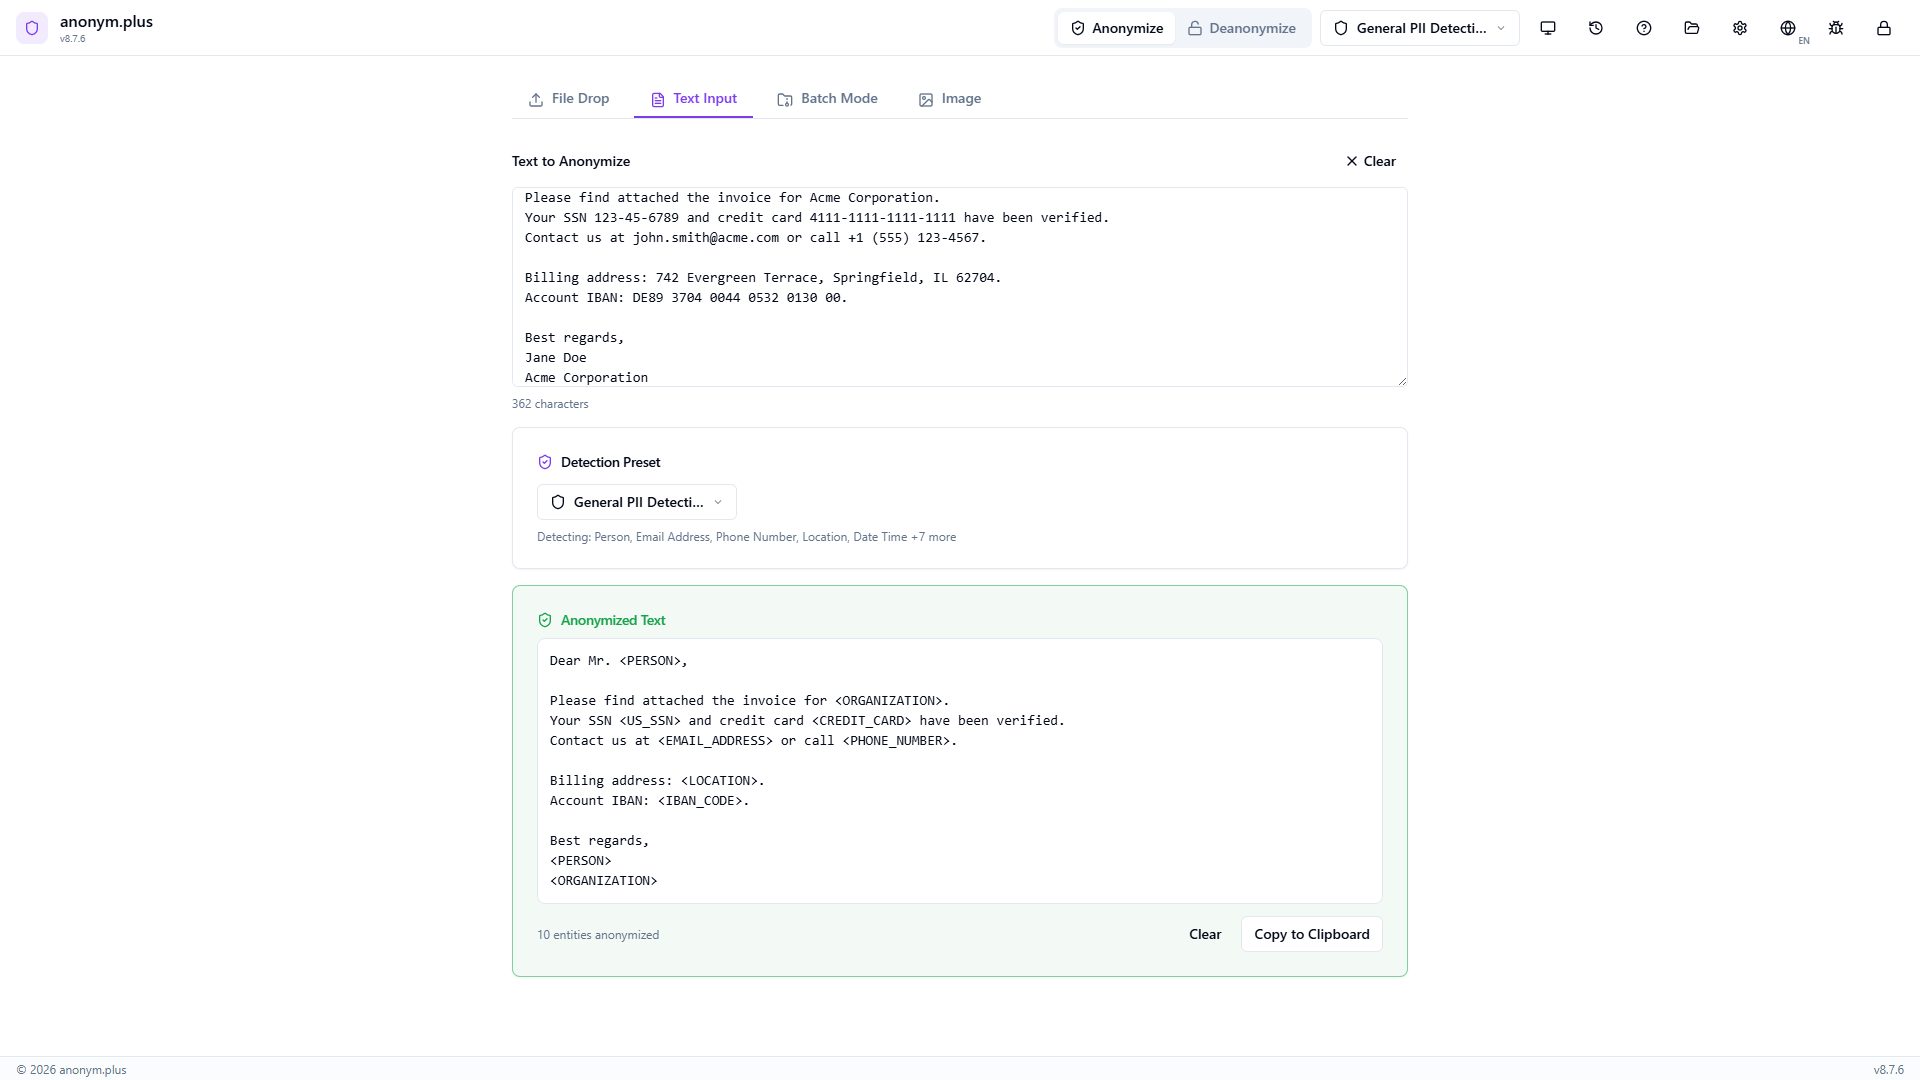
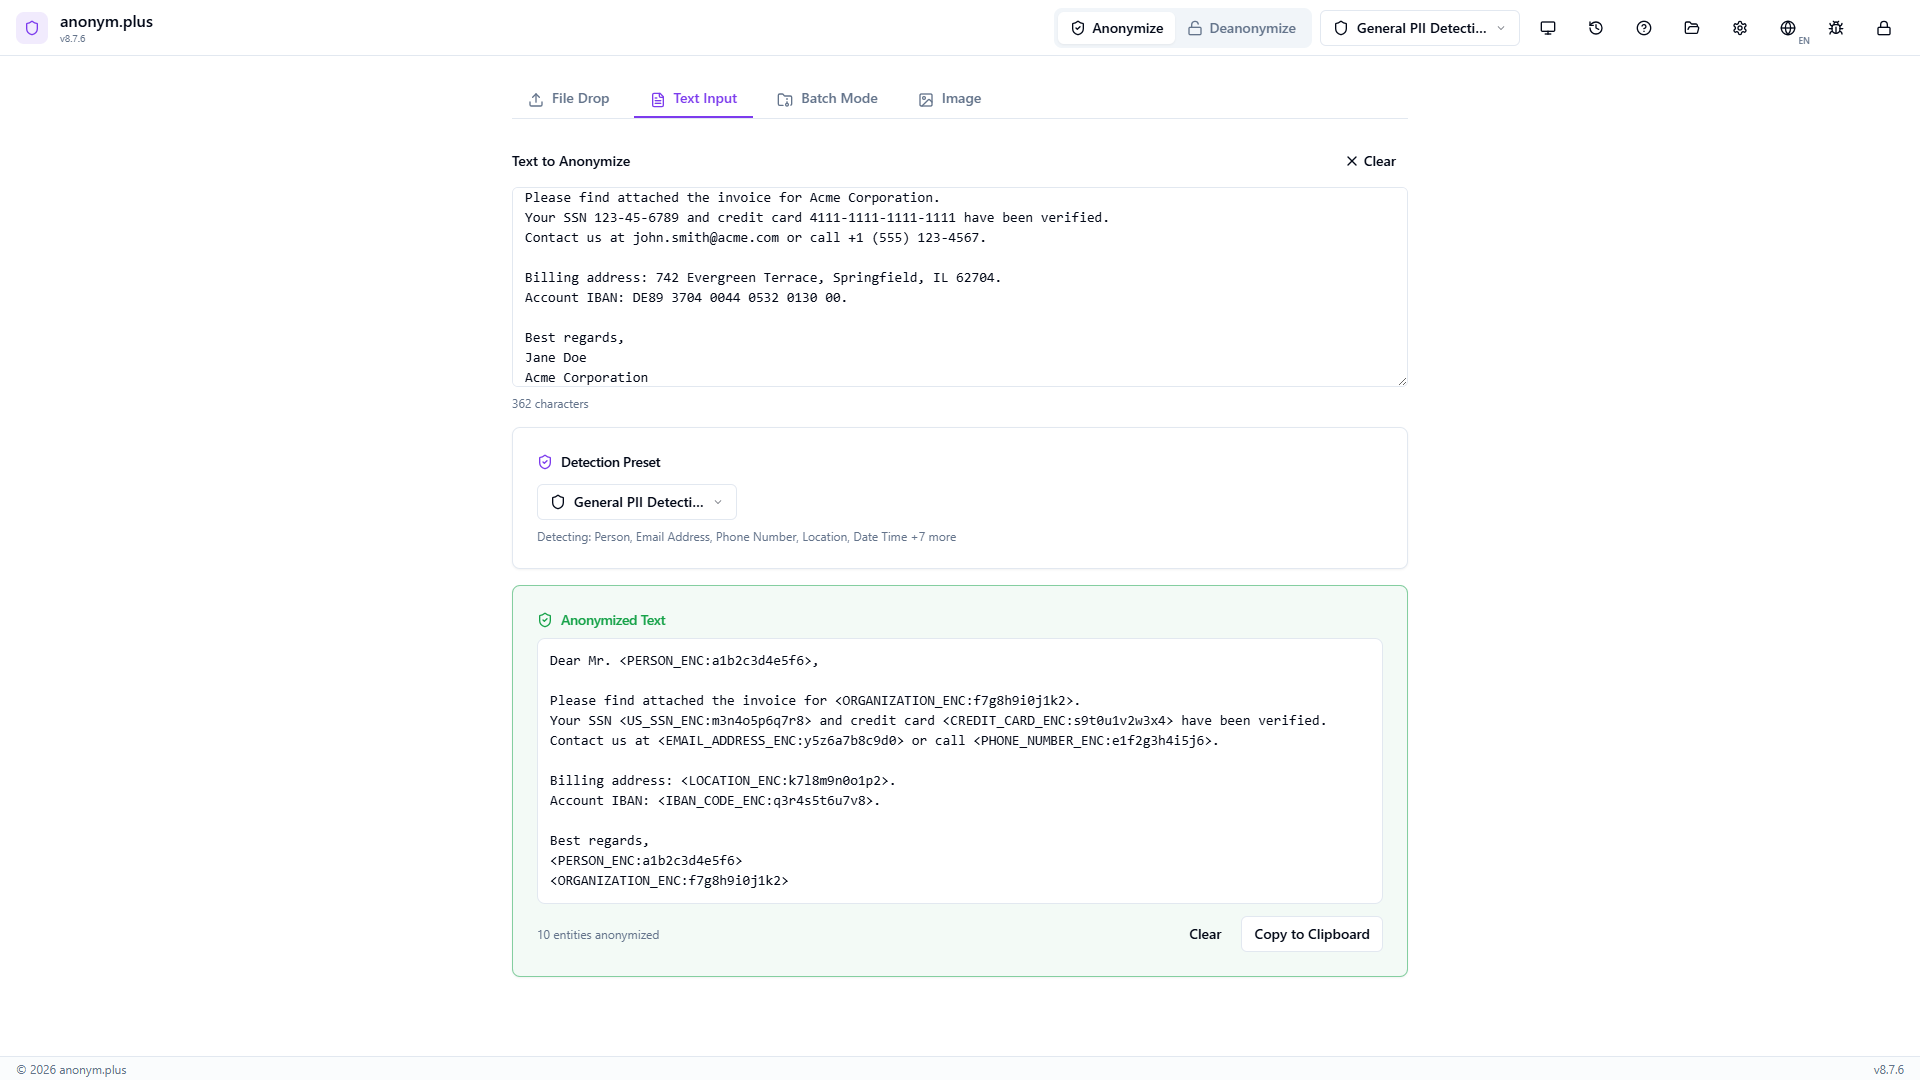
Anonymize text by replacing personal data with type labels like <PERSON> and <EMAIL_ADDRESS>. The original values are permanently removed.
Enter or paste a document containing personal information — names, email addresses, phone numbers, physical addresses, Social Sicherheit Numbers, credit card numbers, IBANs, and organization names.
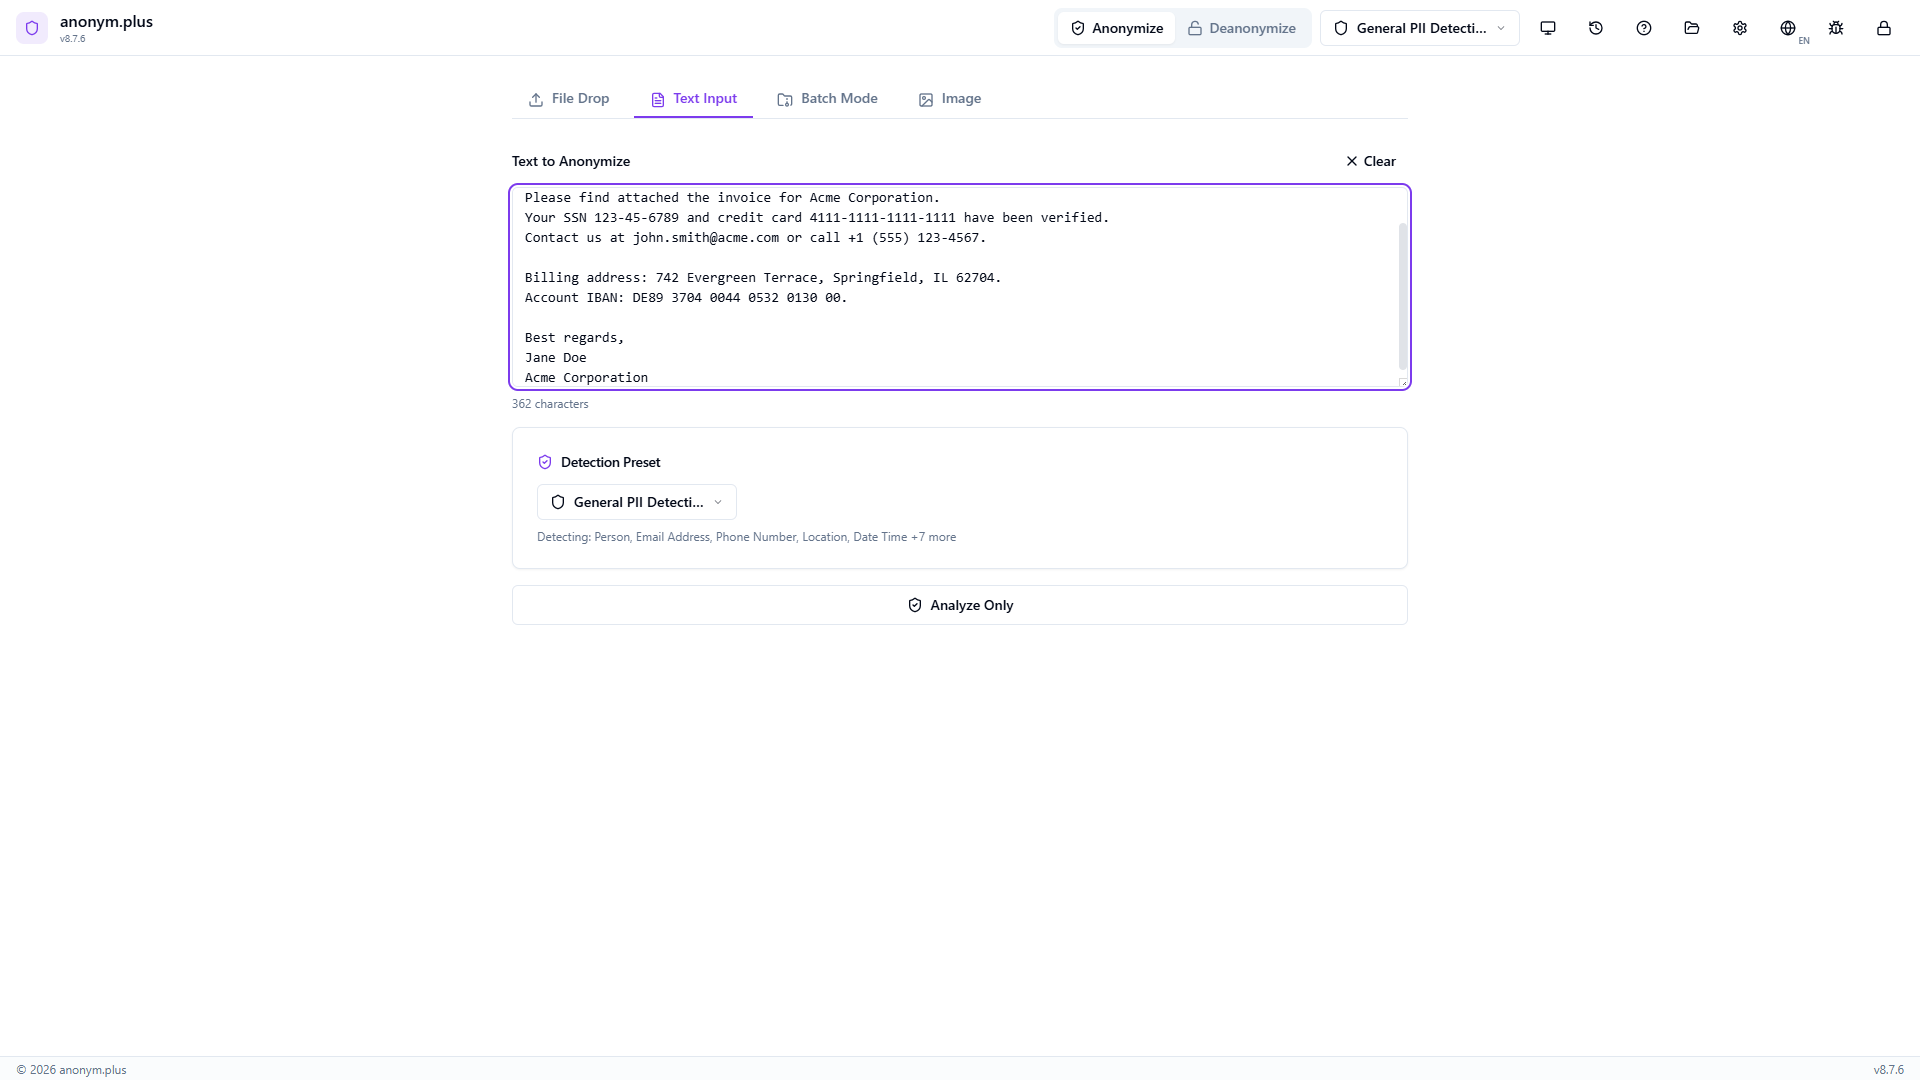
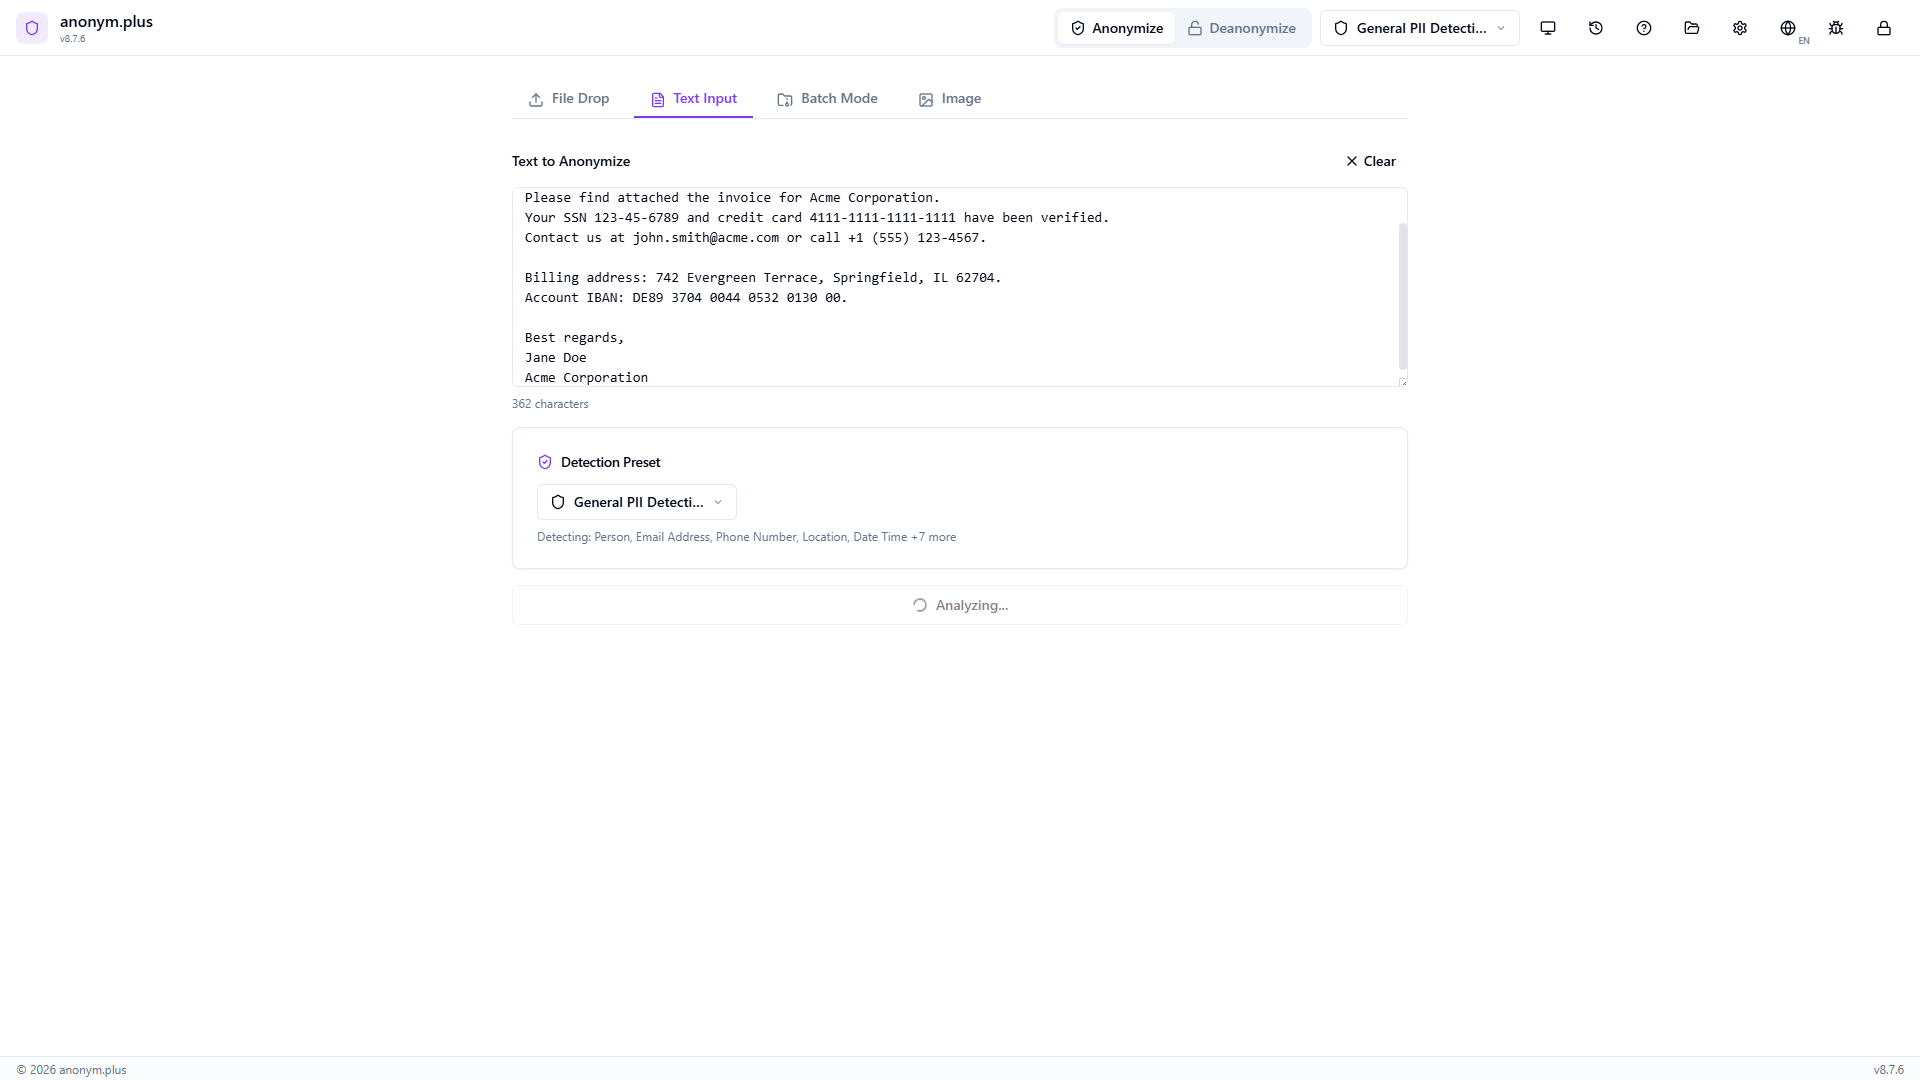
Choose “General PII Detection” from the preset dropdown. This preset detects Person, Email Address, Phone Number, Location, Date Time, and 7 additional entity types using the English NER model.
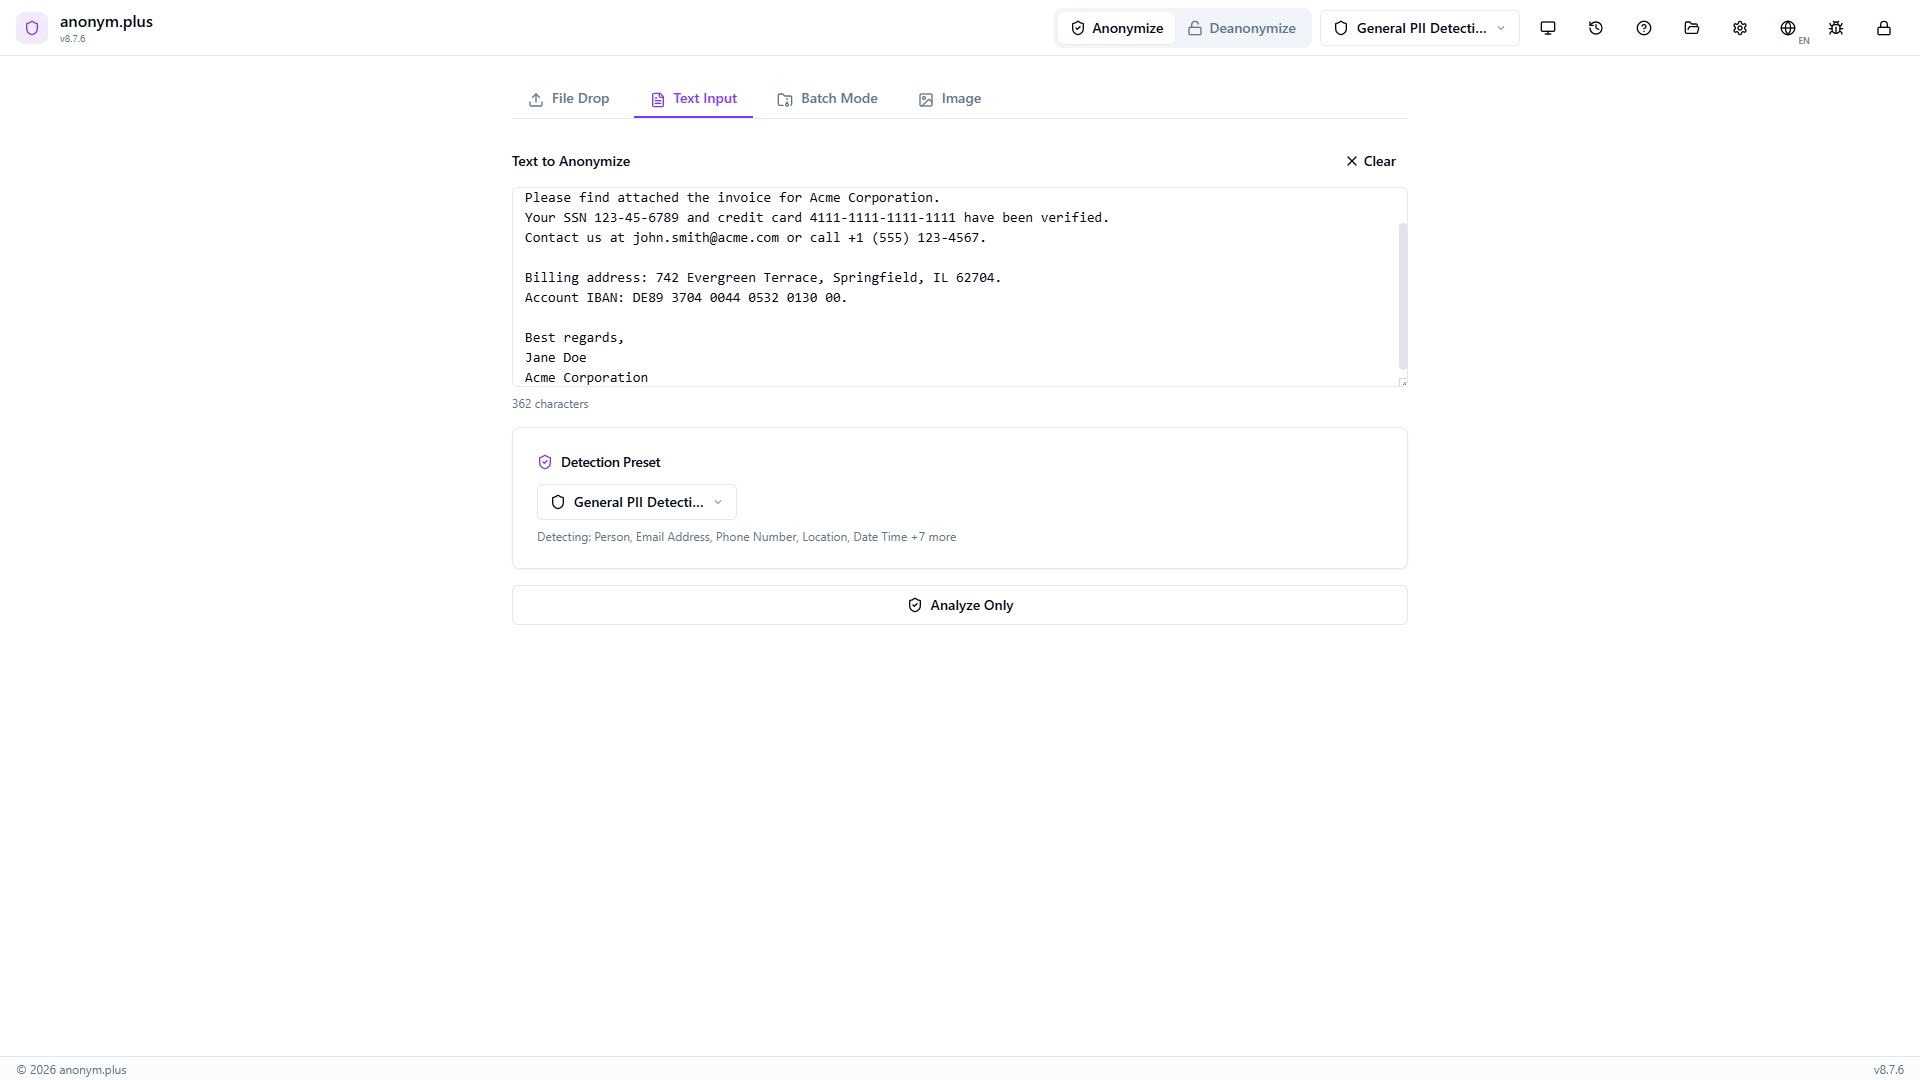
Click “Analyze Only” to run the Named Entity Recognition pipeline. A loading spinner shows while the text is scanned for PII.

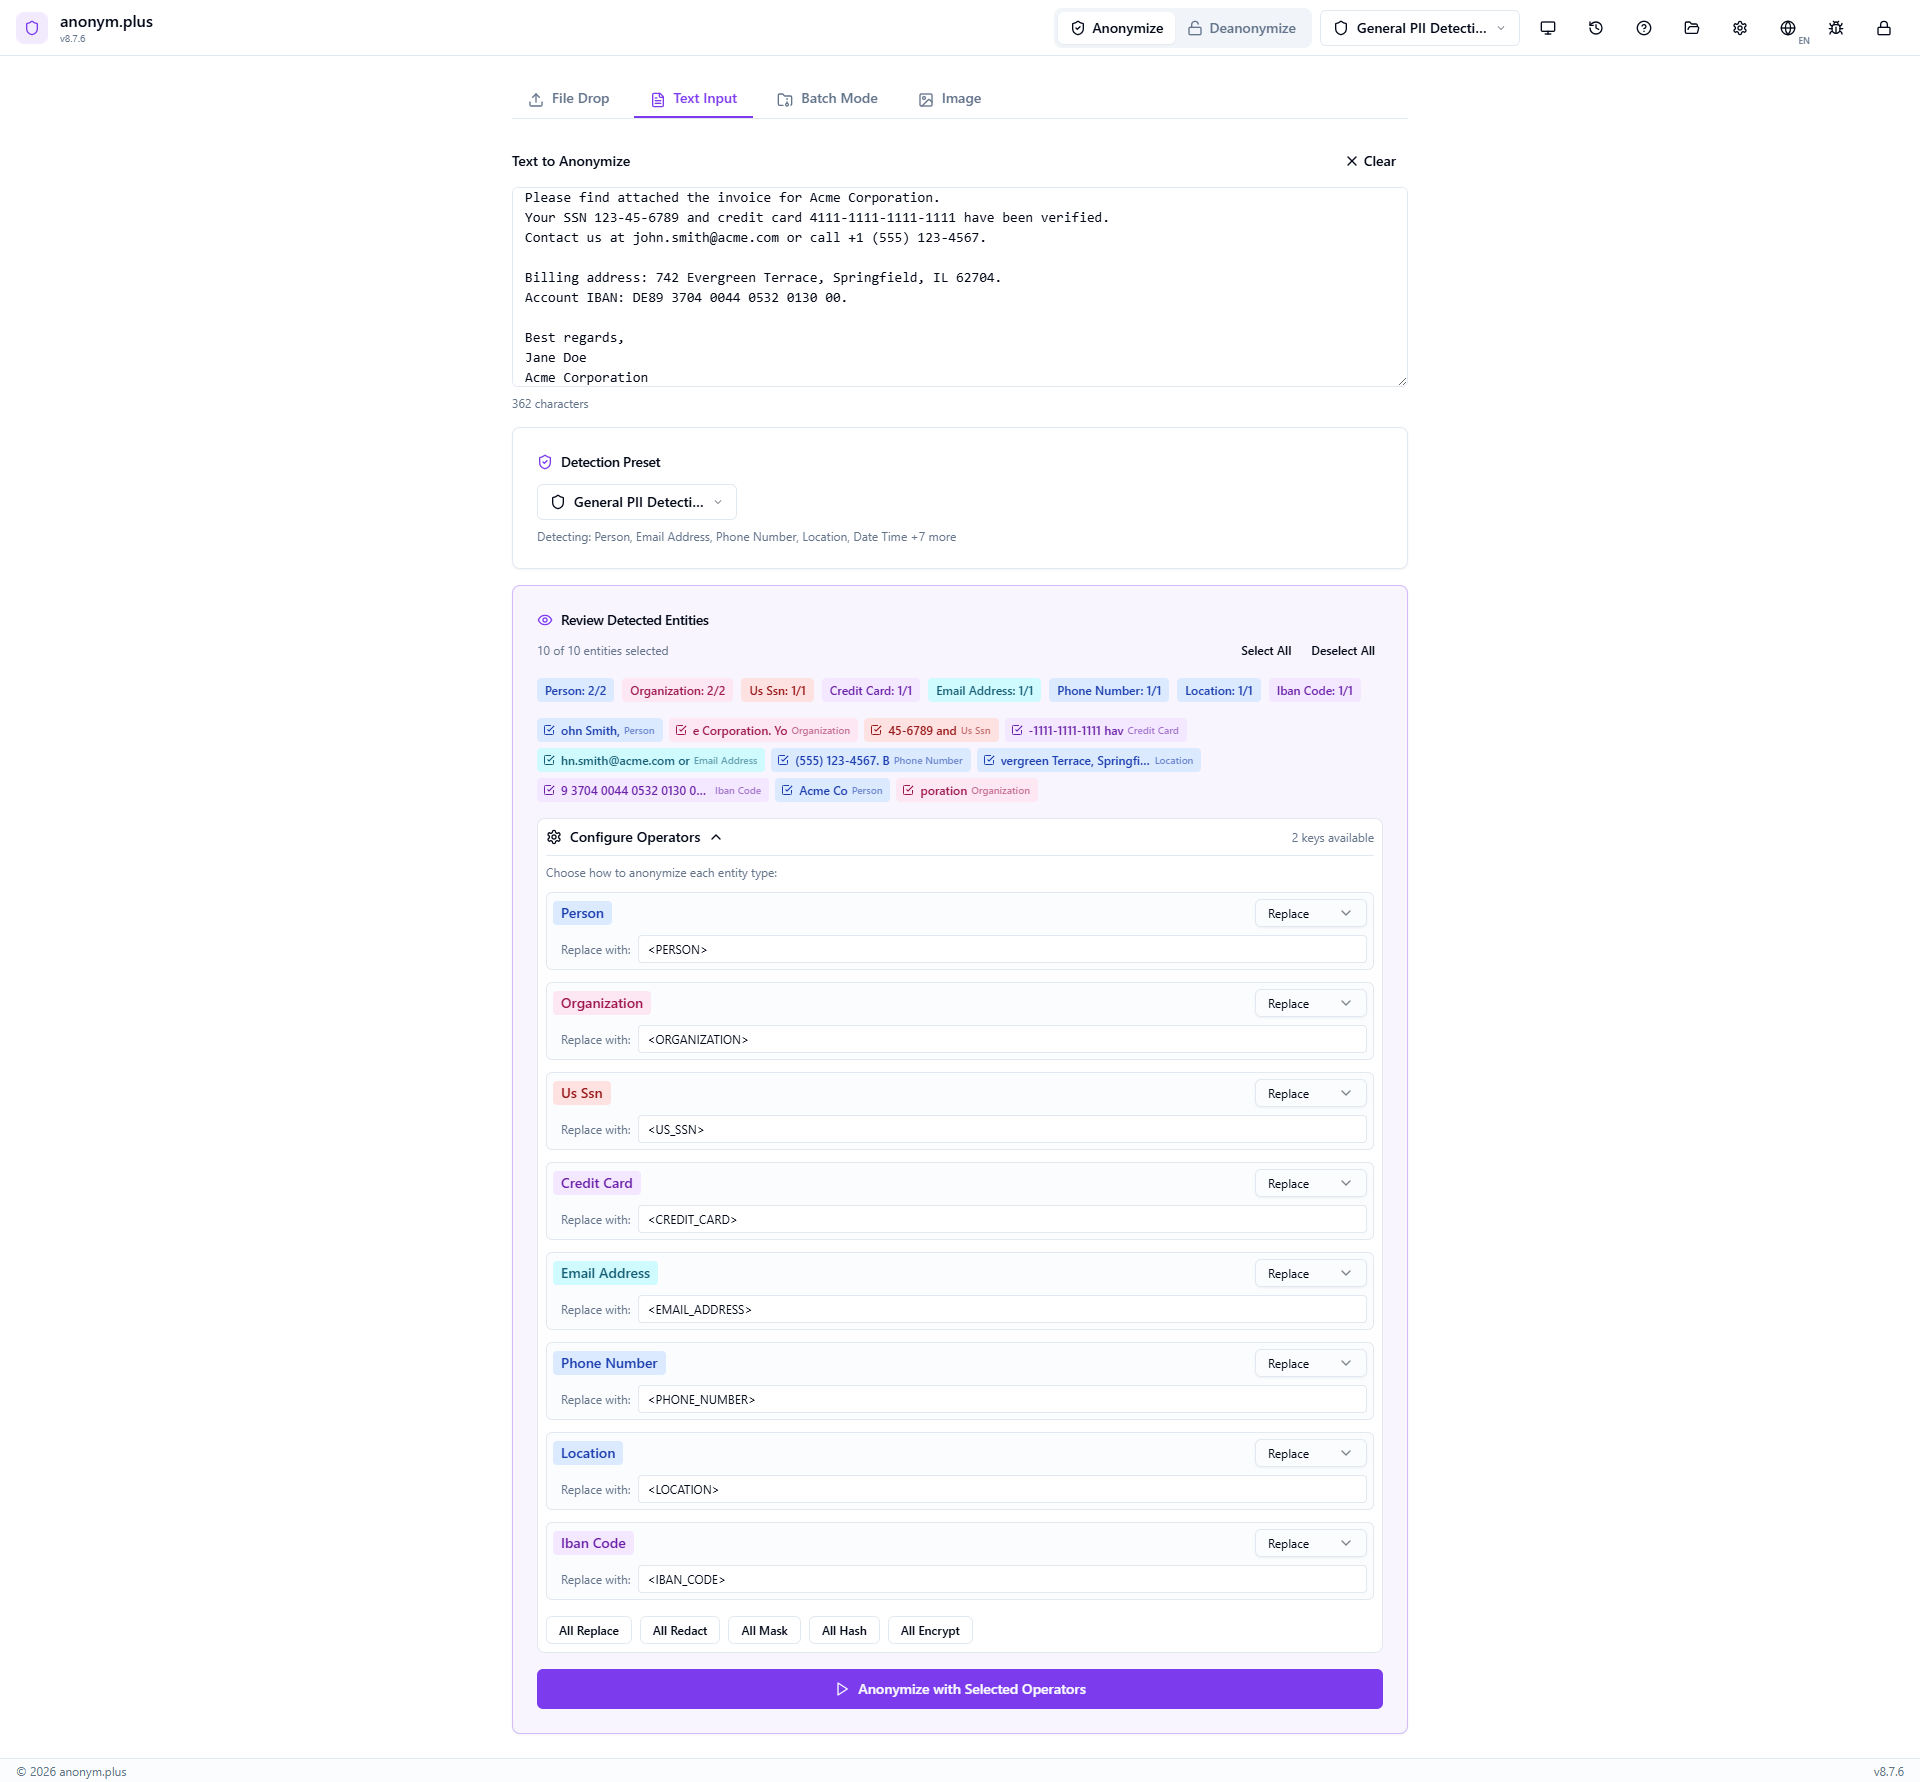
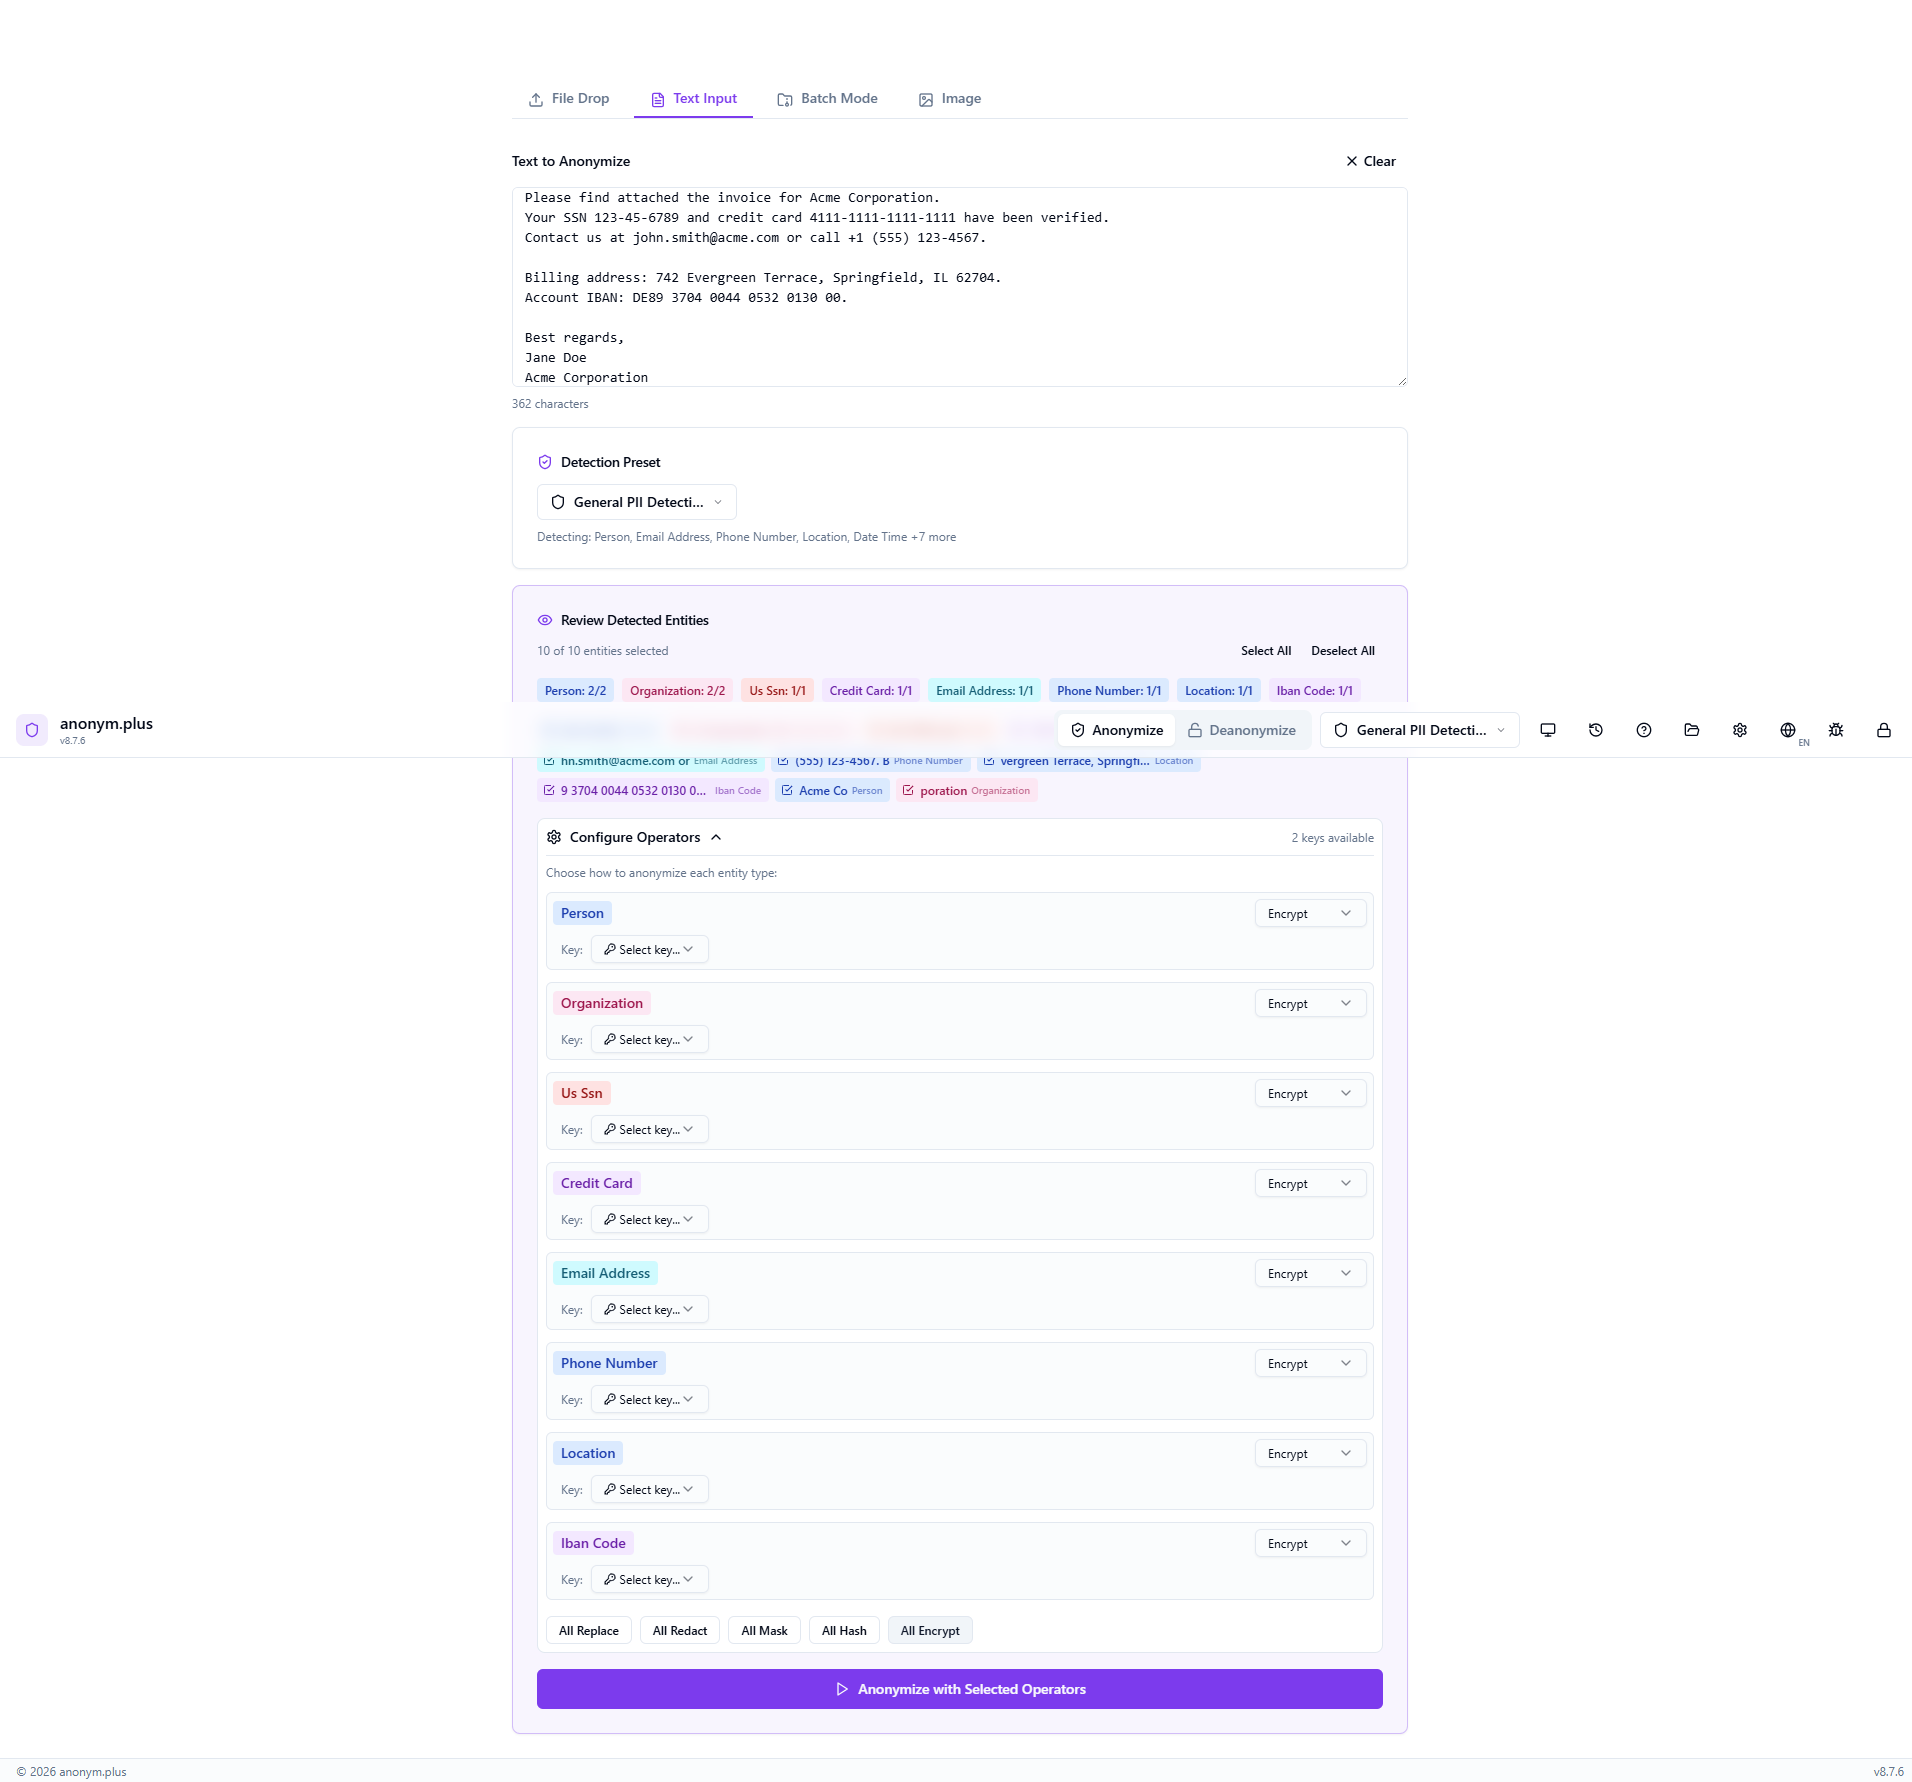
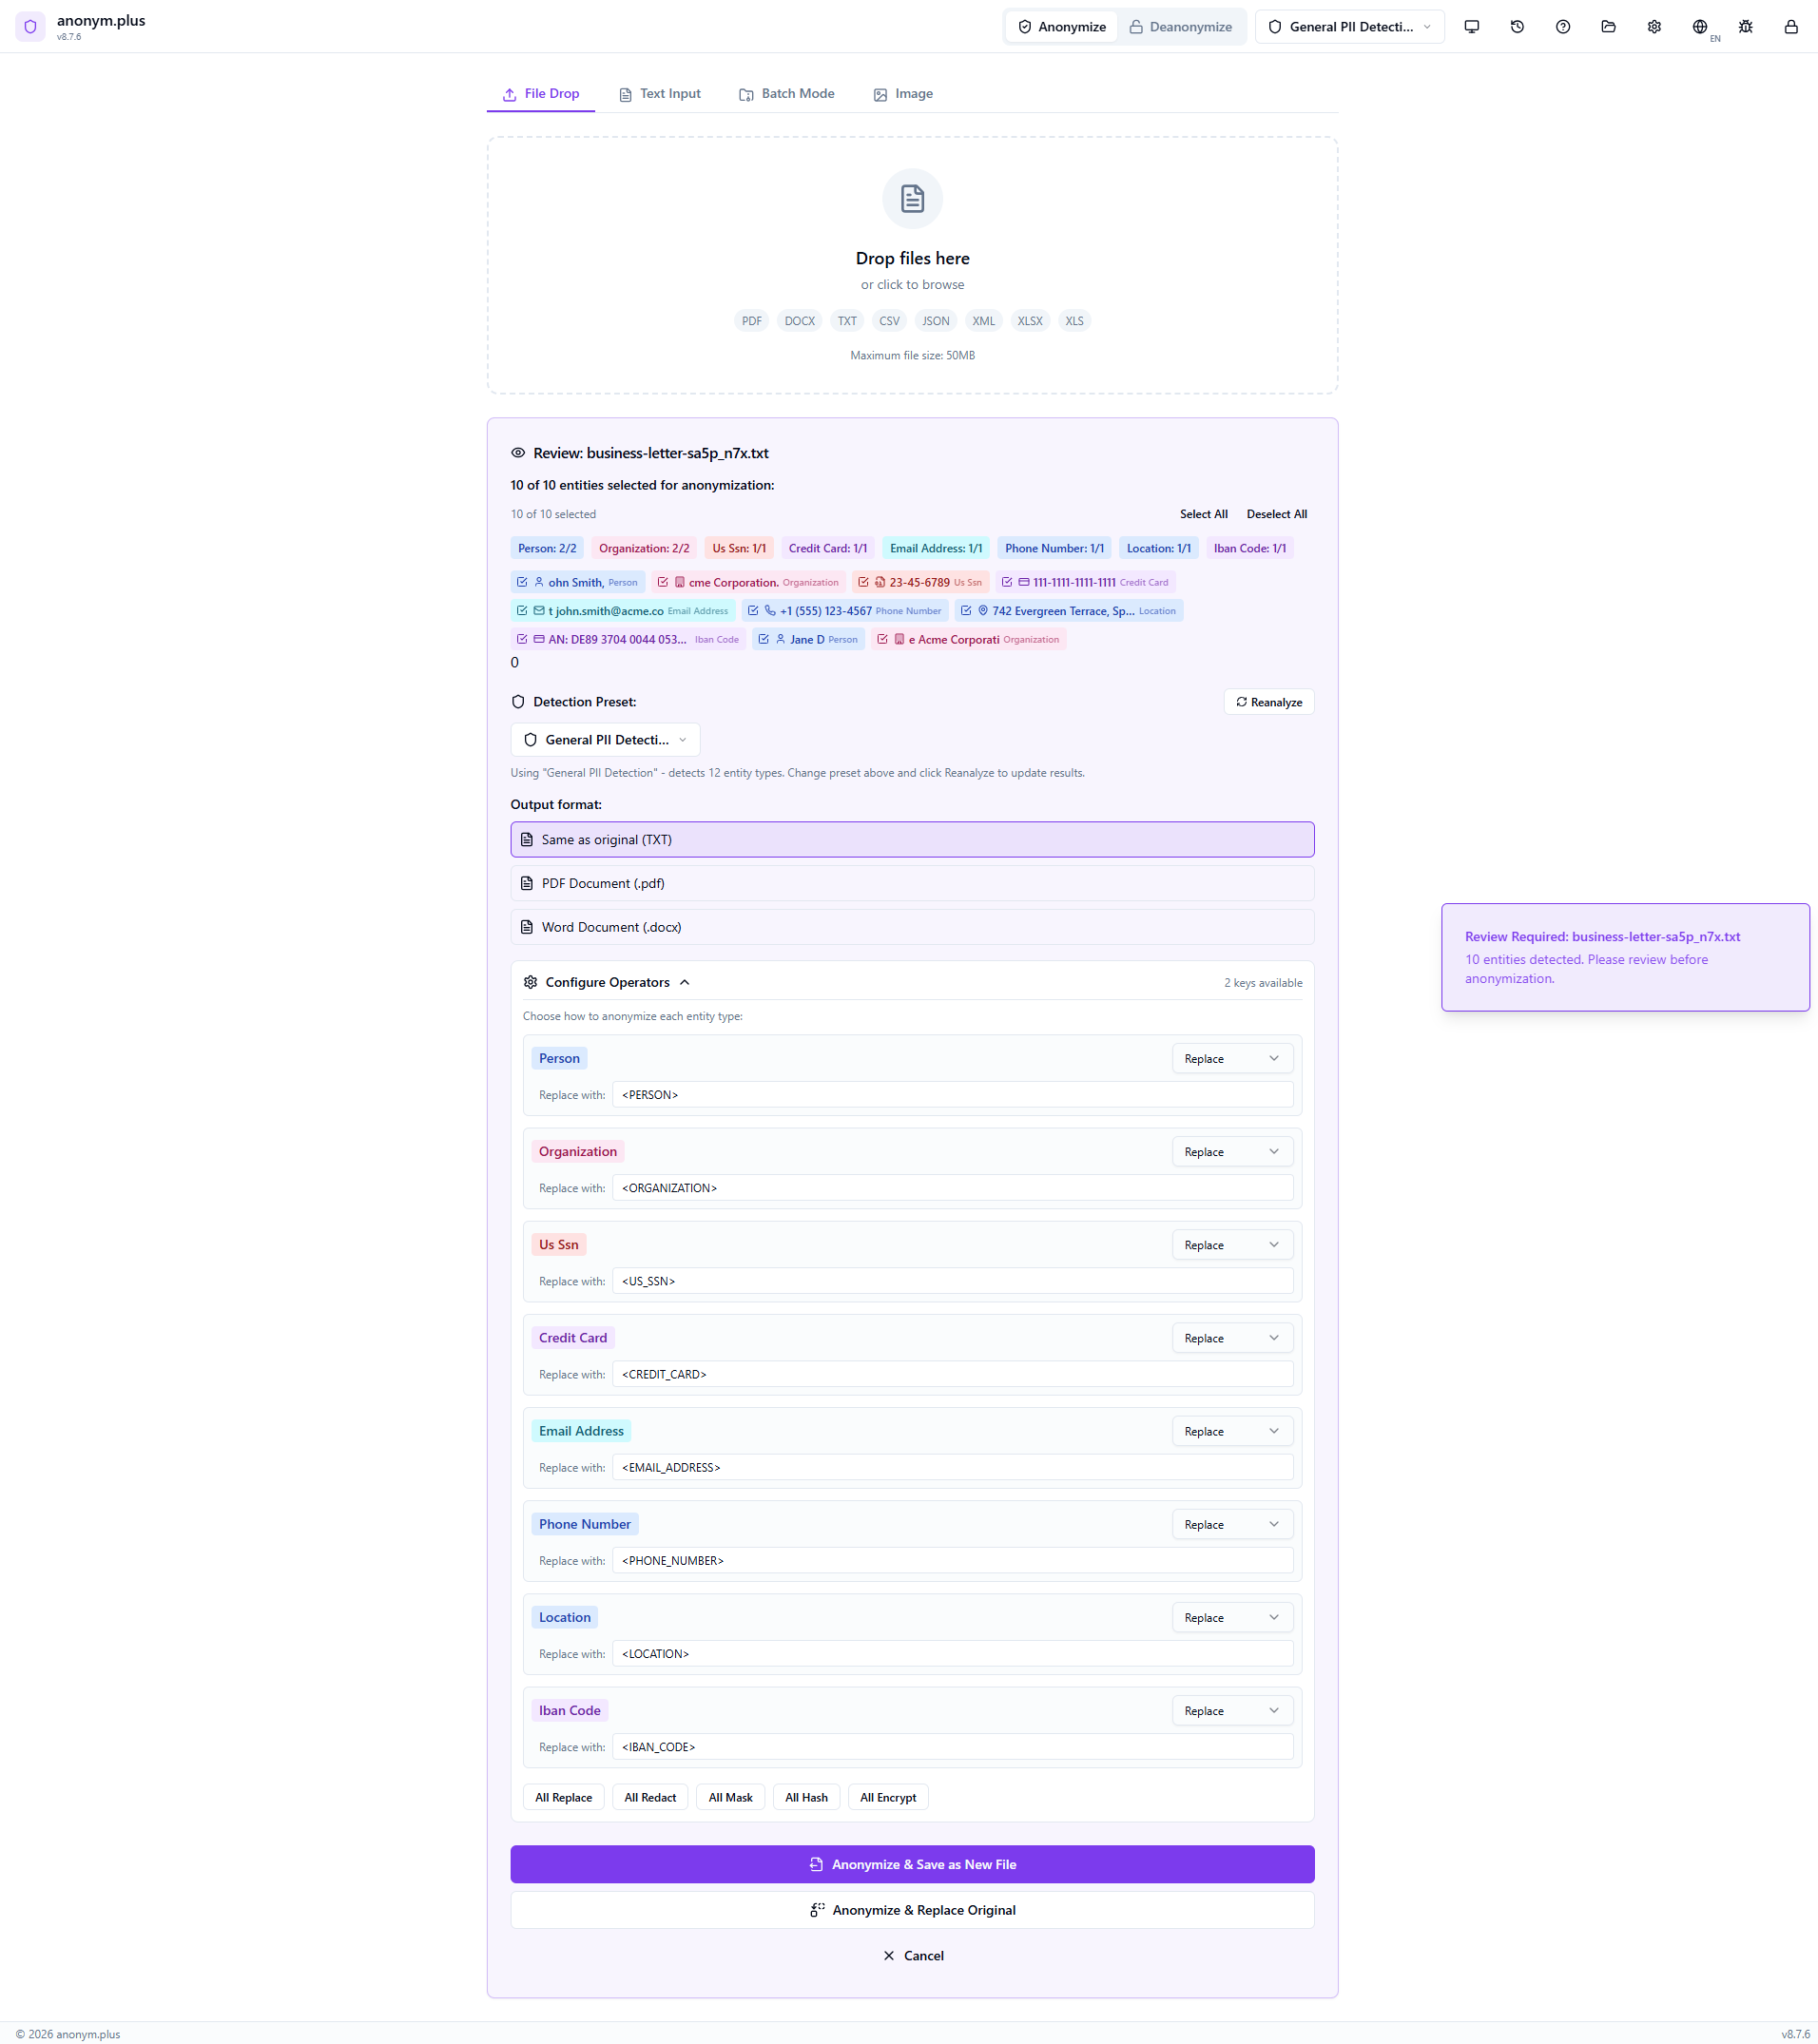
All 10 detected entities appear as color-coded badges: Person (2), Organization (2), US SSN (1), Credit Card (1), Email Address (1), Phone Number (1), Location (1), IBAN Code (1). Toggle individual entities on or off with checkboxes, or use Select All / Deselect All.

The Configure Operators panel shows “Replace” selected for each entity type. Each PII value will be substituted with its type label in angle brackets — e.g., <PERSON>, <EMAIL_ADDRESS>. Quick-action buttons (All Replace, All Redact, All Mask, All Hash, All Encrypt) allow switching all operators at once.
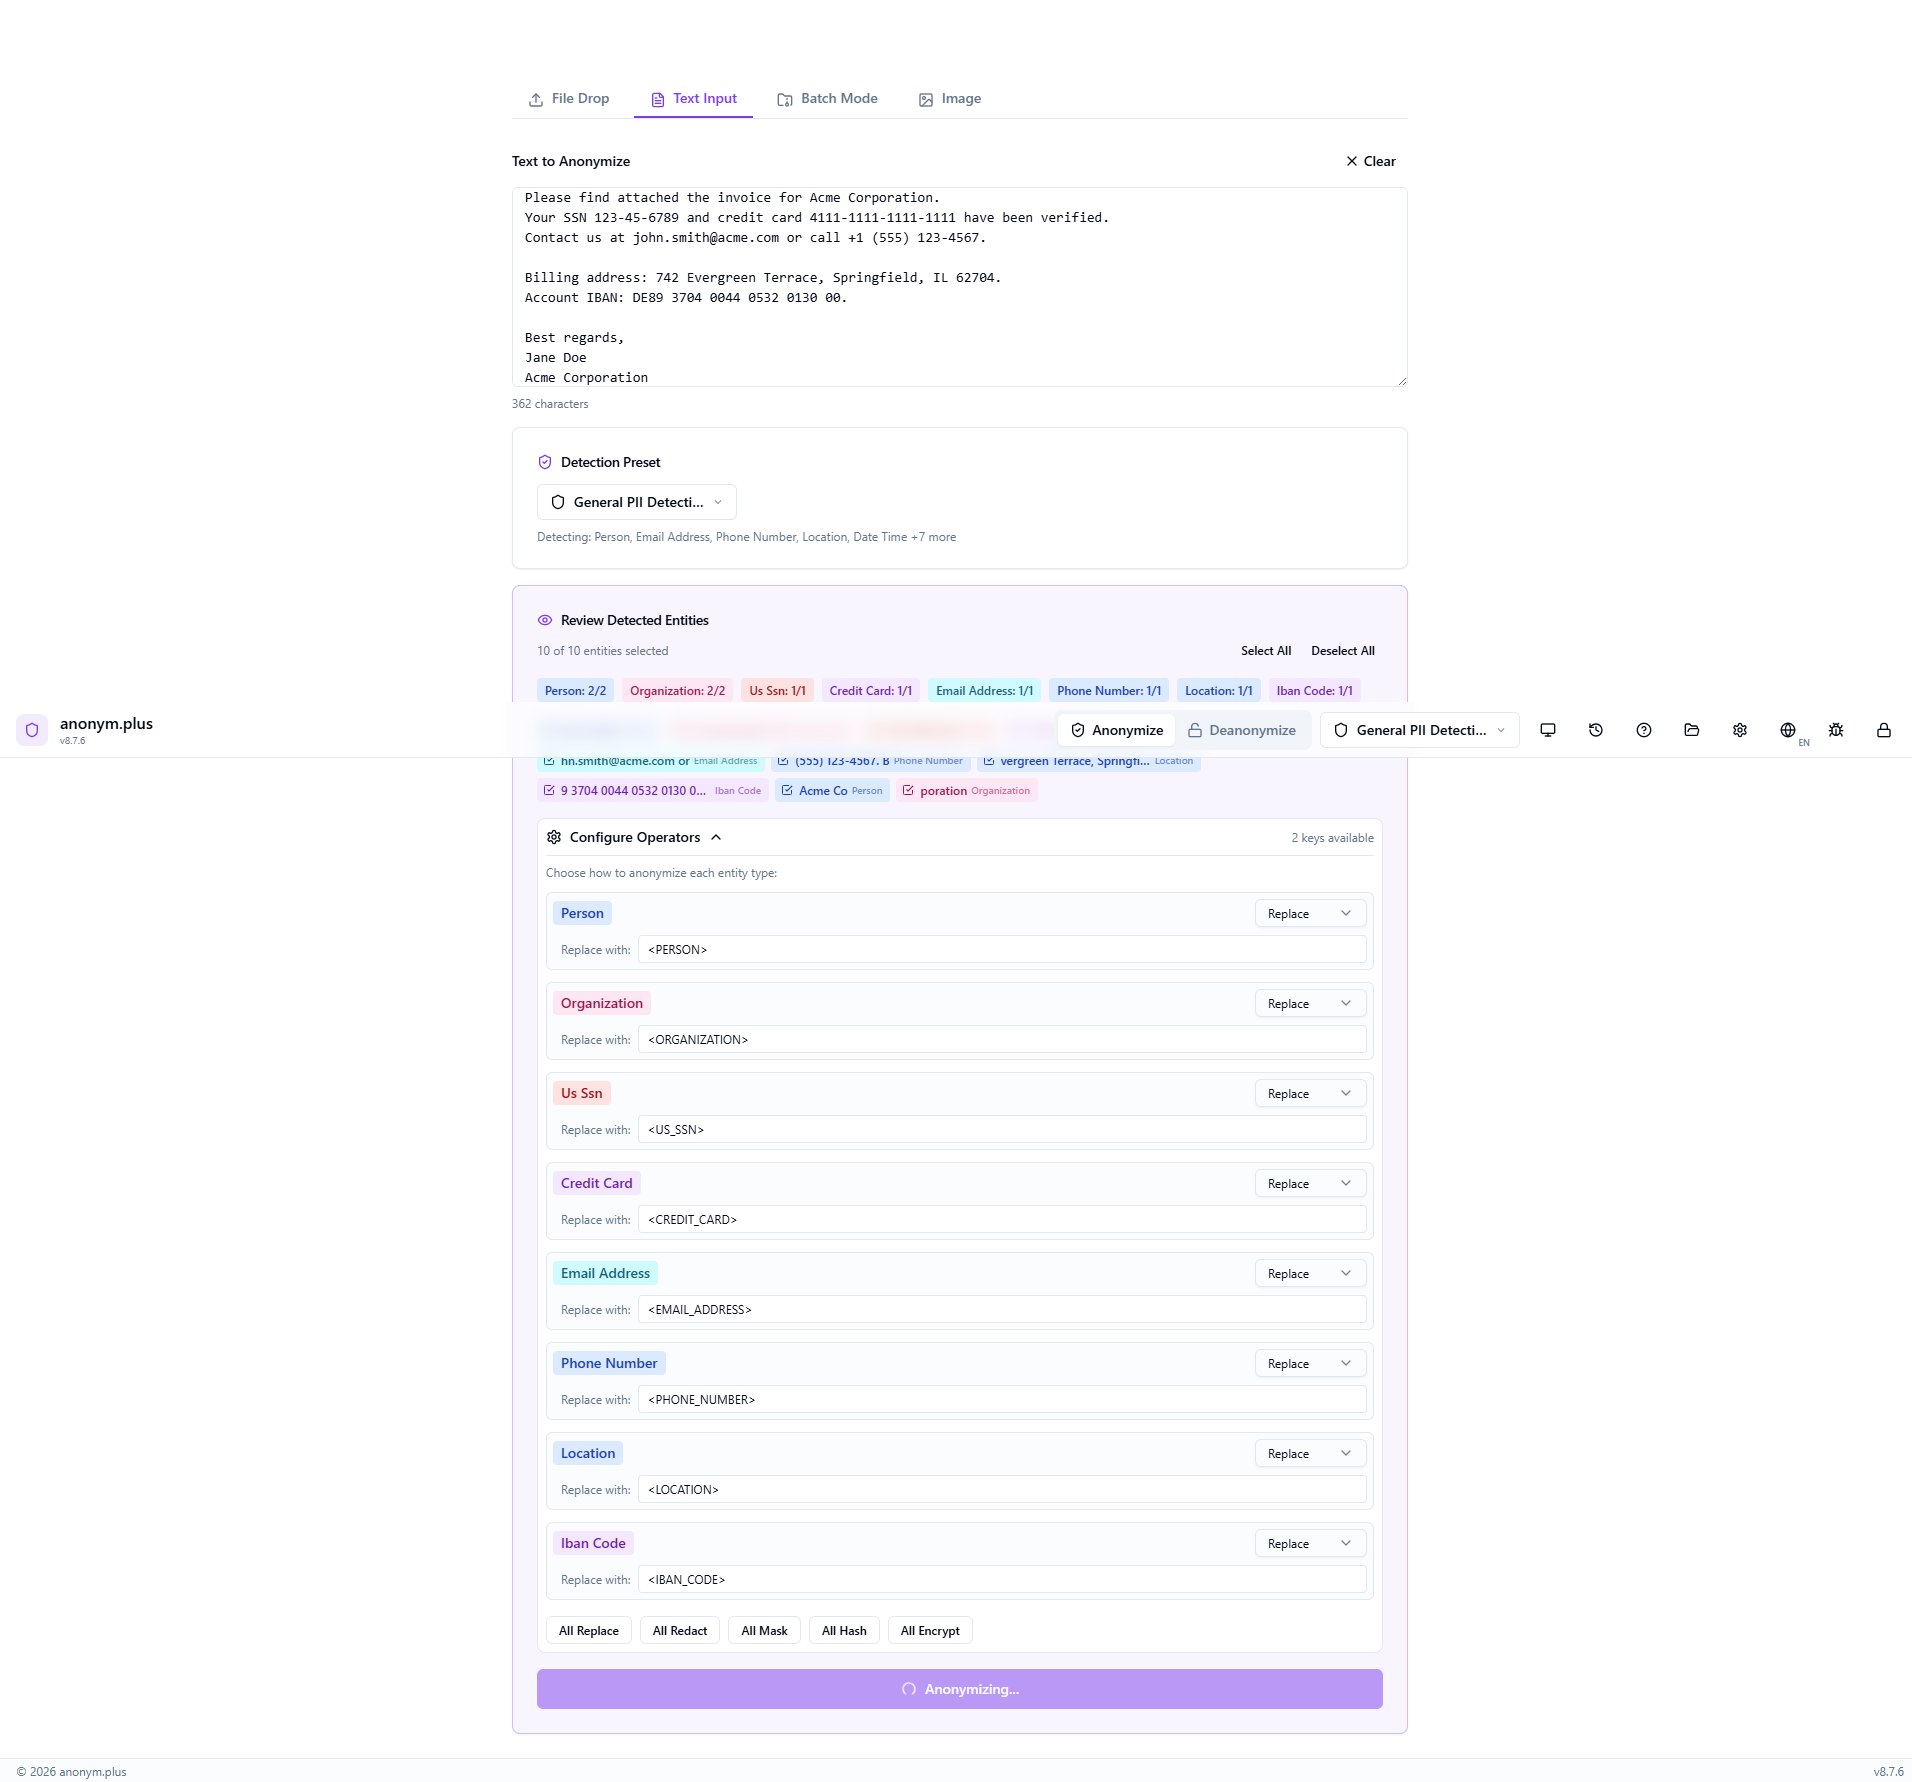
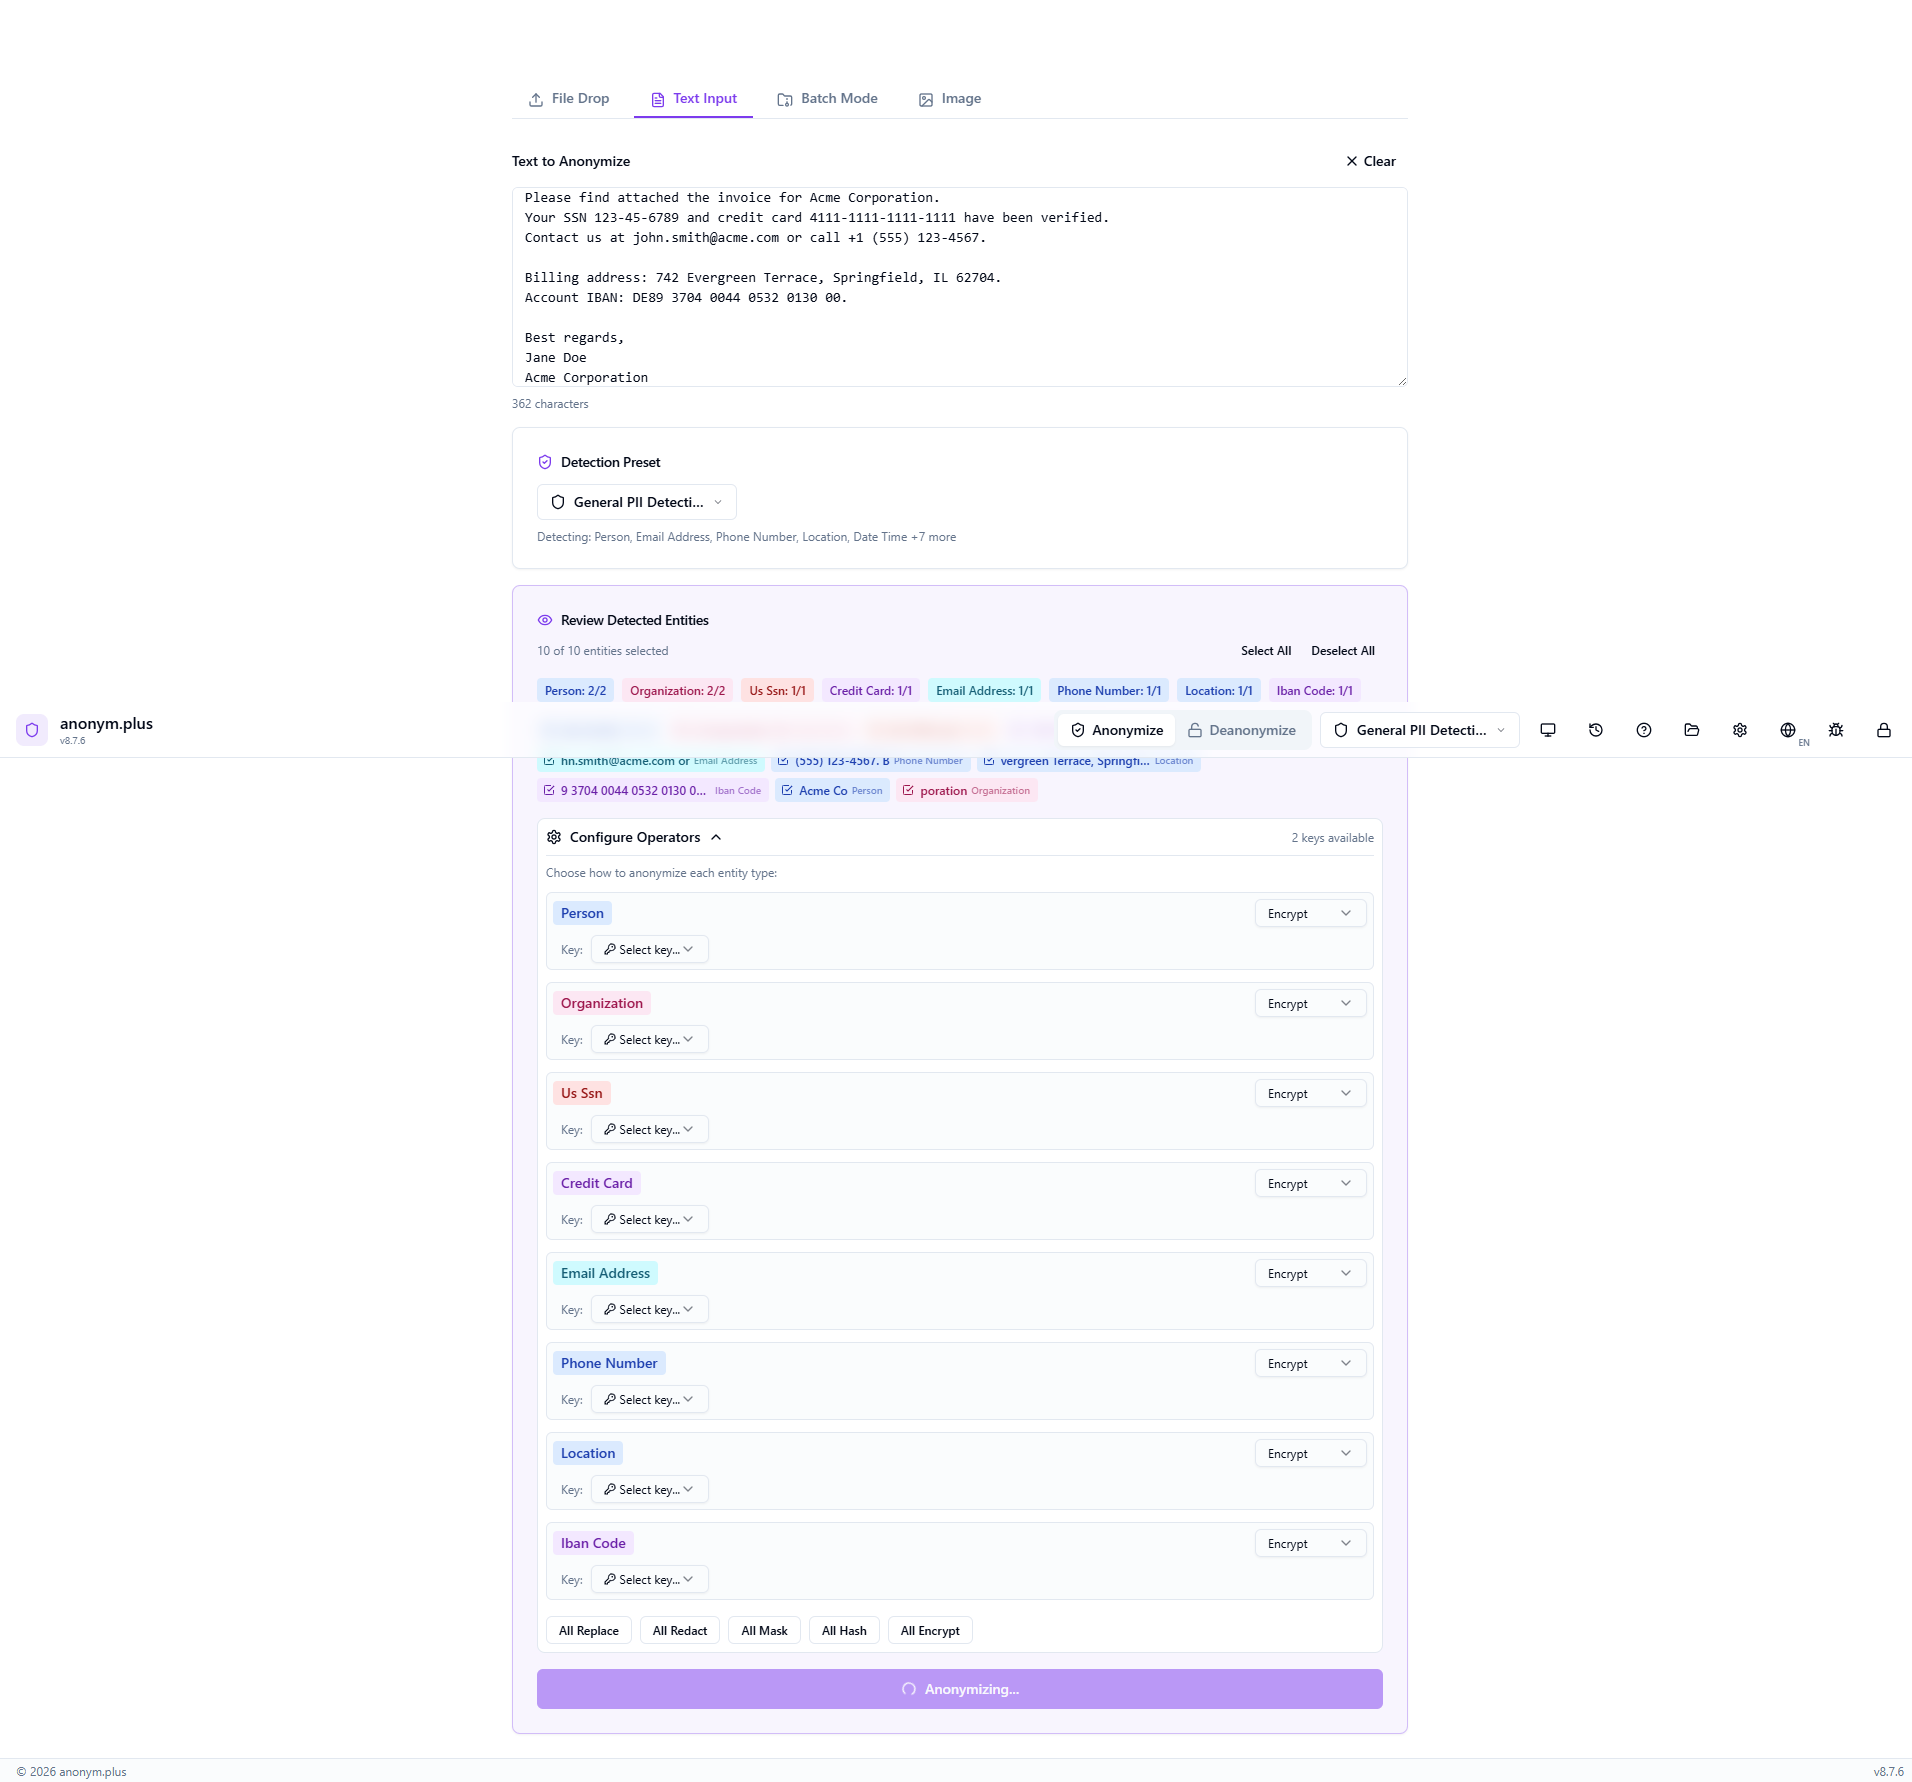
Click “Anonymize with Selected Operators” to process. A brief loading state appears while each entity is replaced.
The anonymized text appears with all PII replaced: <PERSON> for names, <ORGANIZATION> for company names, <US_SSN>, <CREDIT_CARD>, <EMAIL_ADDRESS>, <PHONE_NUMBER>, <LOCATION>, <IBAN_CODE>. Use Kopieren to Clipboard or Clear to reset.
Schritt für Schritt: Text Anonymization with Encrypt
Anonymize text using reversible encryption — each PII value is encrypted with your key and can be decrypted later via the Deanonymize feature.
Enter or paste a document containing personal information — same as the replace workflow.

Choose “General PII Detection” to detect a broad range of entity types.

Run the NER pipeline to detect all personal data entities.
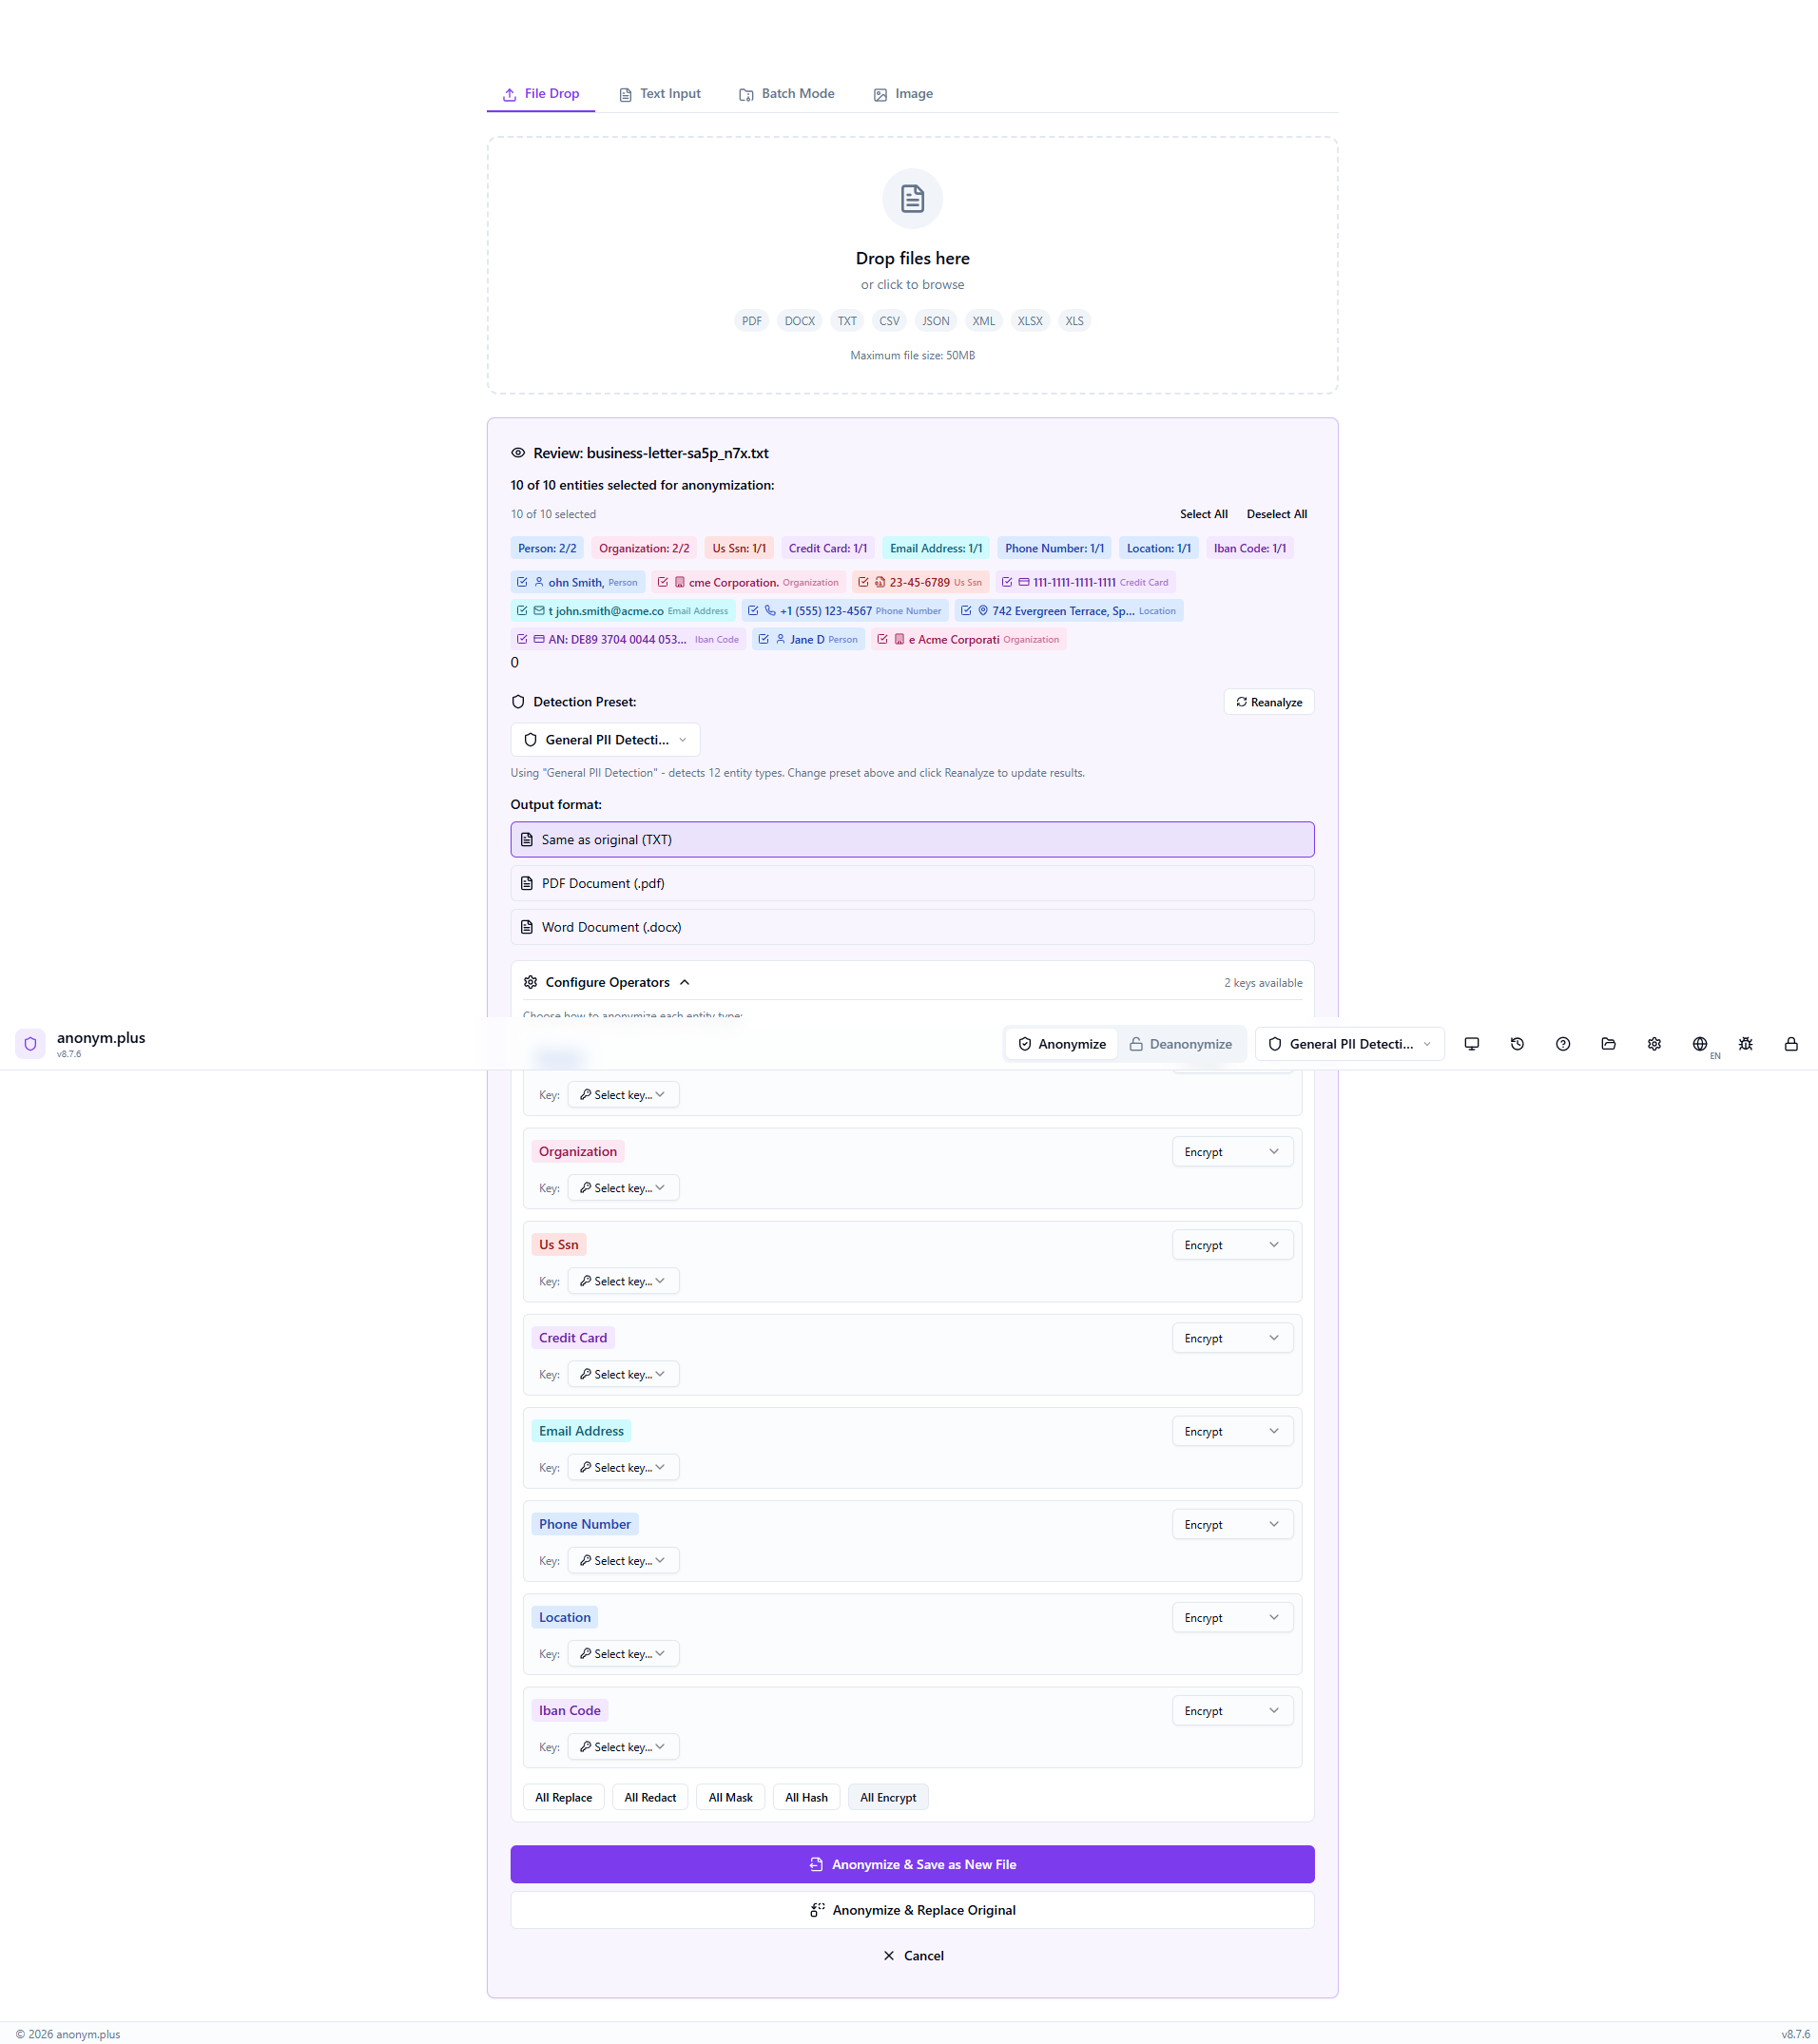
Review 10 detected entities with color-coded badges. Same entity types as replace.

Click “All Encrypt” to set every entity type to the encrypt operator. Select “Production Key (256-bit)” from the key dropdown. Unlike Replace, the encrypt operator produces reversible tokens that can be decrypted later.
Click “Anonymize with Selected Operators” to encrypt all PII with the selected key.
The output contains reversible encrypted tokens: <PERSON_ENC:a1b2c3...>, <EMAIL_ADDRESS_ENC:...>, etc. These tokens can be decrypted back to the original PII using the Deanonymize feature with the same encryption key.
Schritt für Schritt: File Anonymization with Replace
Drop a document file to anonymize — text is extracted, PII detected, and a new anonymized file is saved to your output folder.
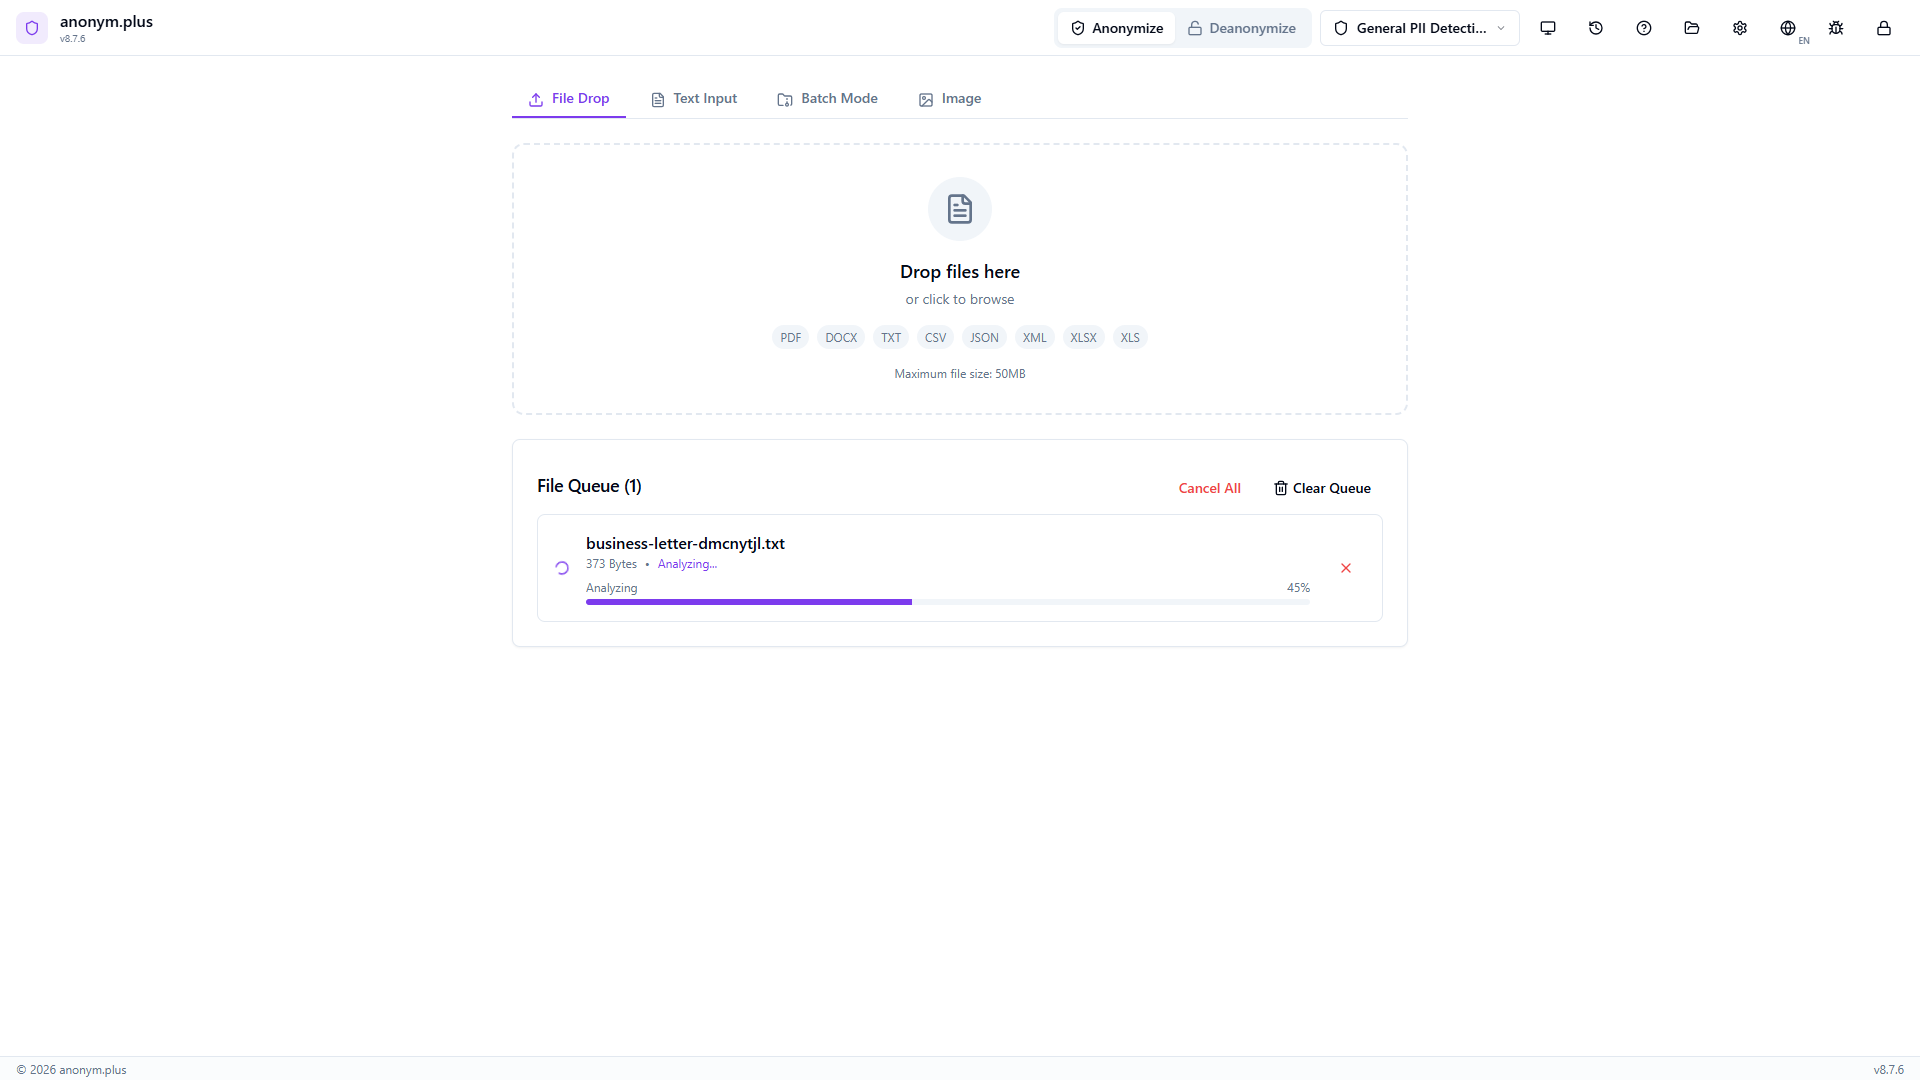
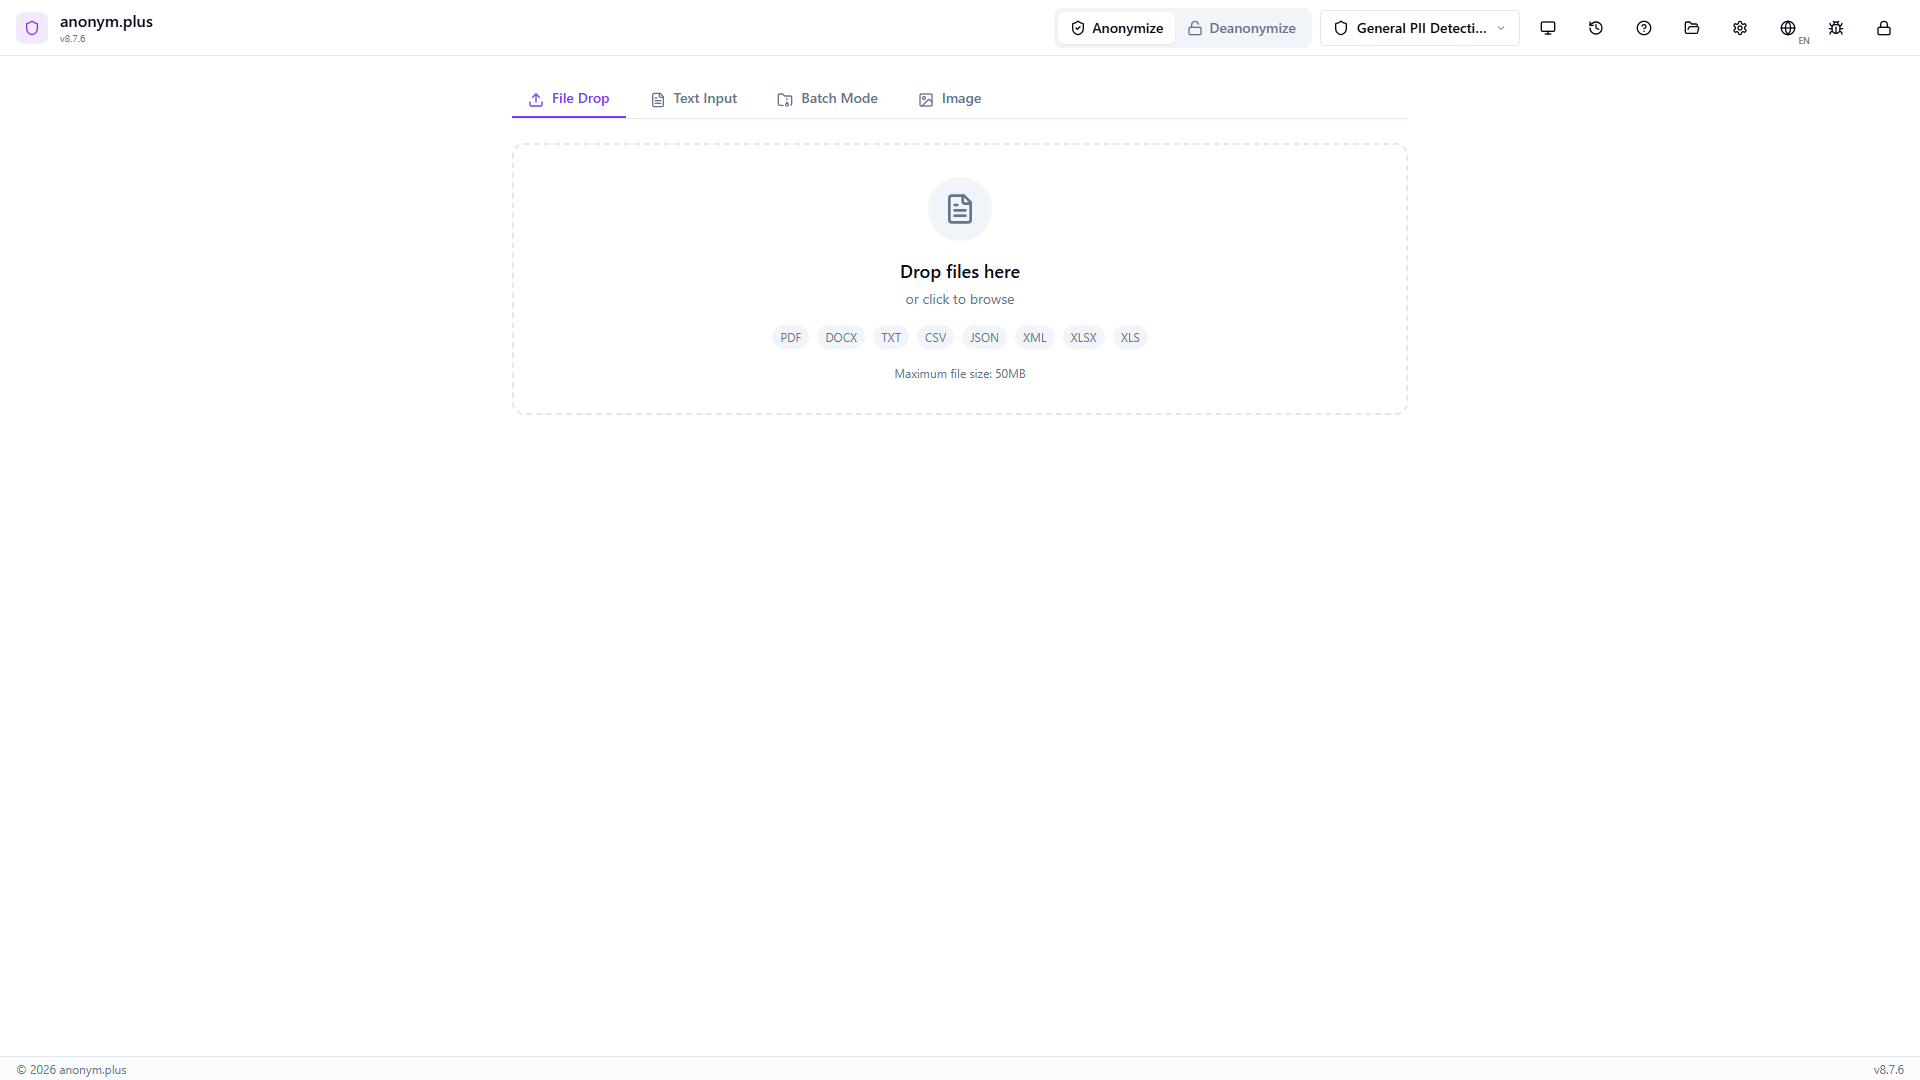
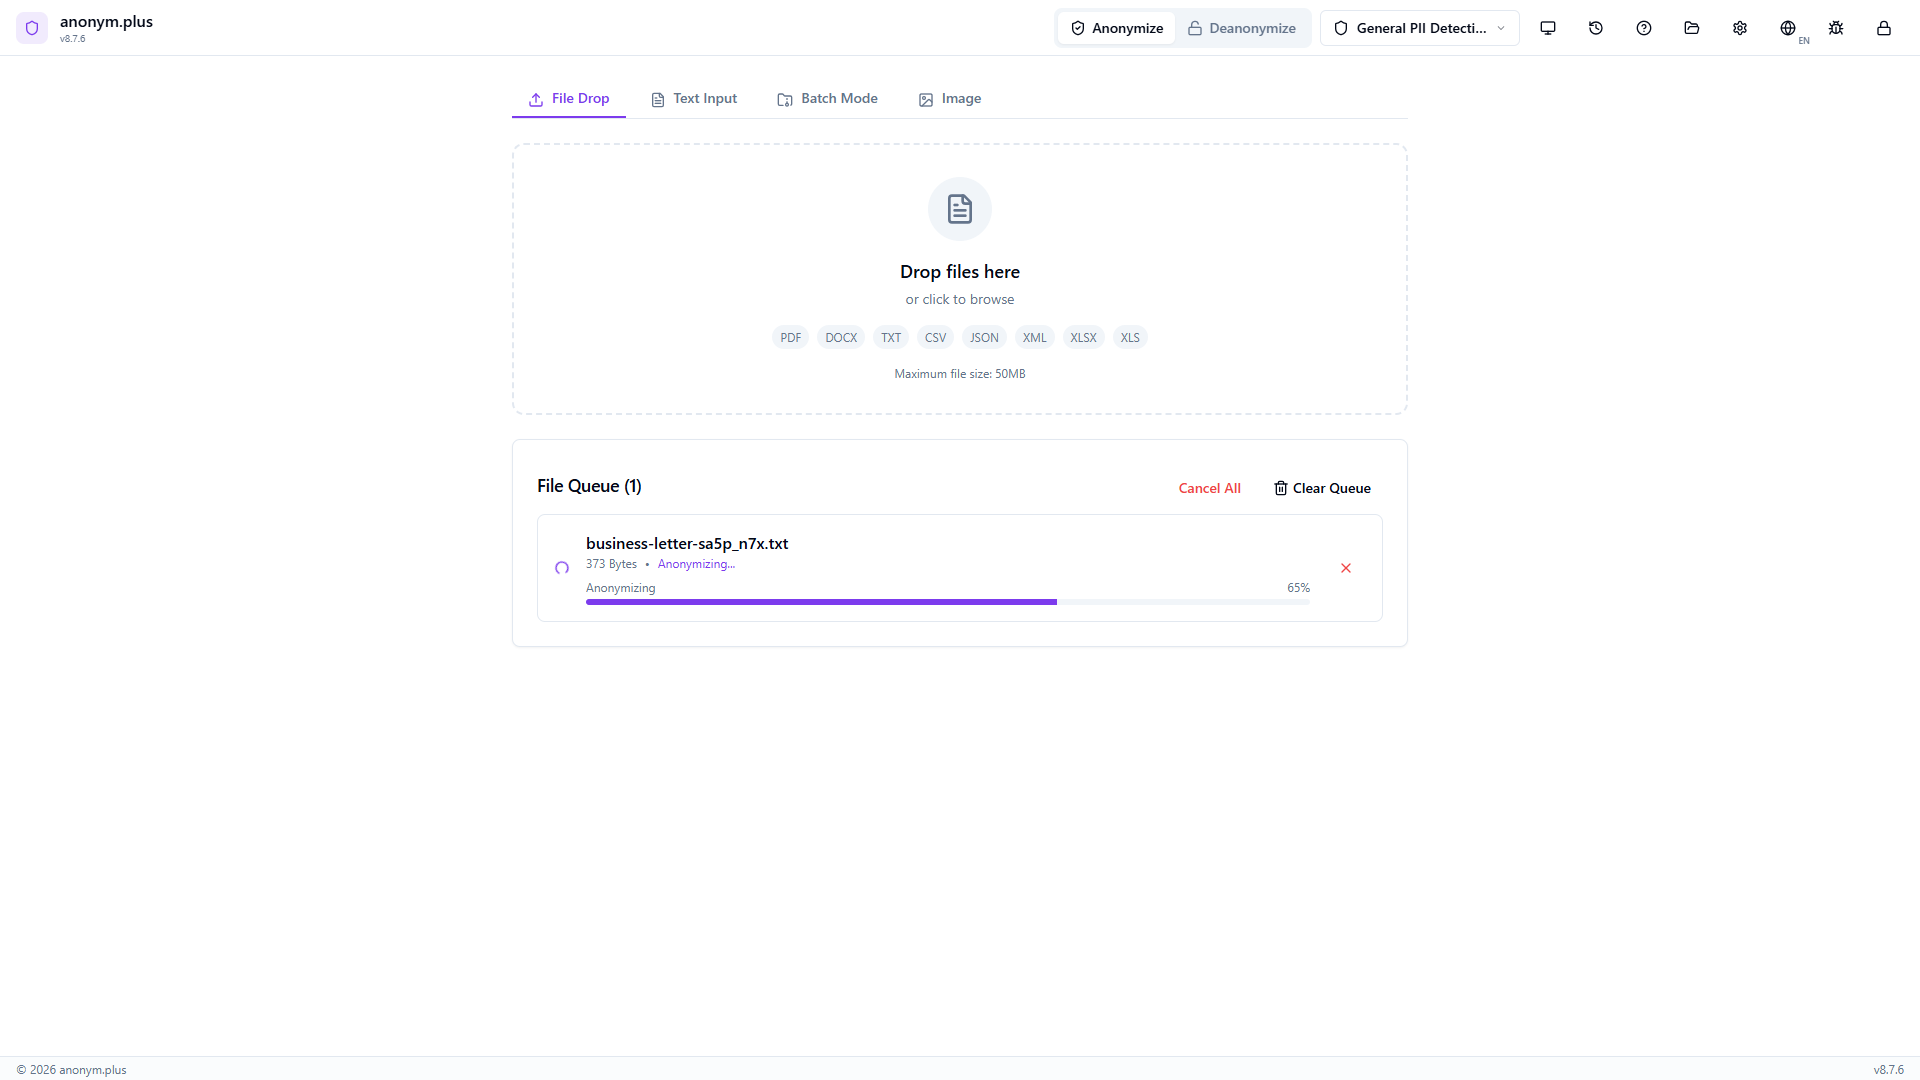
Navigate to the Datei-Drop tab. The dropzone accepts PDF, DOCX, TXT, CSV, JSON, XML, XLSX, and XLS files up to 50MB.

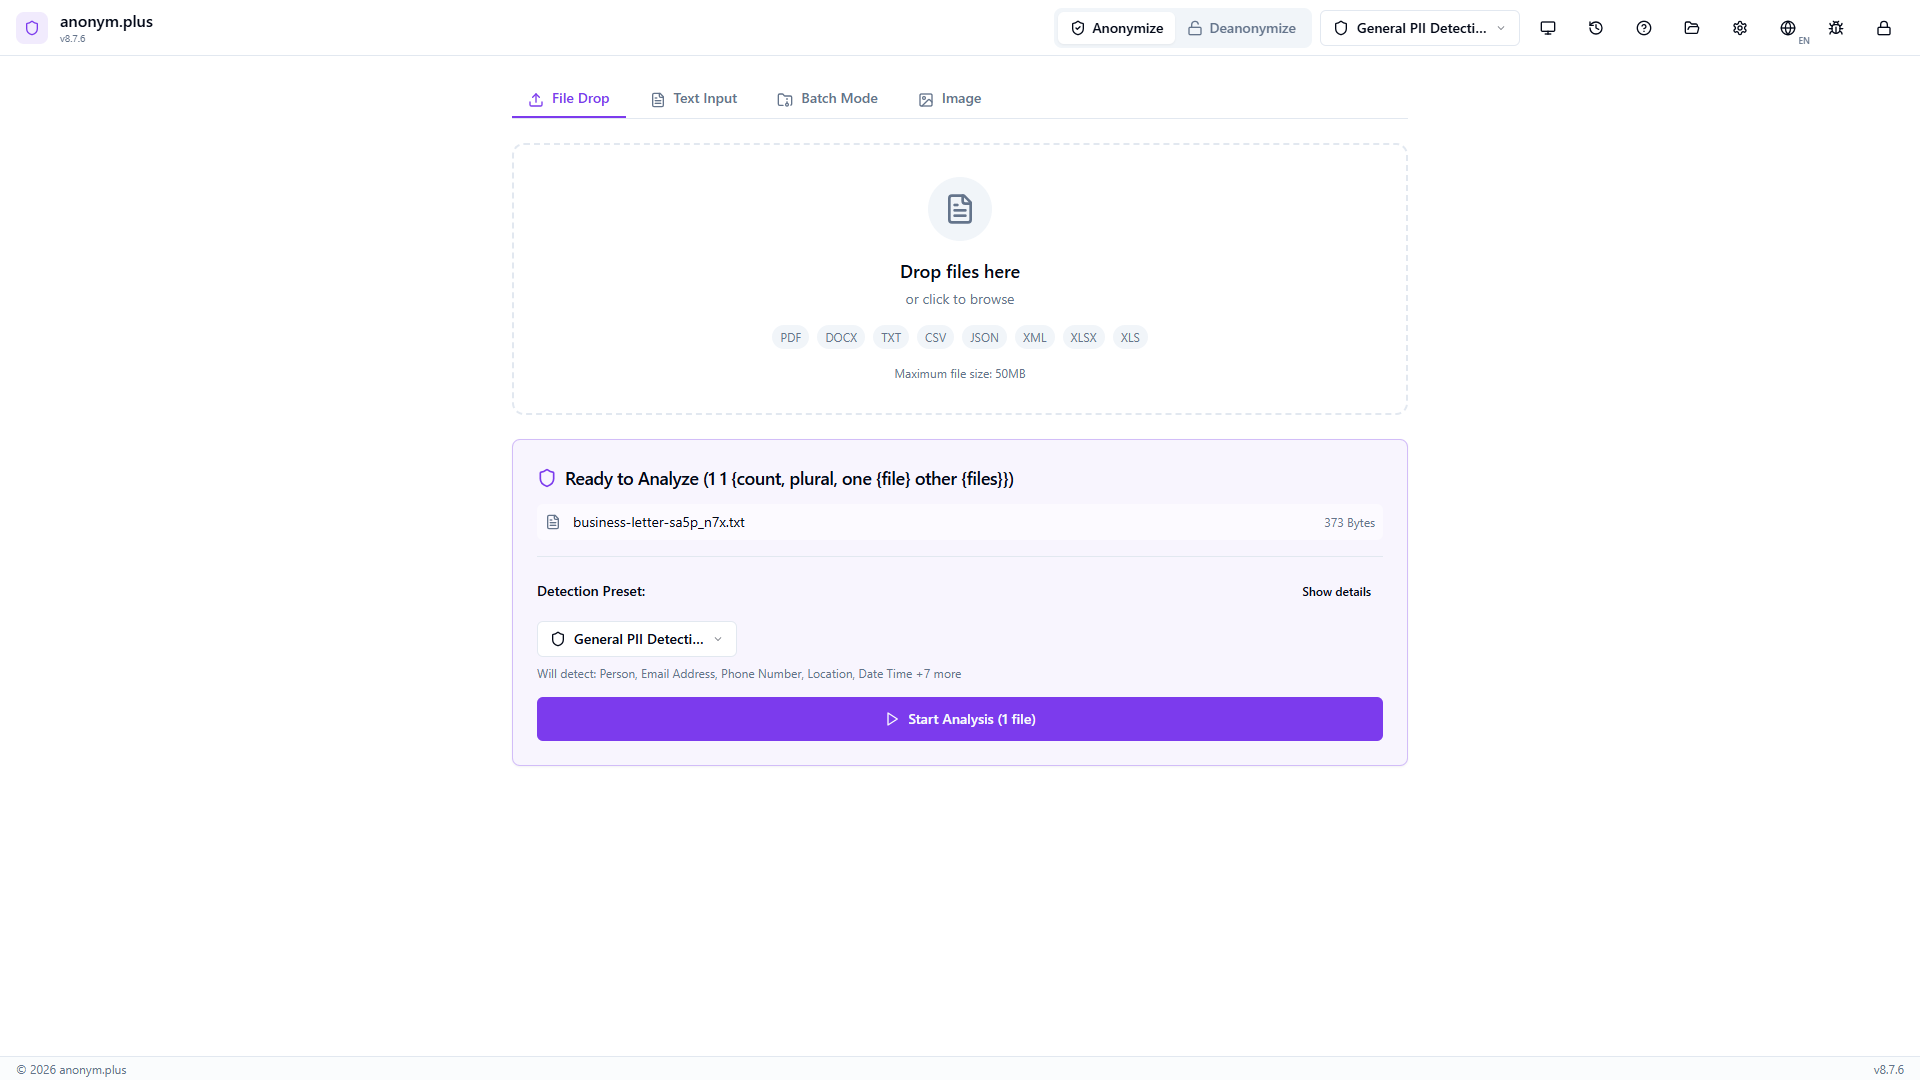
Drop a text file (e.g., business-letter.txt). It appears in a “Ready to Analyze” card with the filename, size, and the “General PII Detection” preset pre-selected. Click “Start Analysis (1 file)”.

Die Dateikarte zeigt “Analyzing...” mit einem Fortschrittsbalken bei 45%. Der Text wird extrahiert und durch die NER-Pipeline verarbeitet.
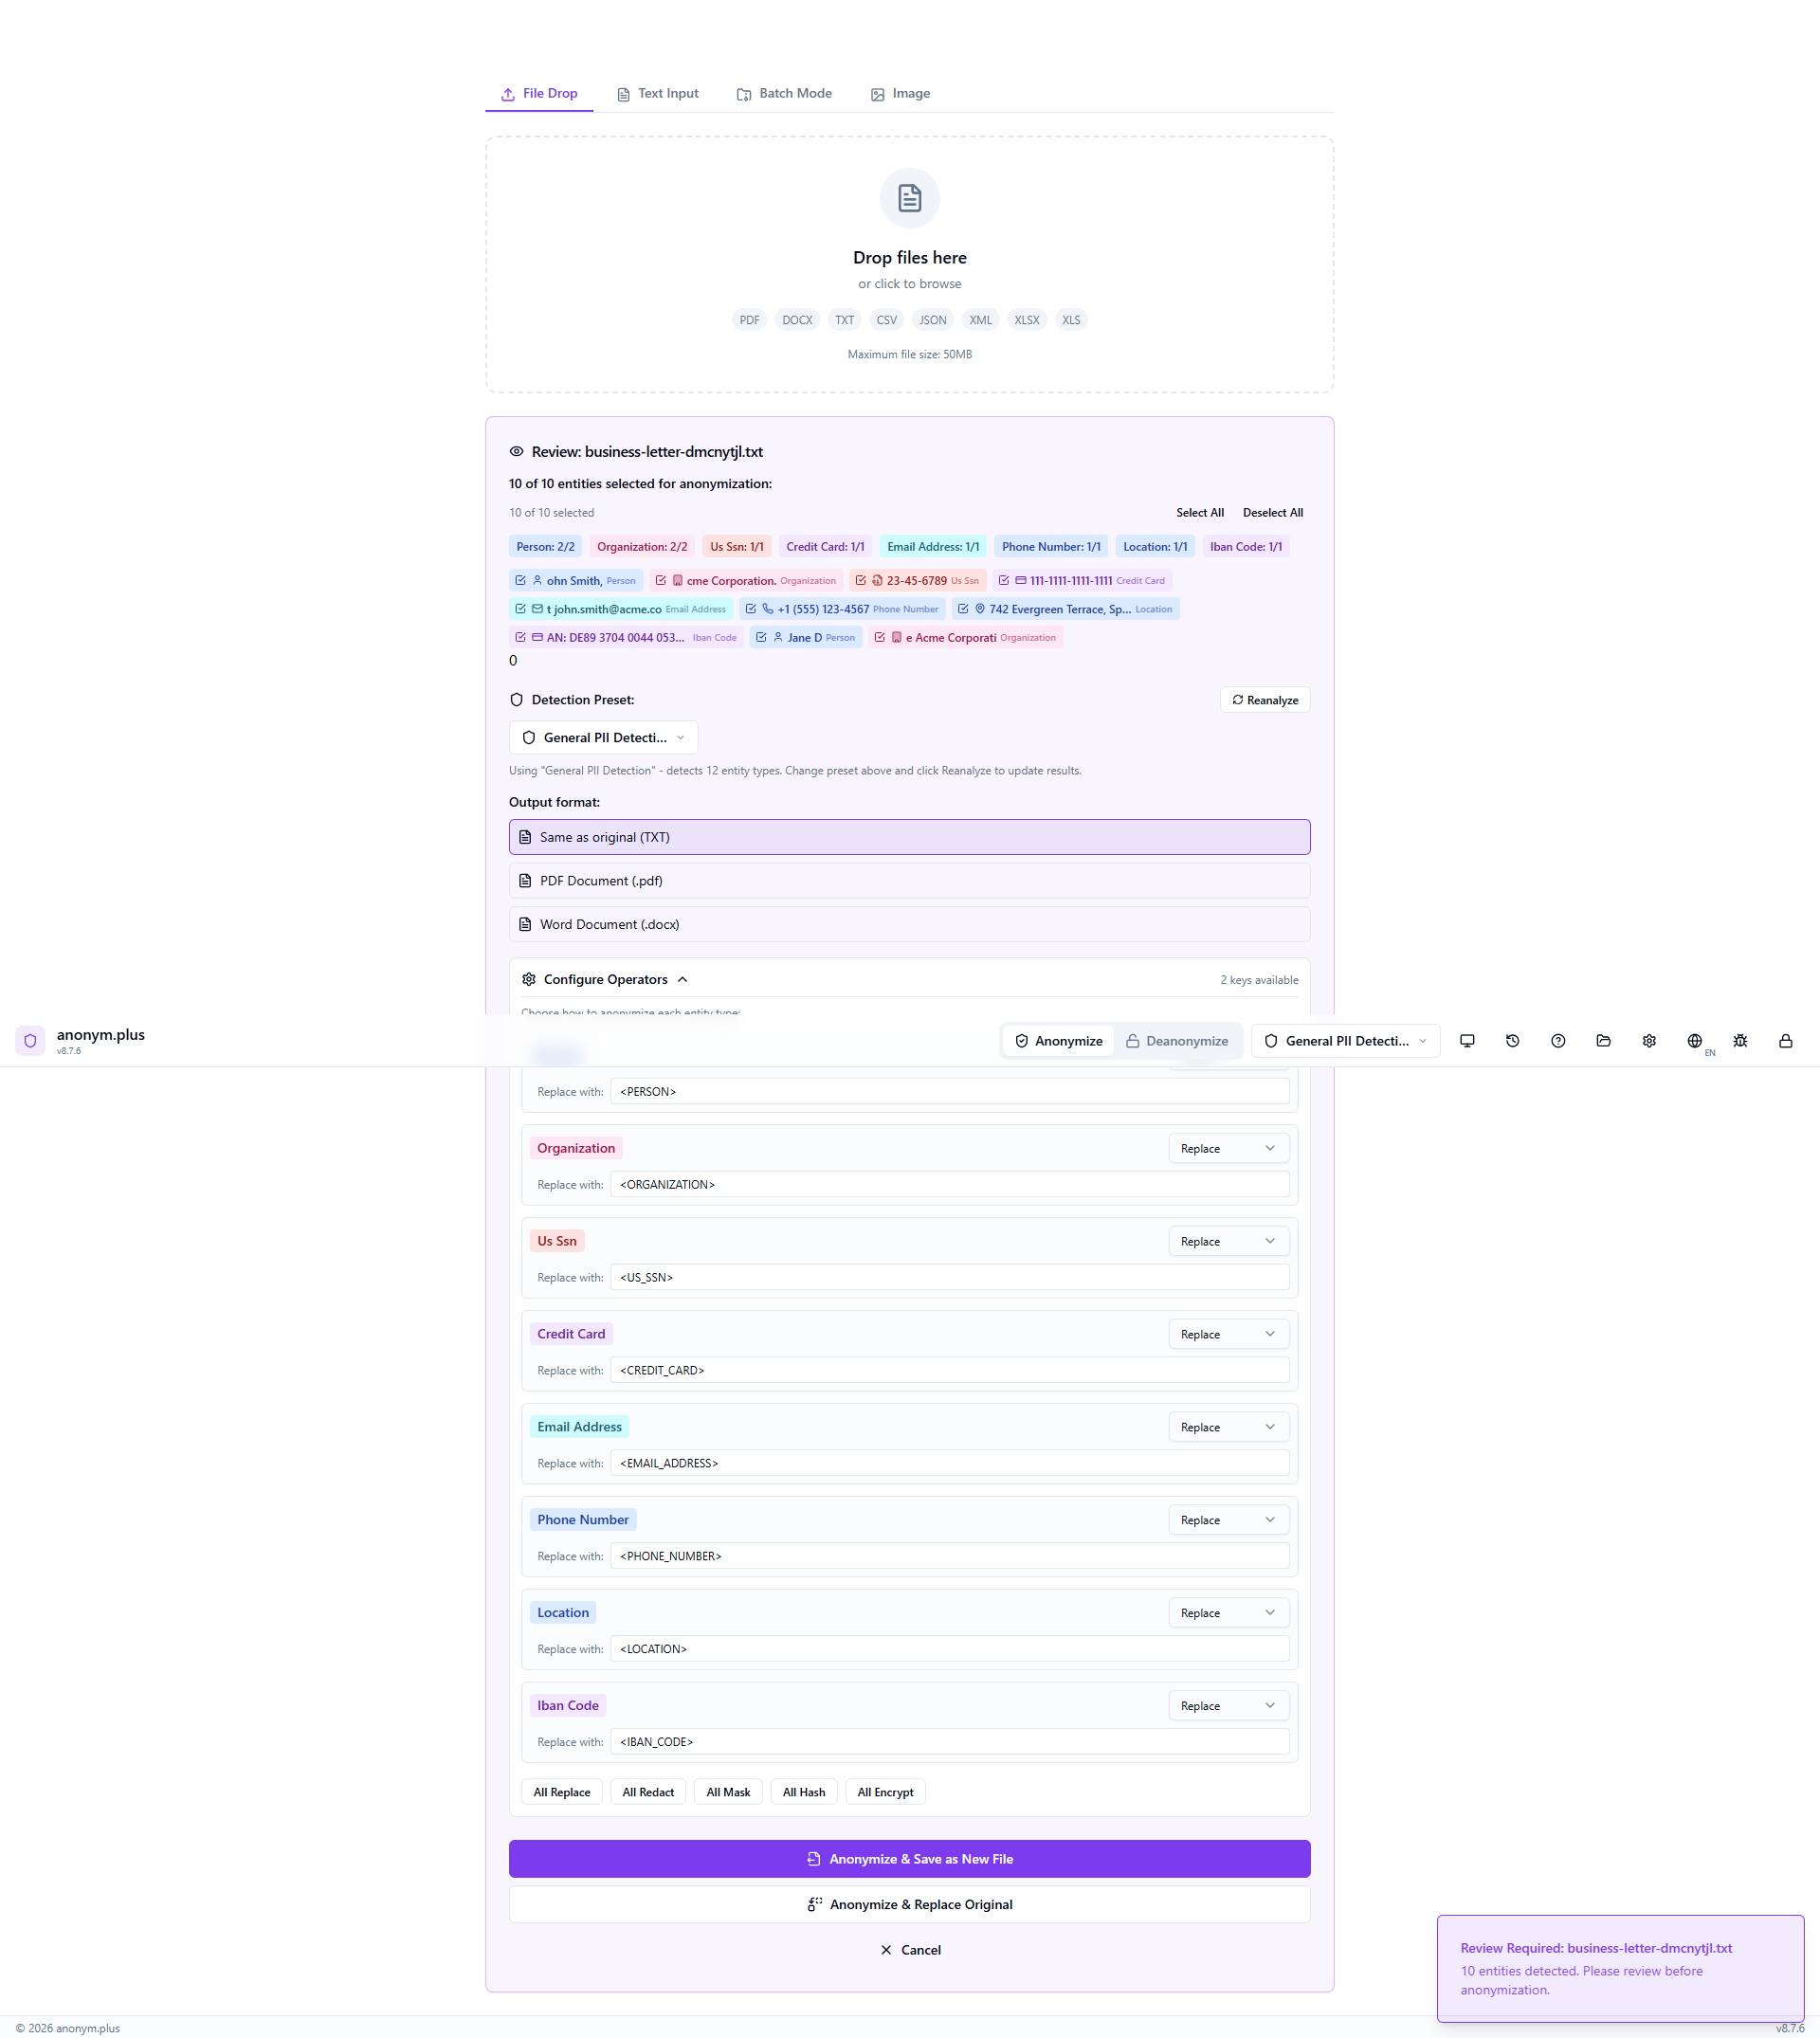
The entity review panel lists all detected PII with color-coded badges and checkboxes. Select All / Deselect All controls are available. The output format selector and operator configuration are visible below.

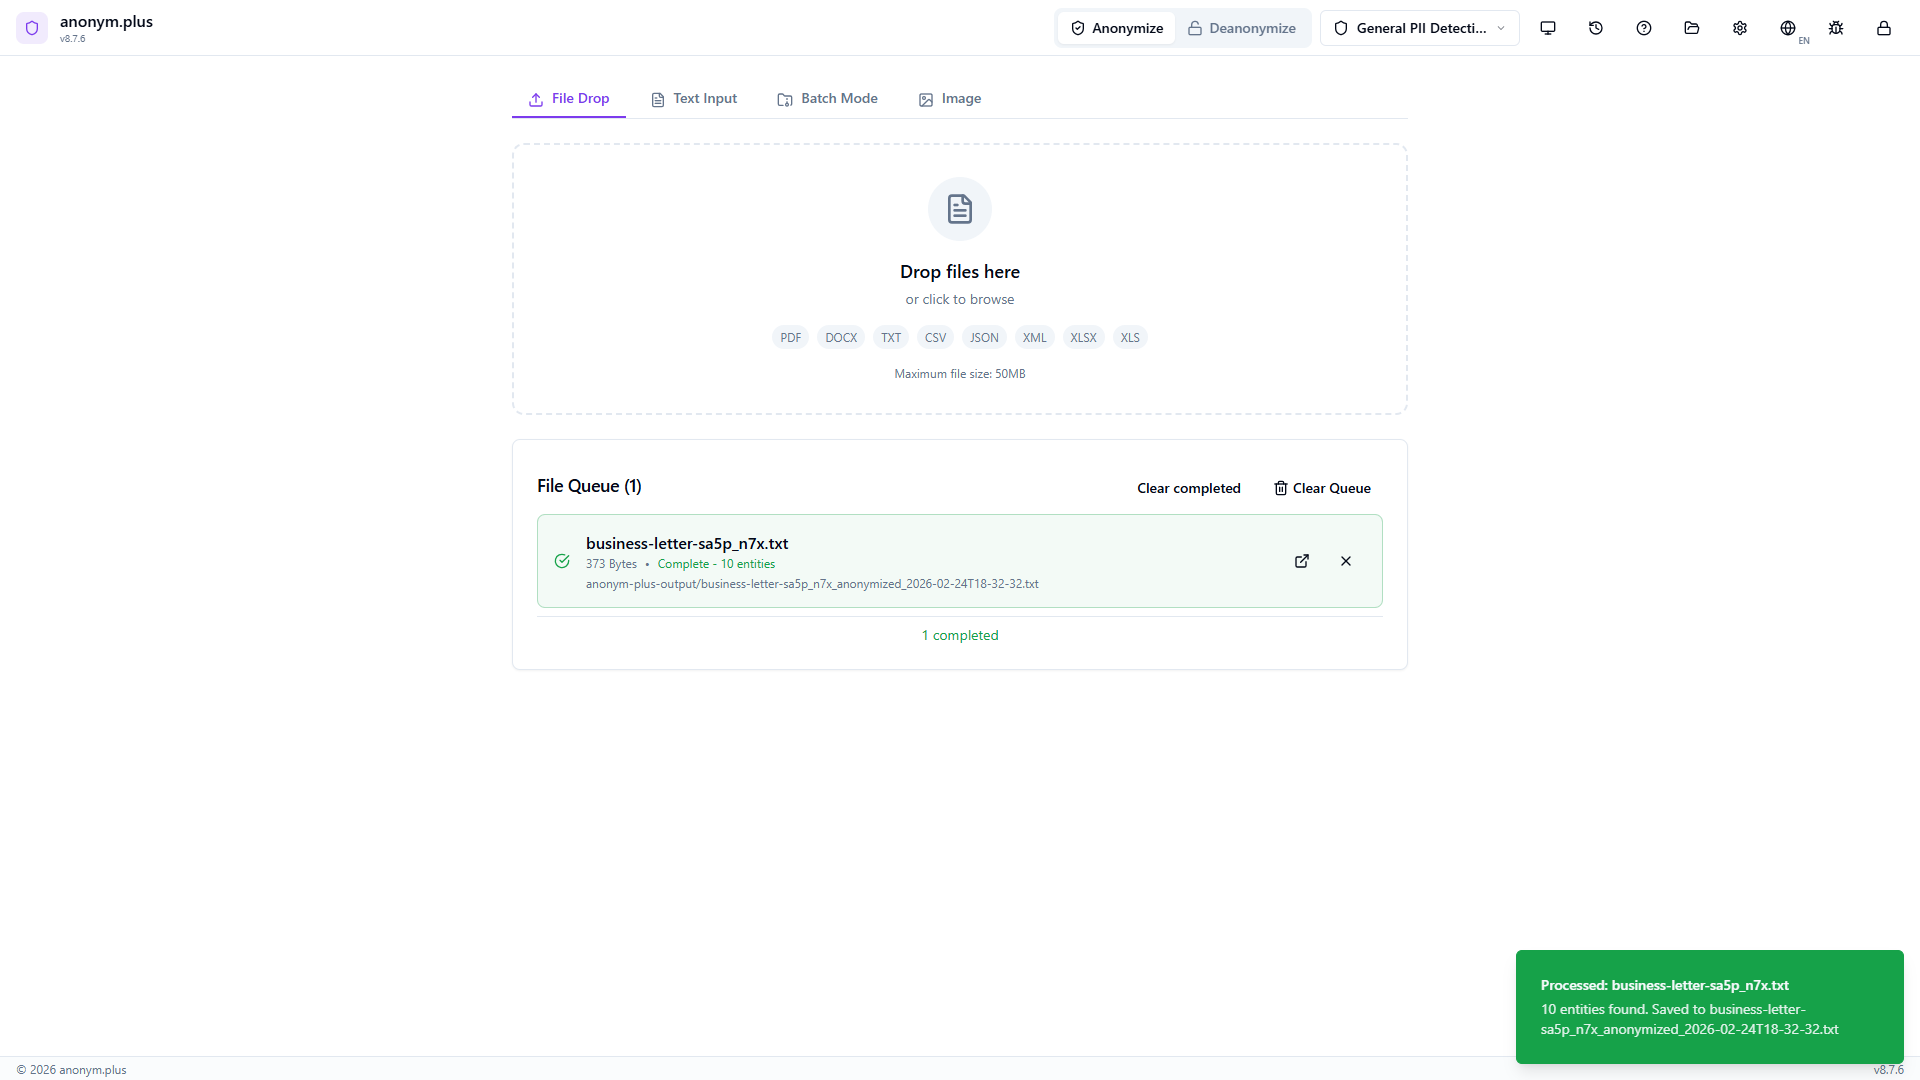
The Replace operator is configured for all entity types. The output format is set to “Same as original (TXT)”. Other format options include PDF and DOCX. Click “Anonymize & Save as New File” to process.
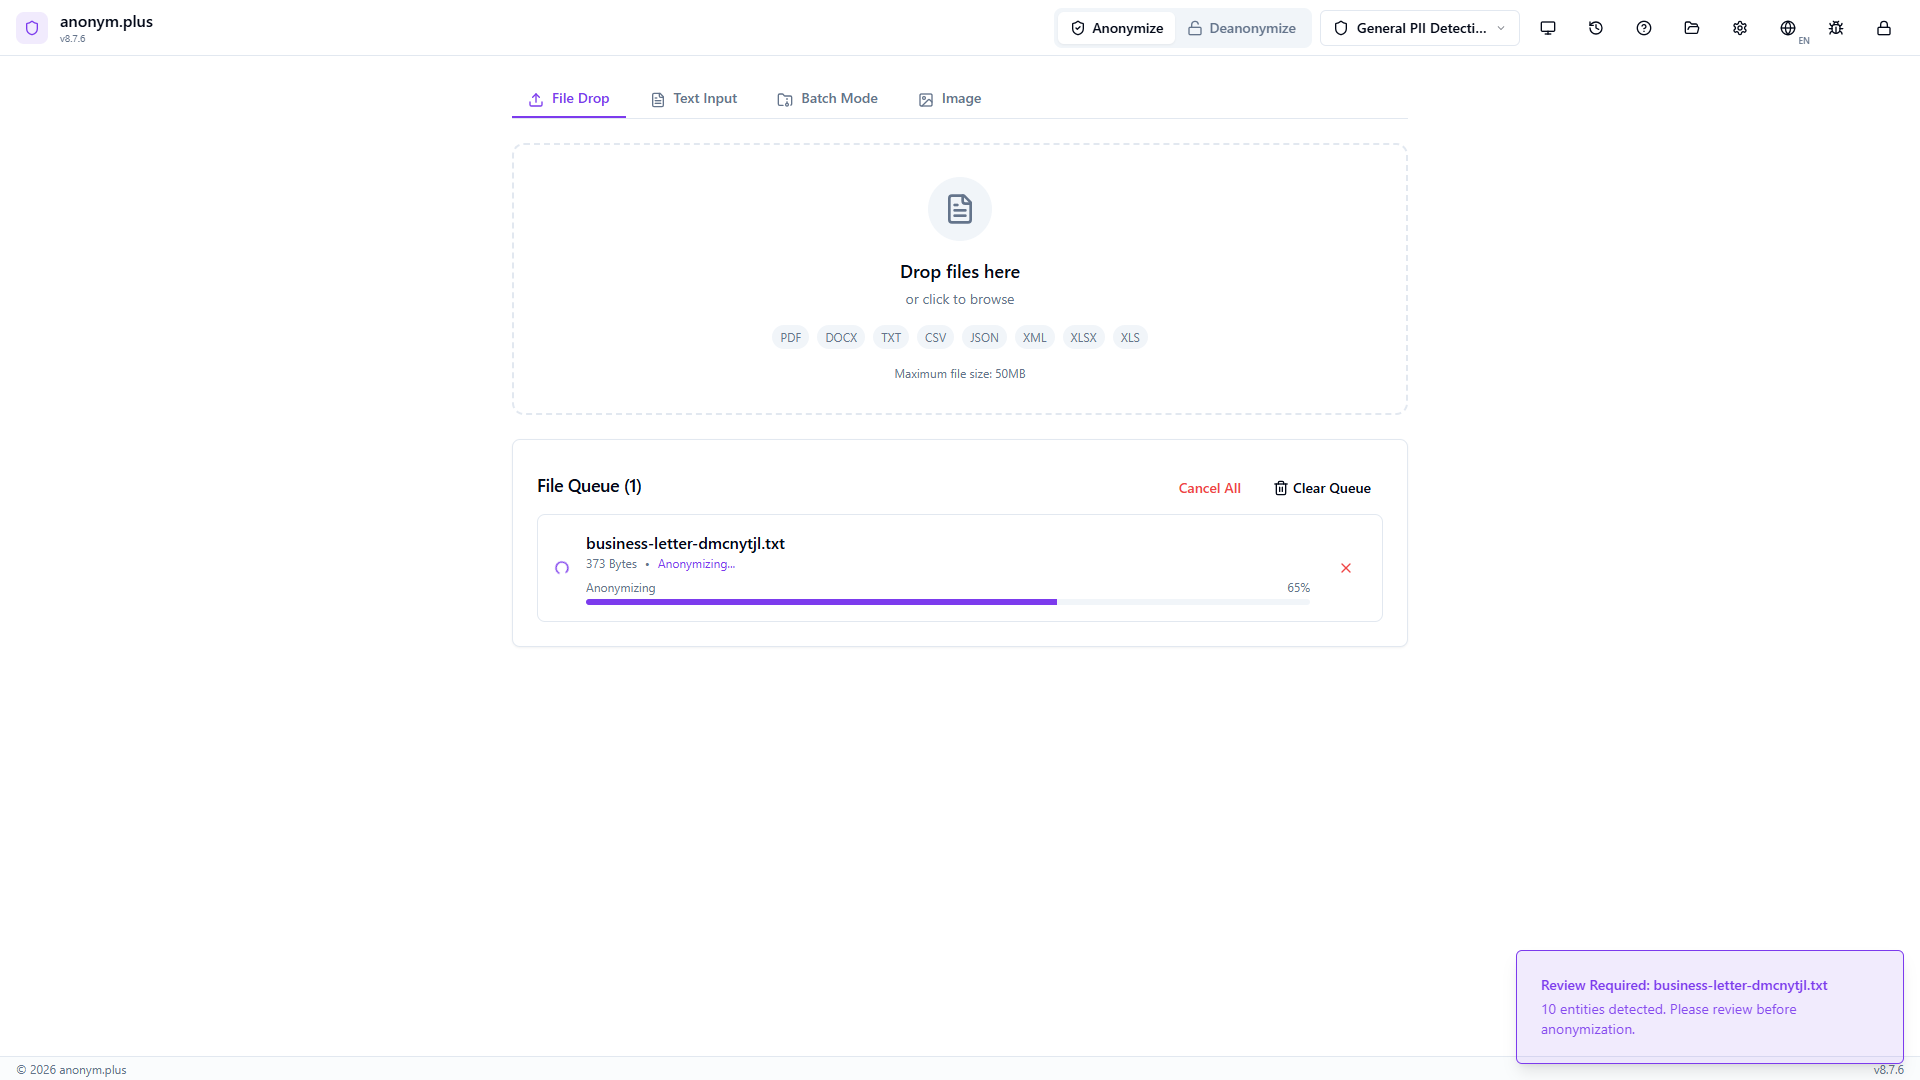
Die Dateikarte zeigt “Anonymizing...” mit einem Fortschrittsbalken, während die Ausgabedatei rekonstruiert und gespeichert wird.
Green “Complete” status with entity count displayed. The anonymized file is saved to the output folder. A green toast notification confirms the output path.

Schritt für Schritt: File Anonymization with Encrypt
Encrypt PII in document files for reversible anonymization — output files contain encrypted tokens that can be decrypted later.
Same dropzone as Replace — supports all document formats up to 50MB.
Drop a text file. It appears in “Ready to Analyze” with preset selected.
Progress bar while text is extracted and PII detected.

Same entity review panel with color-coded badges.
Click “All Encrypt” to switch all operators to encrypt mode. Select “Production Key (256-bit)” for reversible encryption.
The file is processed with encrypt operators and saved to the output folder.
Output file contains encrypted tokens like <PERSON_ENC:...> that can be decrypted later using the Deanonymize feature.
Unterstützunged Formats
Input
Output
File Size Limits
| Format | Max Size |
|---|---|
| 50 MB | |
| TXT | 50 MB |
| DOCX | 30 MB |
| CSV | 30 MB |
| JSON | 30 MB |
| XML | 30 MB |
| XLSX | 20 MB or 100,000 rows |
Bildanonymisierung
Detect and redact personal information directly in images. Uses Tesseract OCR to extract text from images, then applies the same PII detection engine to find and visually redact sensitive data.
Workflow
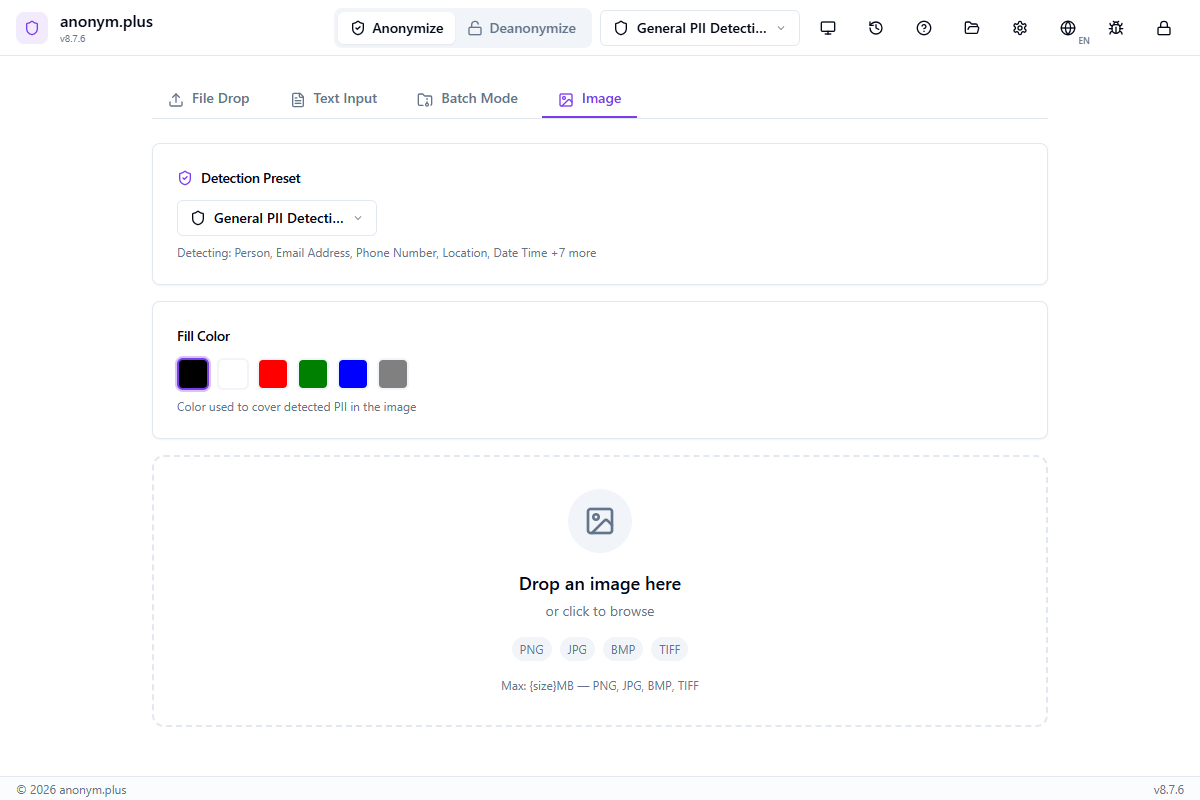
Click the Image tab in the anonymization panel
Drag and drop an image file (PNG, JPG, BMP, or TIFF) or click to browse. Max: 10 MB, 25 megapixels.
Choose a detection preset and the OCR language matching the text in your image
Click 'Analyze' to extract text via OCR and detect PII entities with bounding boxes
Click 'Redact' to generate a new image with PII covered by colored redaction boxes
Laden Sie das bearbeitete Bild als PNG herunter
Schritt für Schritt: Bildanonymisierung
Detect and redact PII in images using OCR text extraction and NER-based entity detection.
Navigate to the Image tab. The dropzone accepts PNG, JPG, BMP, and TIFF images up to 10MB.
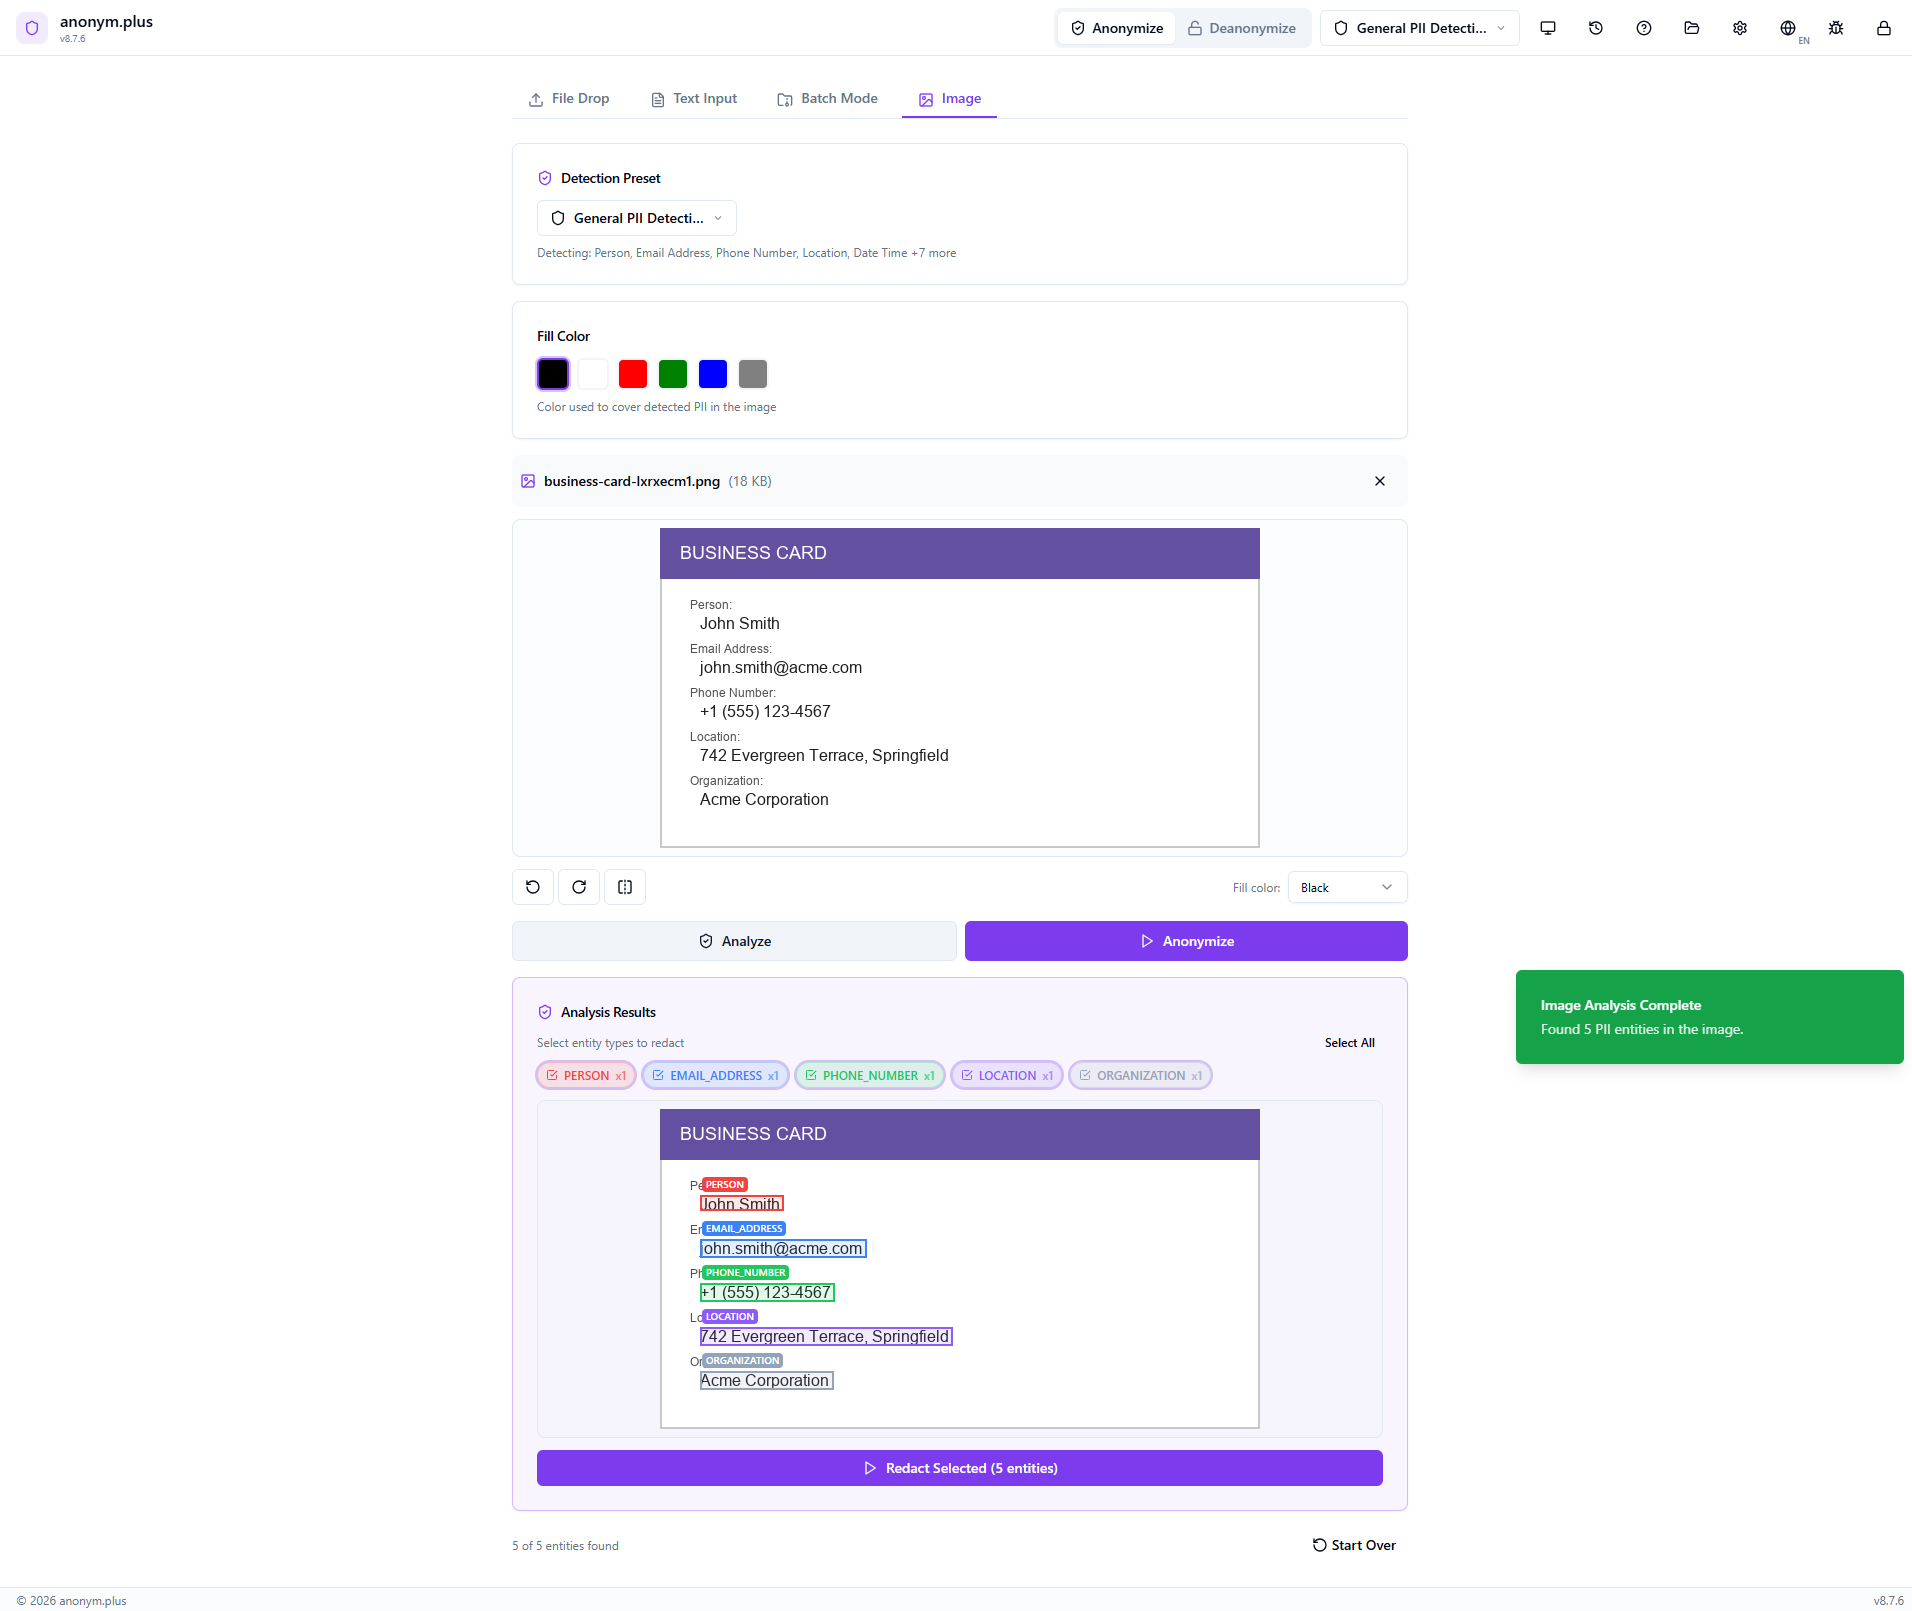
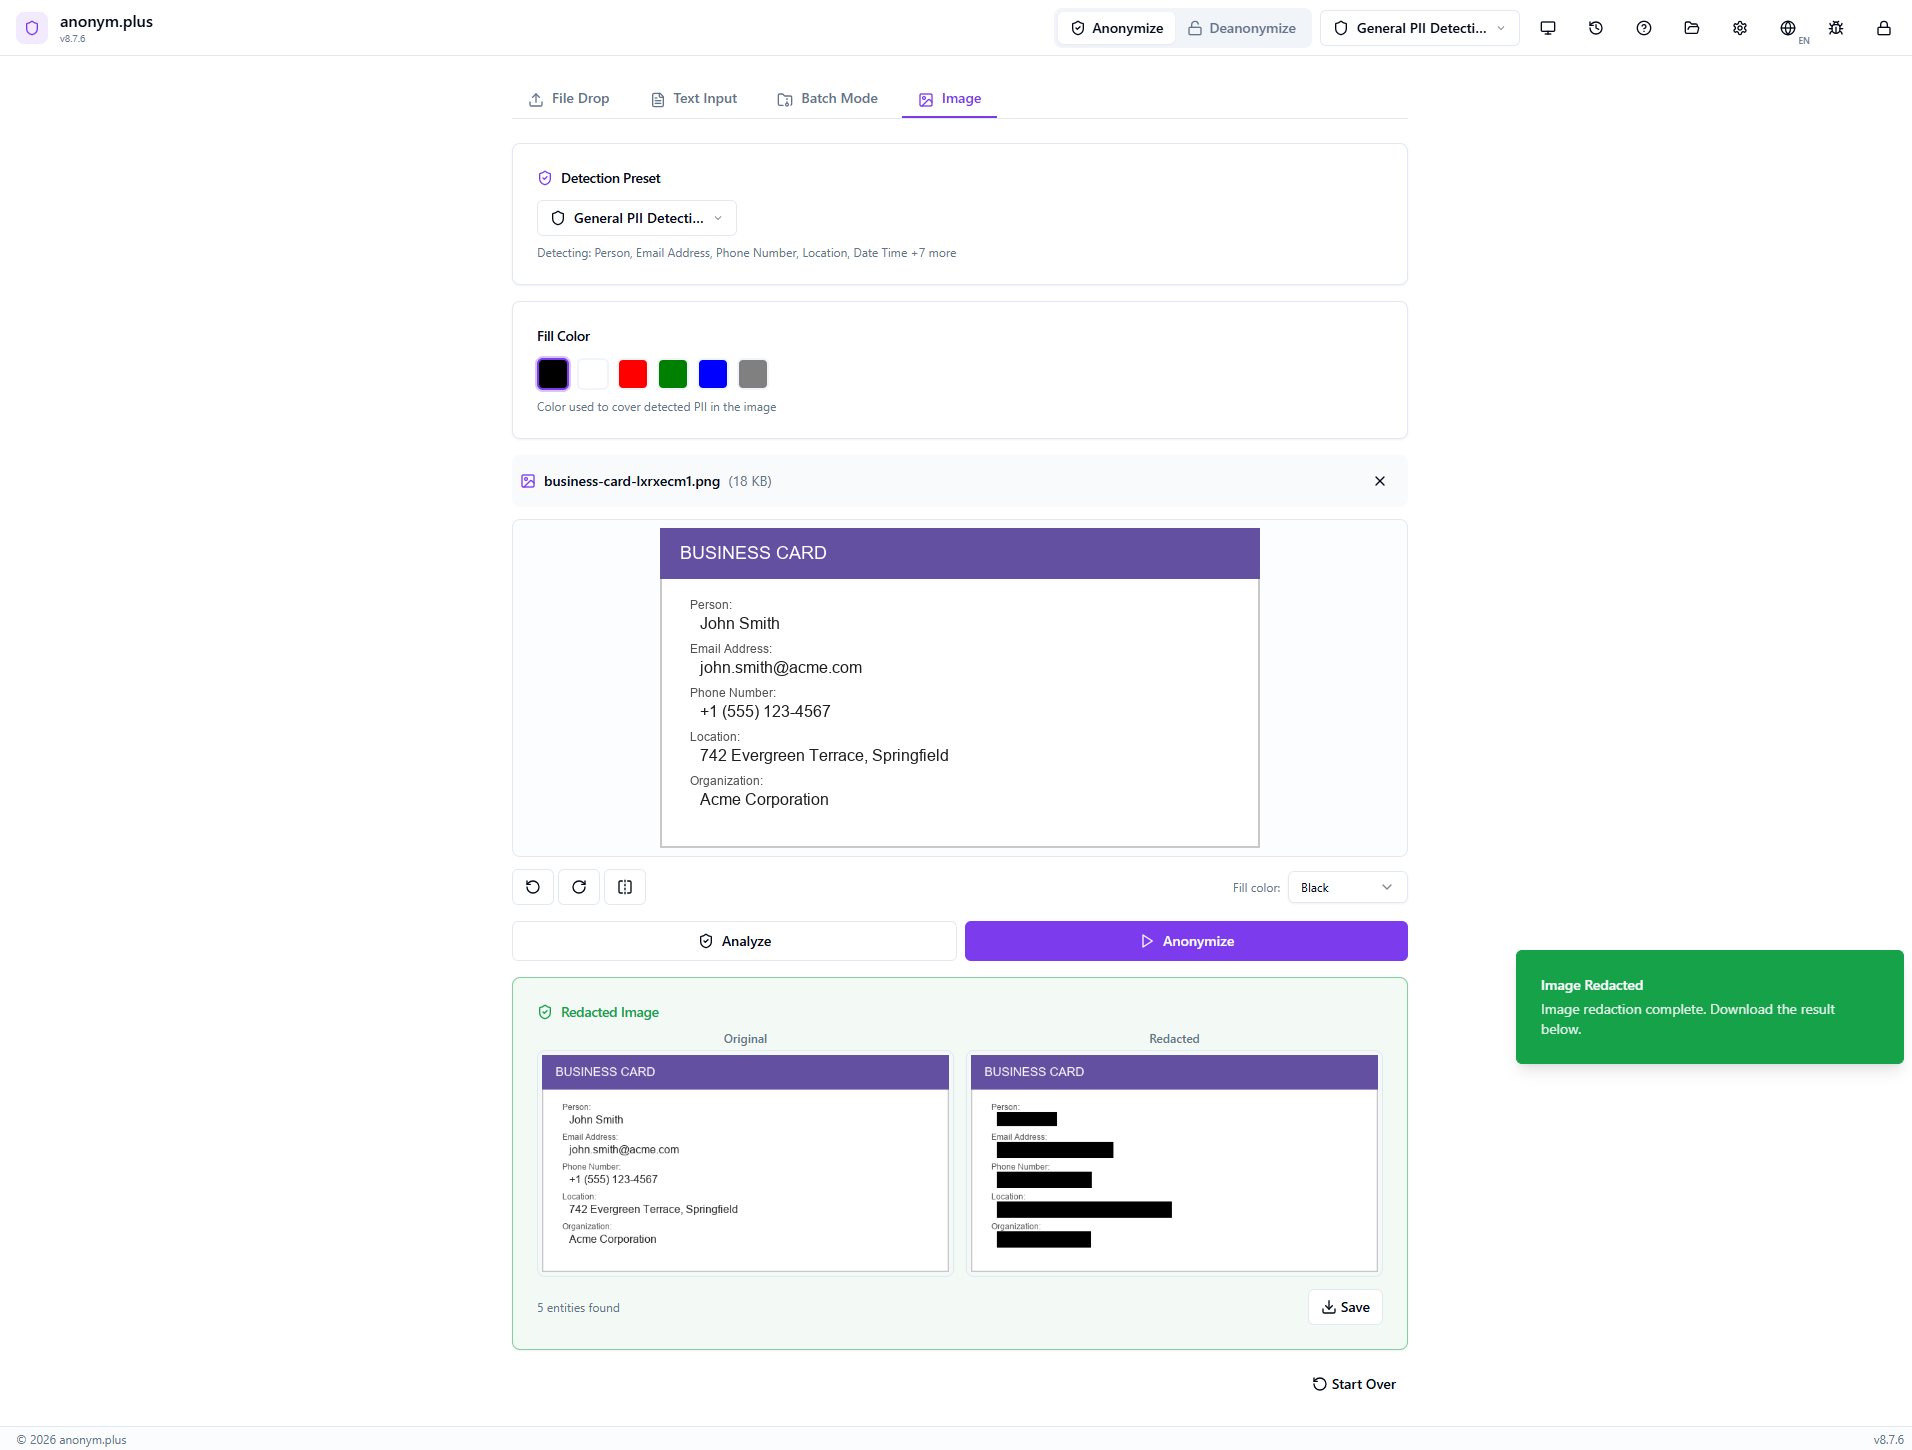
Drop a business card image. The preview shows the card with visible PII. Below: fill color selector (black, red, green, blue, gray), detection preset “General PII Detection”, and transform tools (rotate, flip). Click “Analyze”.
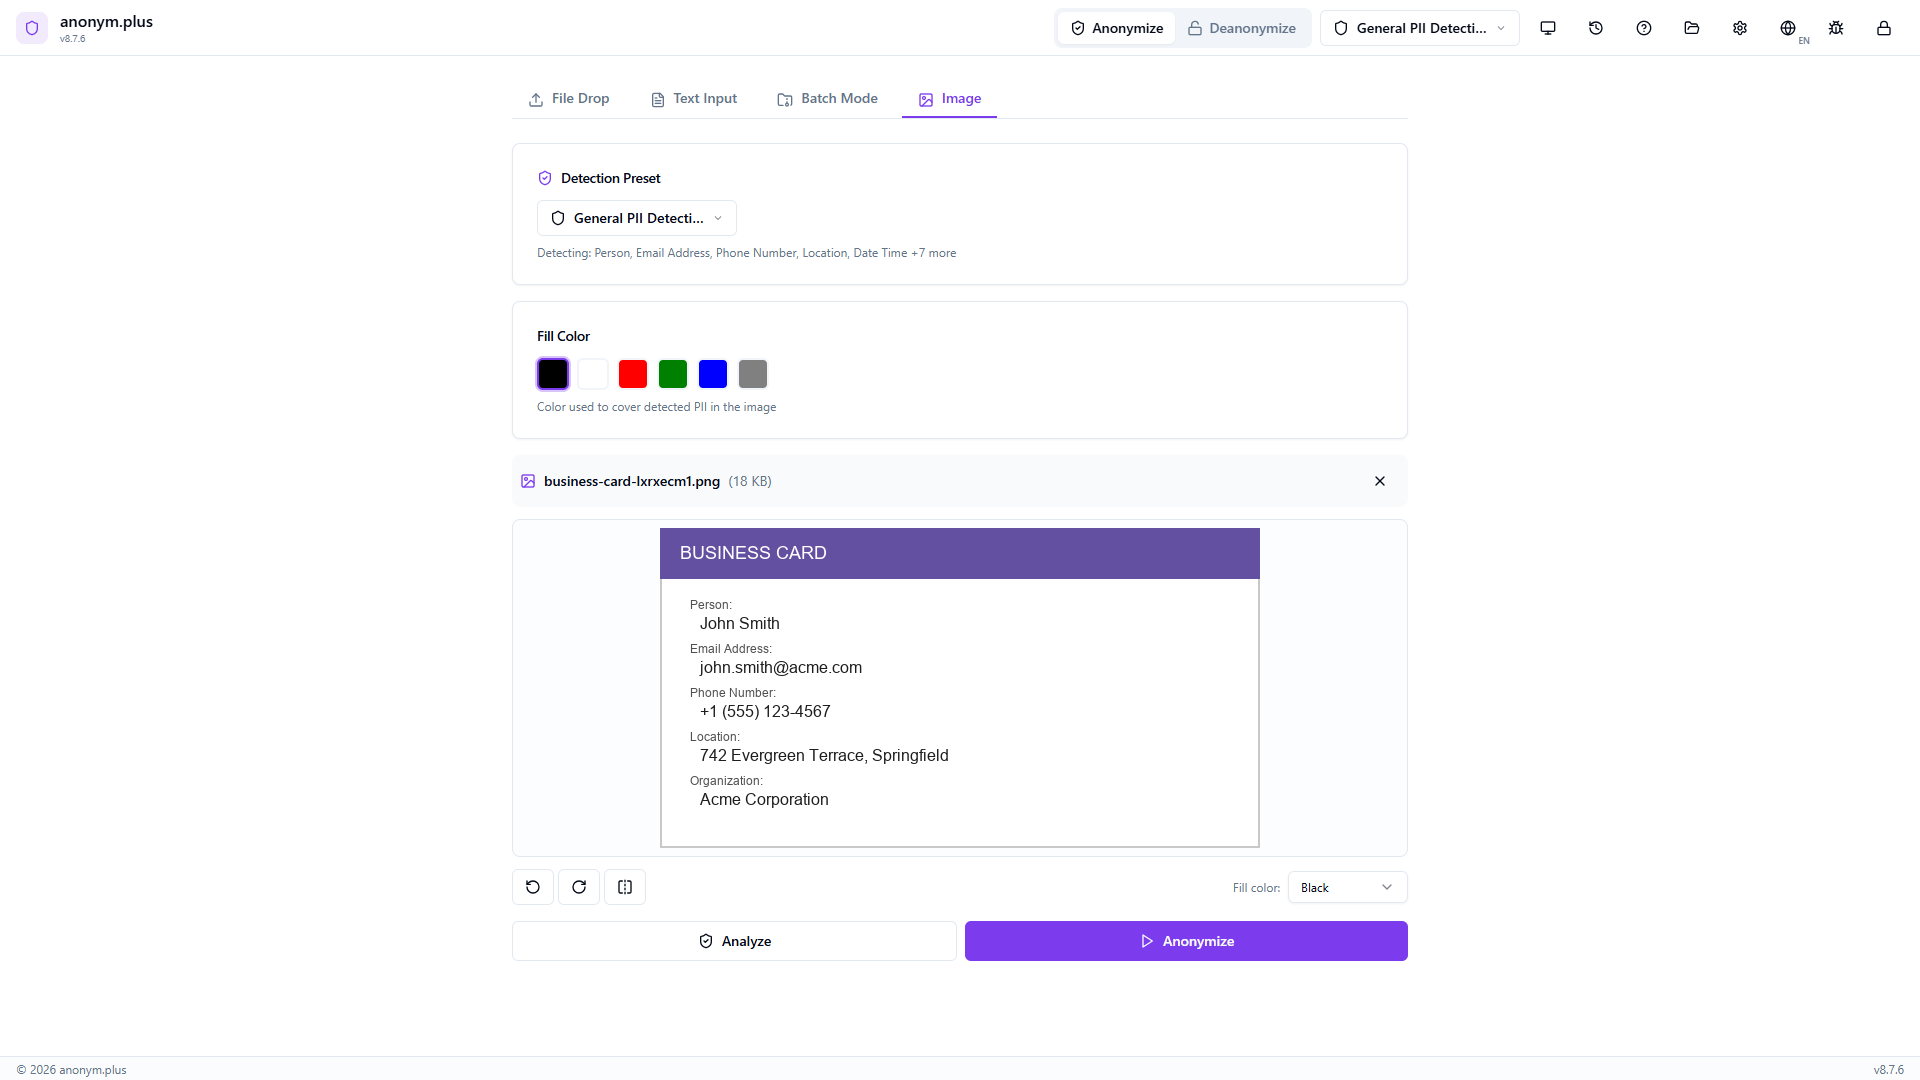
The app runs Tesseract OCR to extract text, then Presidio NER to detect PII entities and their bounding box positions within the image.
The image shows colored bounding boxes overlaid on each detected PII area. Entity type filter badges (Person, Email Address, Phone Number, Location, Organization) with checkboxes allow selecting which to redact. Click “Redact Selected (5 entities)”.
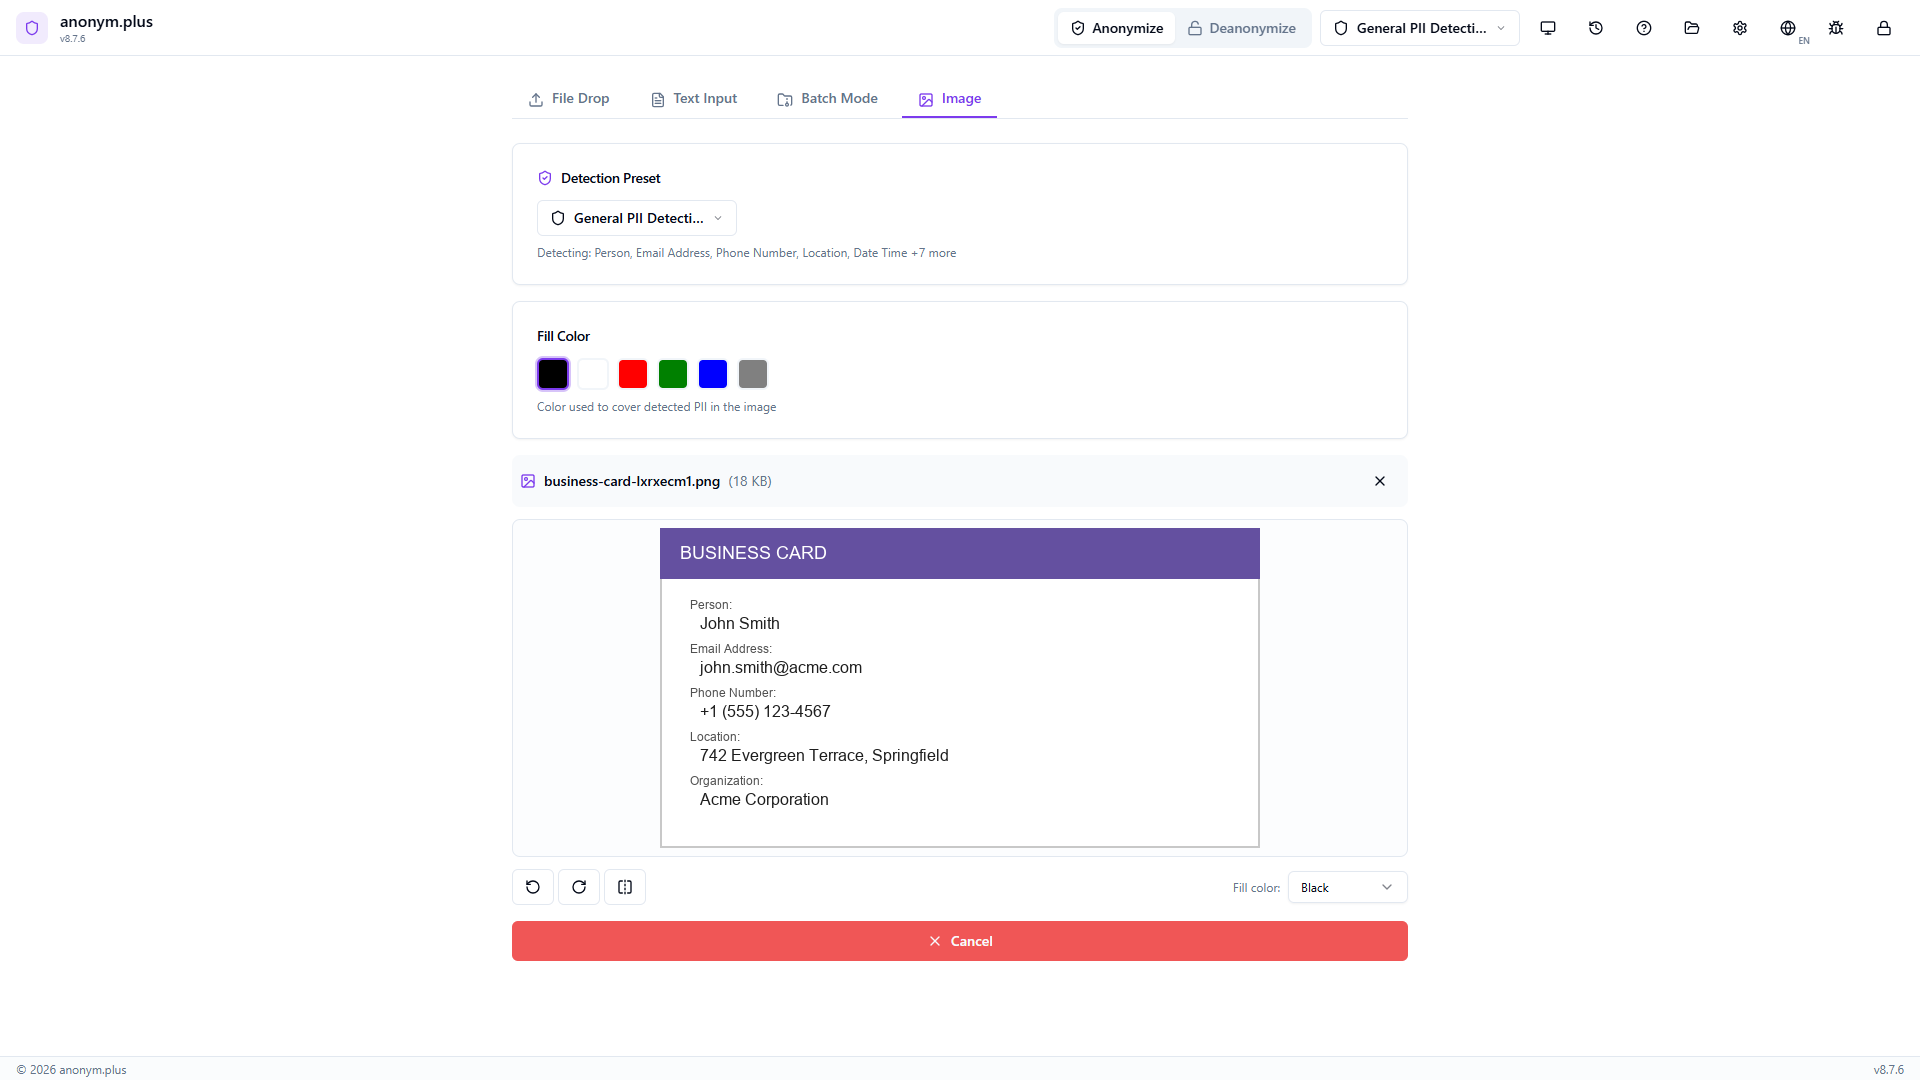
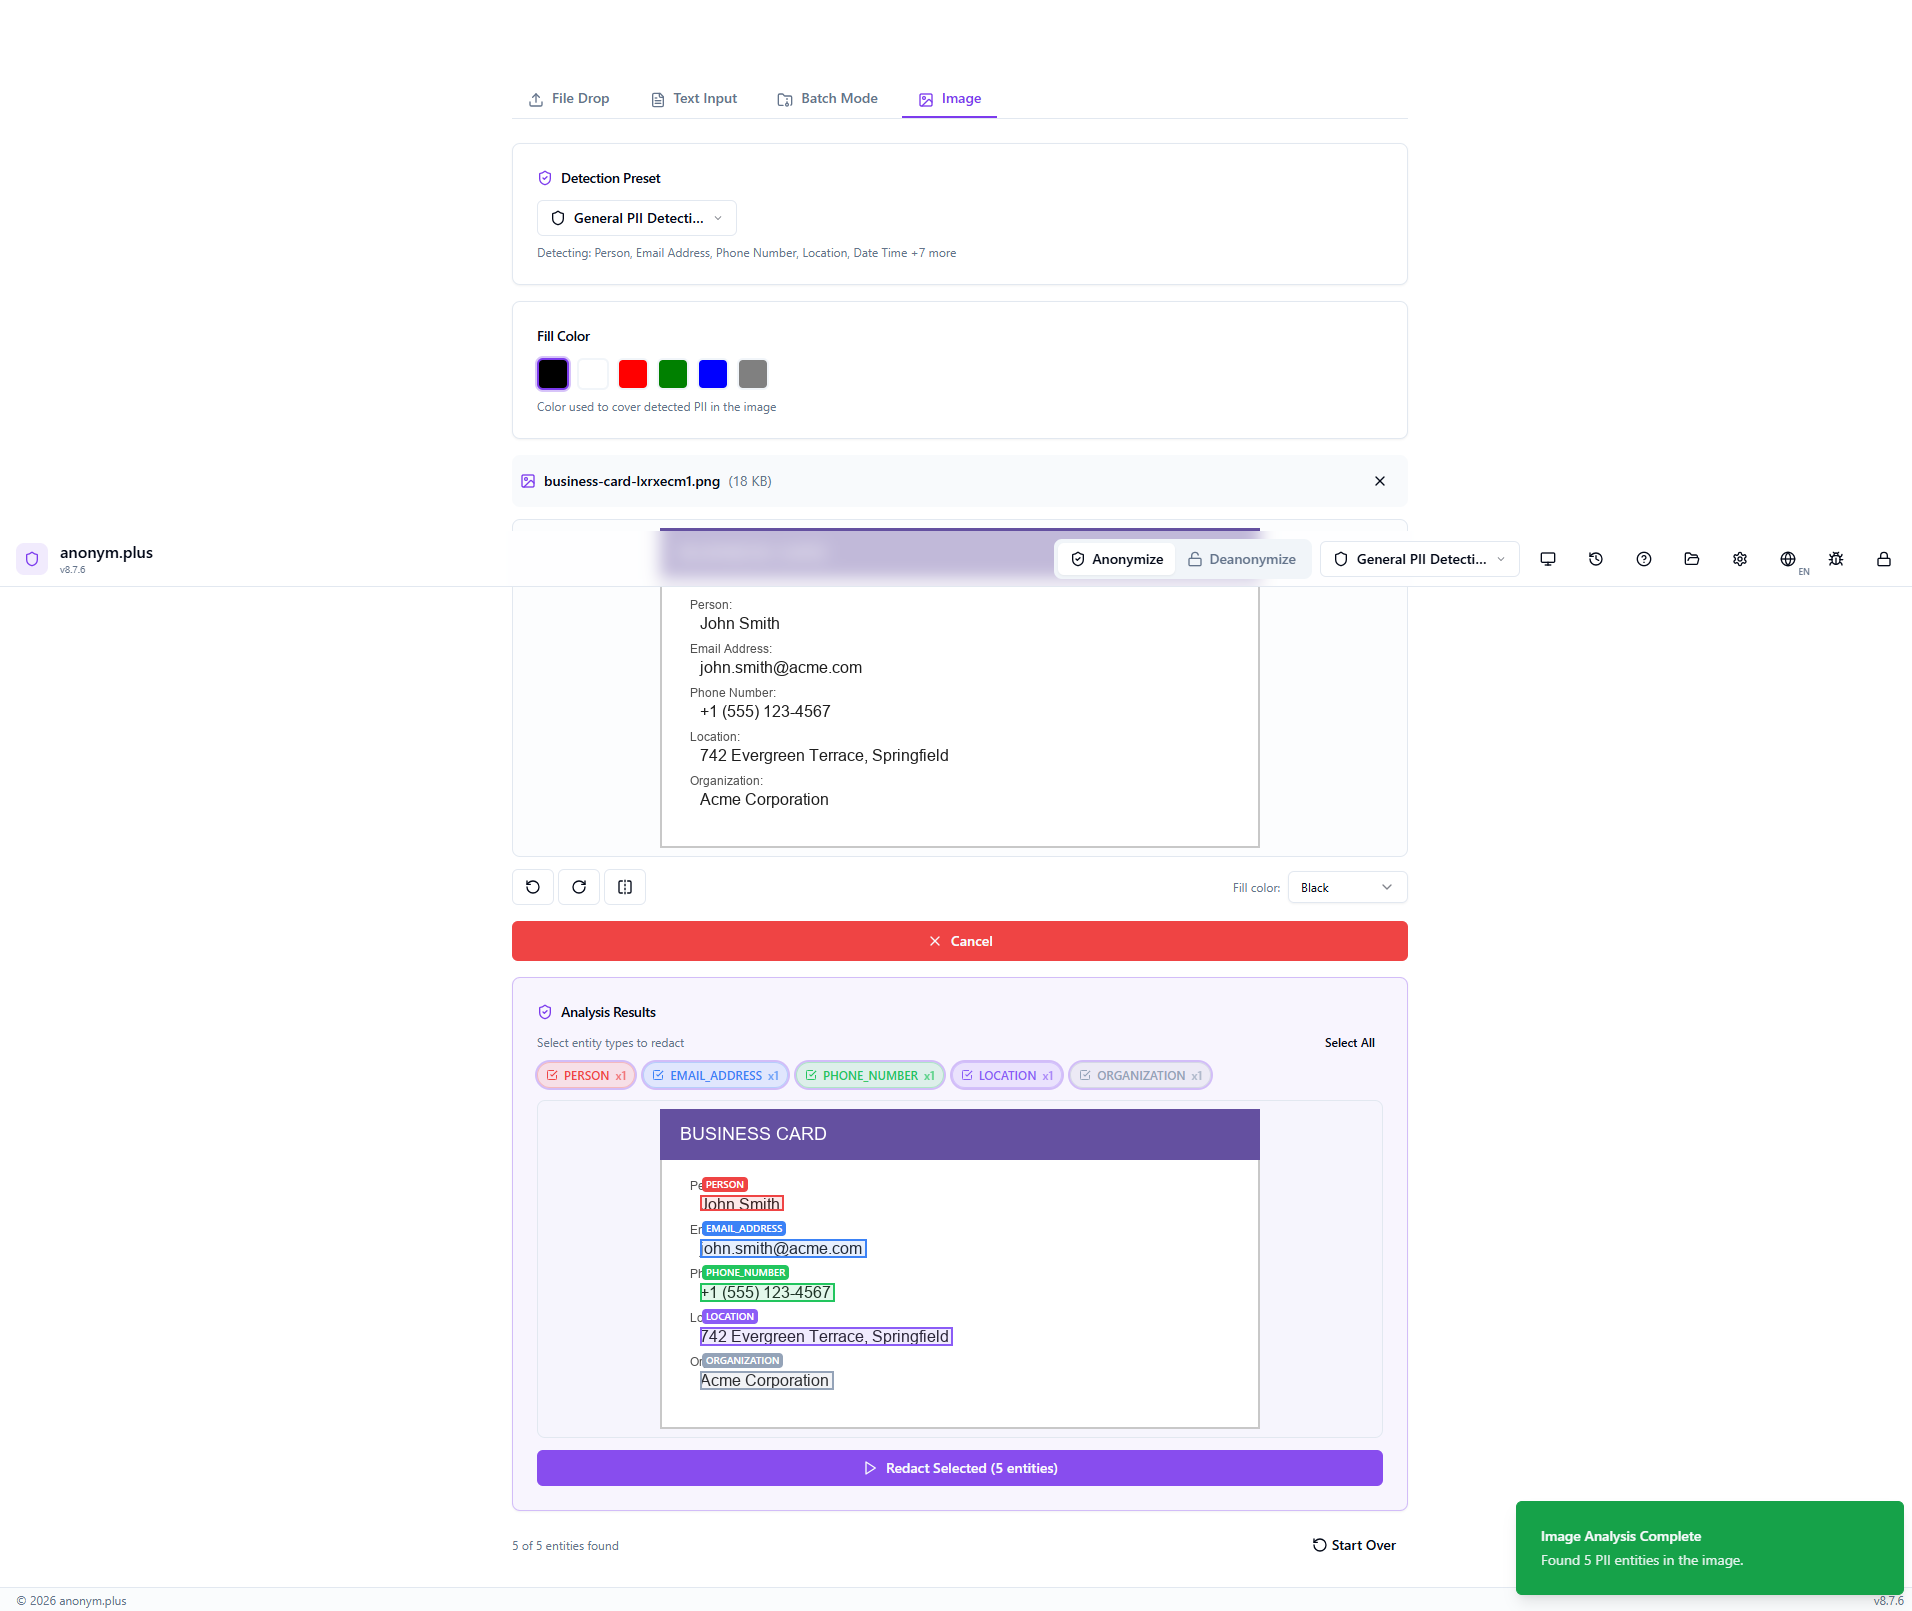
A loading indicator appears while selected PII regions are covered with black fill rectangles.
Side-by-side view: the Original image (left) with visible PII, and the Redacted image (right) with black bars covering all detected areas. Stats show entity count. Use the Save button to download the redacted image.
Unterstützunged Formats
OCR Languages
38 languages supported including English, German, French, Spanish, Italian, Portuguese, Dutch, Arabic, Chinese, Japanese, Korean, Hindi, Russian, and more. Select the correct language for best OCR accuracy.
Wie es funktioniert
Known Limitations
| Issue | Detail |
|---|---|
| Photos of screens | Moiré patterns, glare, and reflections degrade OCR. Use screenshots instead. |
| Handwritten text | Tesseract is optimized for printed/typed text only. |
| Low resolution | Below 150 DPI may have poor accuracy. Use 300+ DPI for scans. |
| Rotated/skewed text | Text at angles >15° may not extract correctly. |
| Complex backgrounds | Watermarks and colored backgrounds can interfere. |
| Very small text | Below ~8pt at the image's effective resolution may not be detected. |
| Multi-column layouts | OCR may mix columns in complex layouts. |
| NER language | Named entity recognition uses the English model. Pattern-based entities (phones, IBANs, emails) work in all languages. |
Tips
- Use screenshots instead of camera photos of screens for much better results
- Select the correct OCR language matching the text in your image
- Ensure images are well-lit with good contrast between text and background
- For scanned documents, use 300 DPI or higher resolution
- Crop images to focus on the text area for faster processing
- EXIF orientation is applied automatically — no need to manually rotate photos
Batch-Verarbeitung
Process multiple documents at once with parallel file handling. Batch mode is available for document anonymization.
Workflow
Drag and drop up to 20 files at once onto the dropzone, or click to browse and select multiple files
Choose a detection preset — the same preset applies to all files in the batch
All files are extracted and analyzed in parallel for faster processing
Review detected entities for each file individually — accept, reject, or modify detections
Save all processed files to your output folder
Schritt für Schritt: Batch-Verarbeitung with Replace
Process multiple files at once with the Replace operator — all PII is substituted with type labels and saved as a ZIP archive.
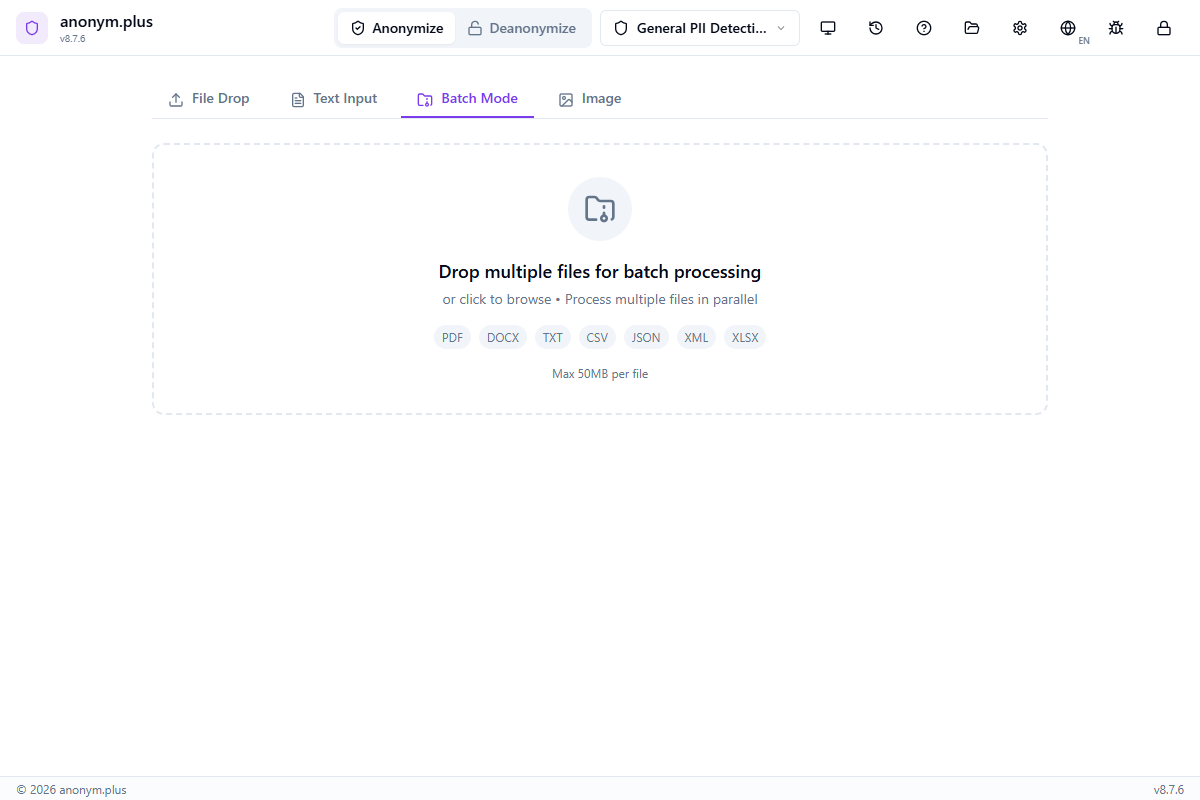
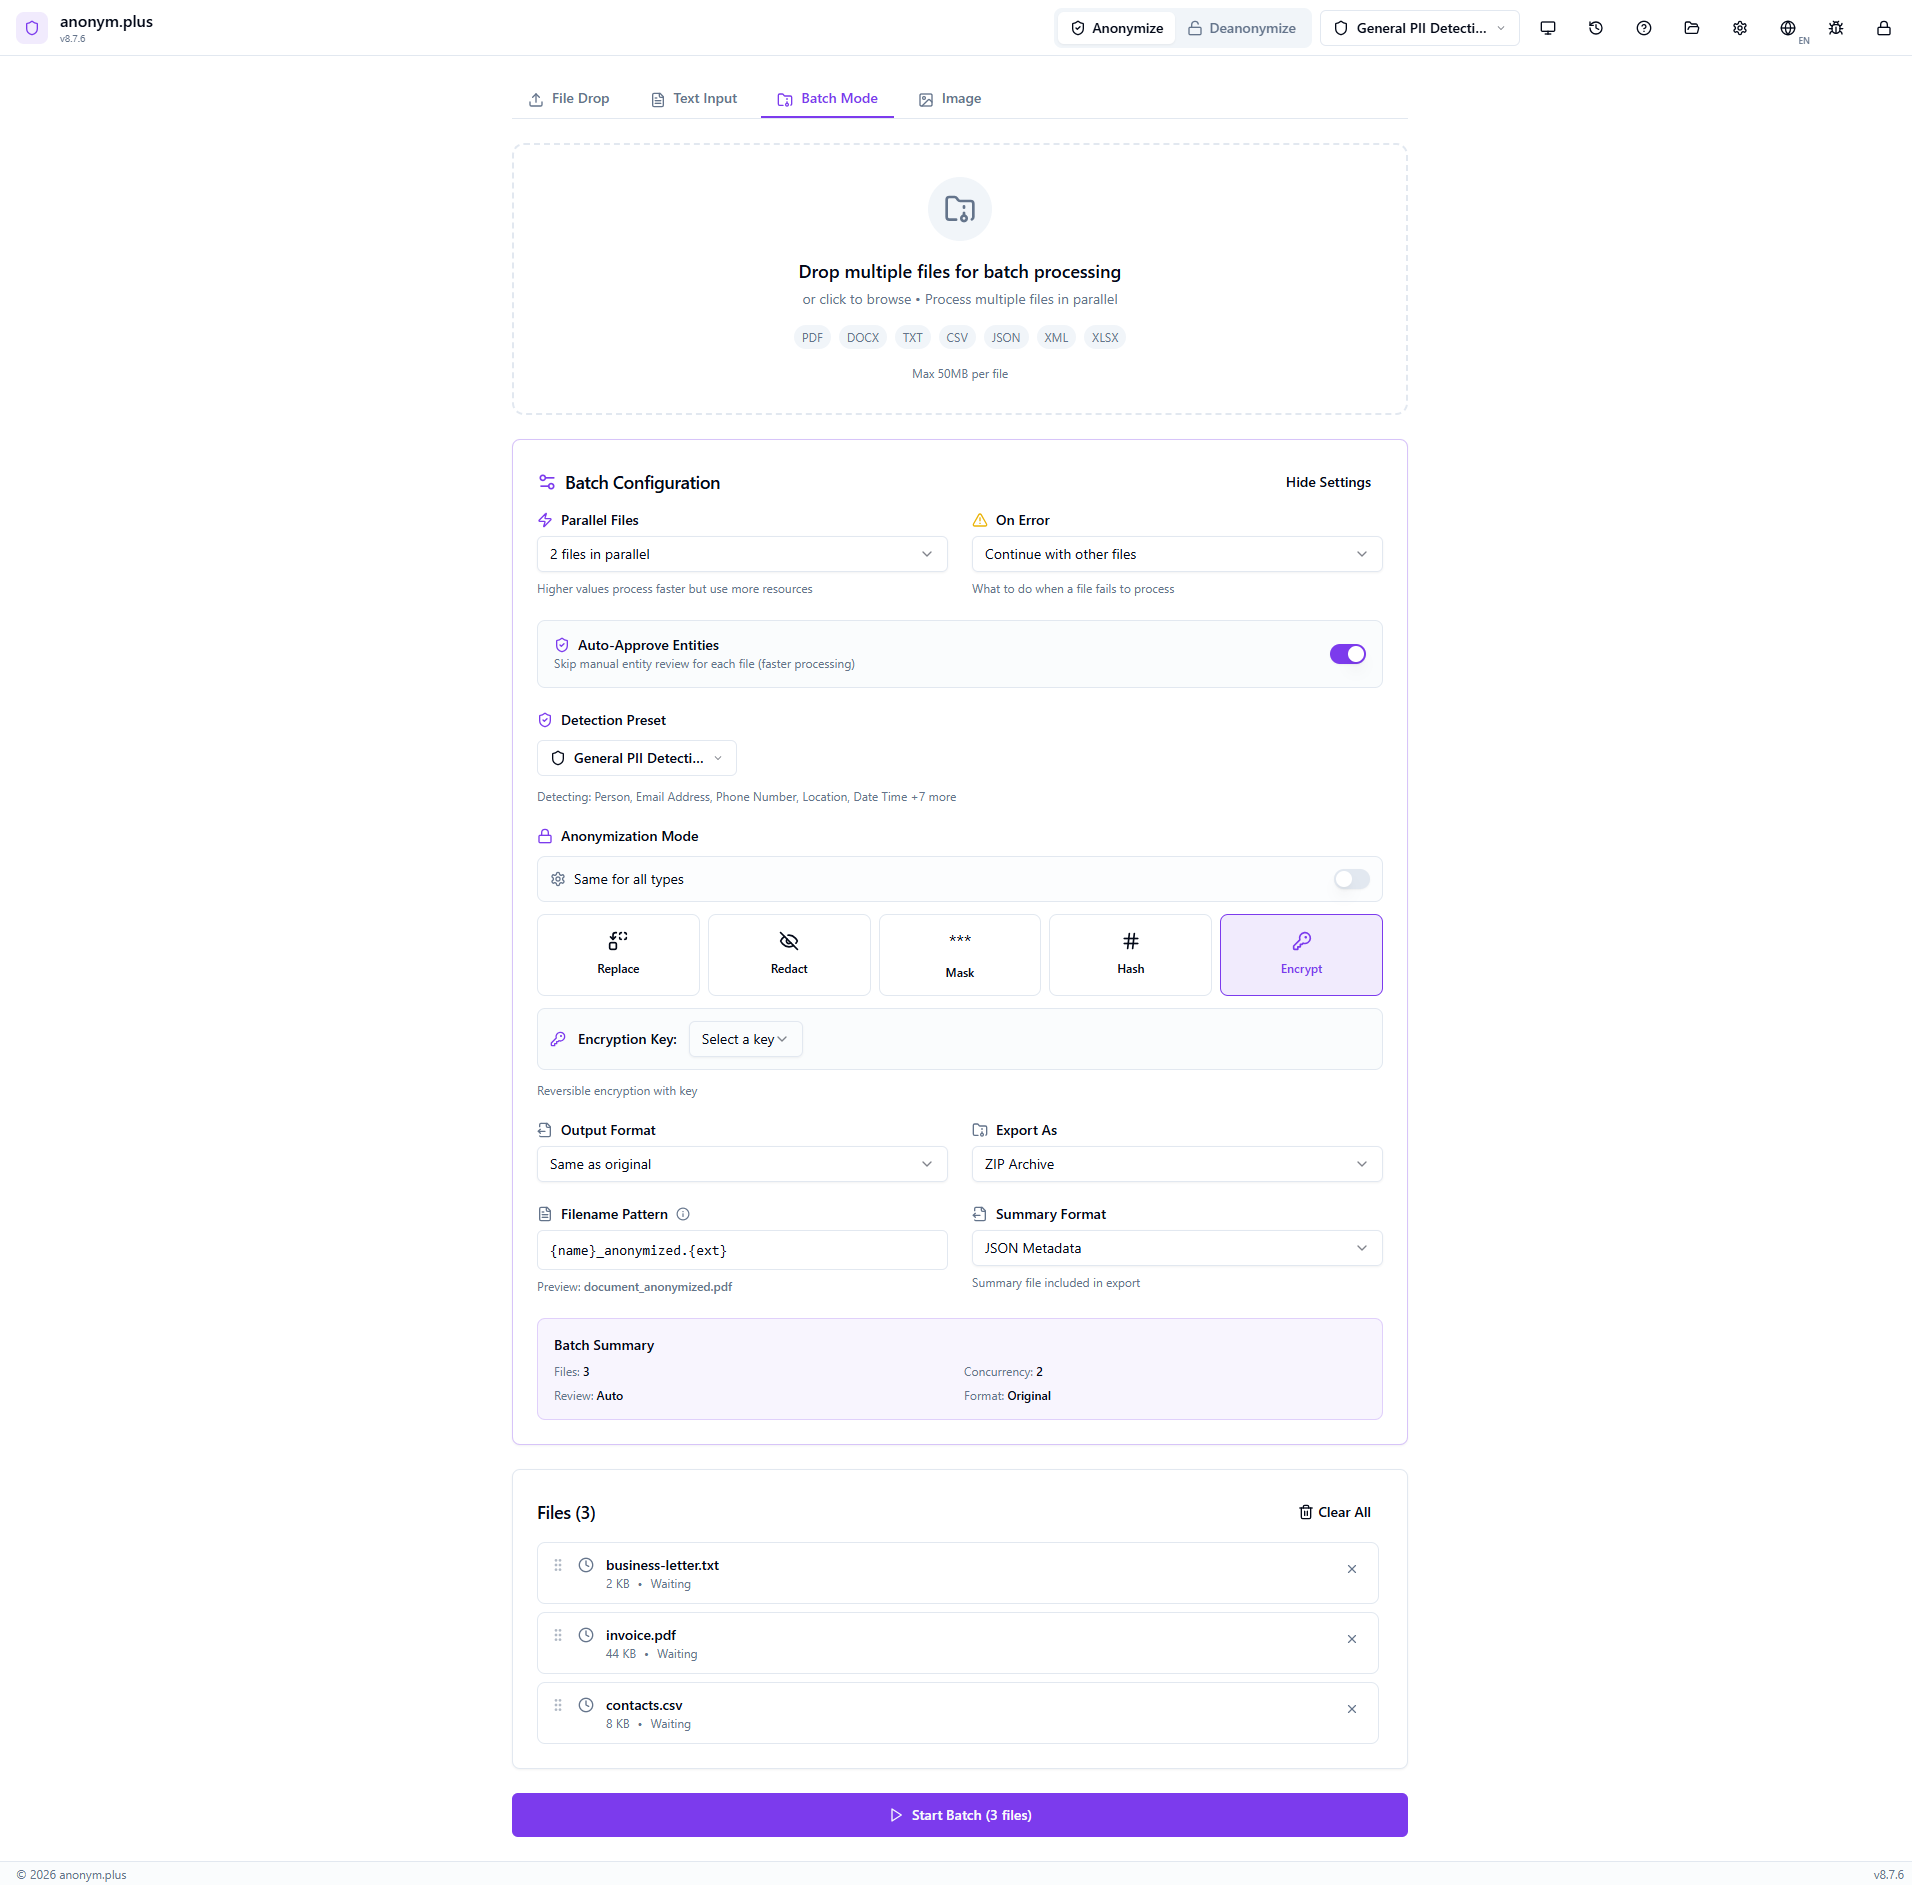
Navigate to the Batch Mode tab. The dropzone accepts multiple files (PDF, DOCX, TXT, CSV, JSON, XML, XLSX) up to 50MB per file.

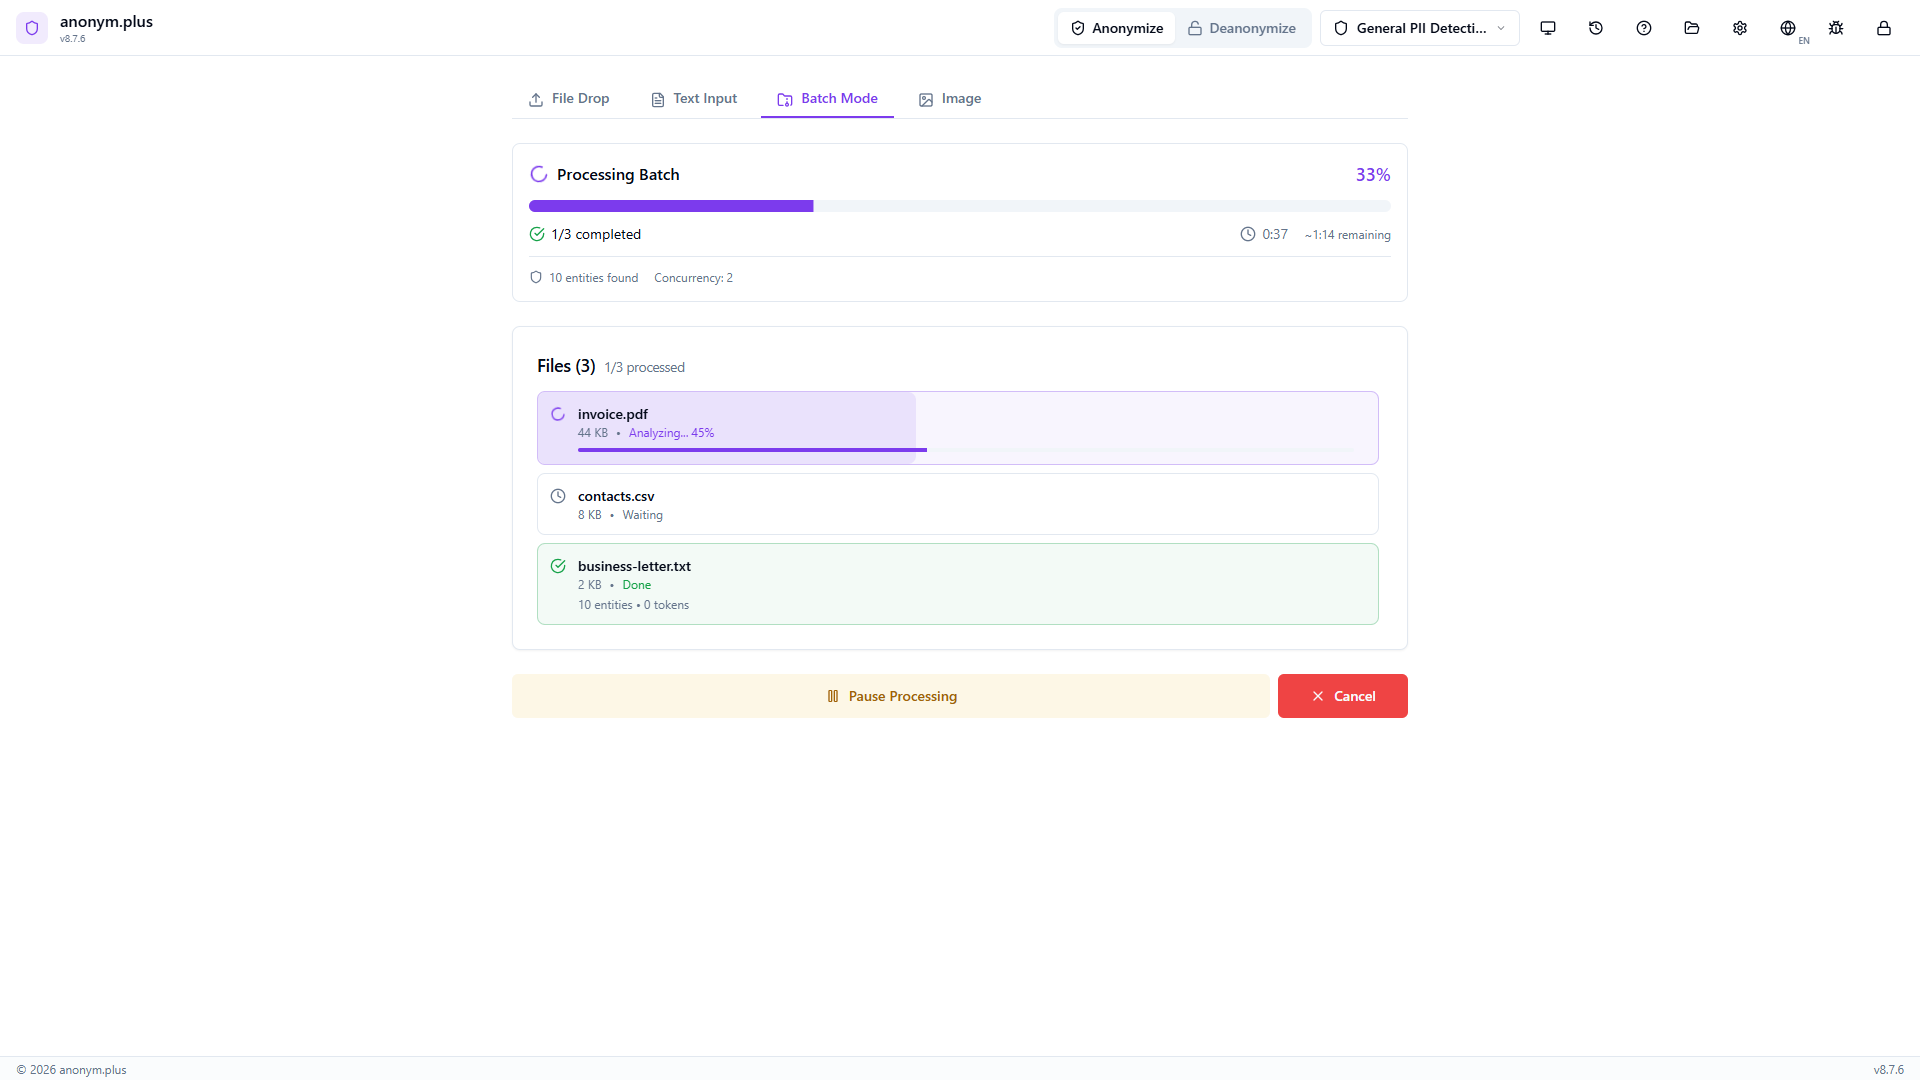
Three files added: business-letter.txt (2 KB), invoice.pdf (44 KB), contacts.csv (8 KB). Each shows in a card with pending status. The Batch Configuration panel shows preset selector, Replace operator mode, concurrency, auto-approve toggle, and export settings.

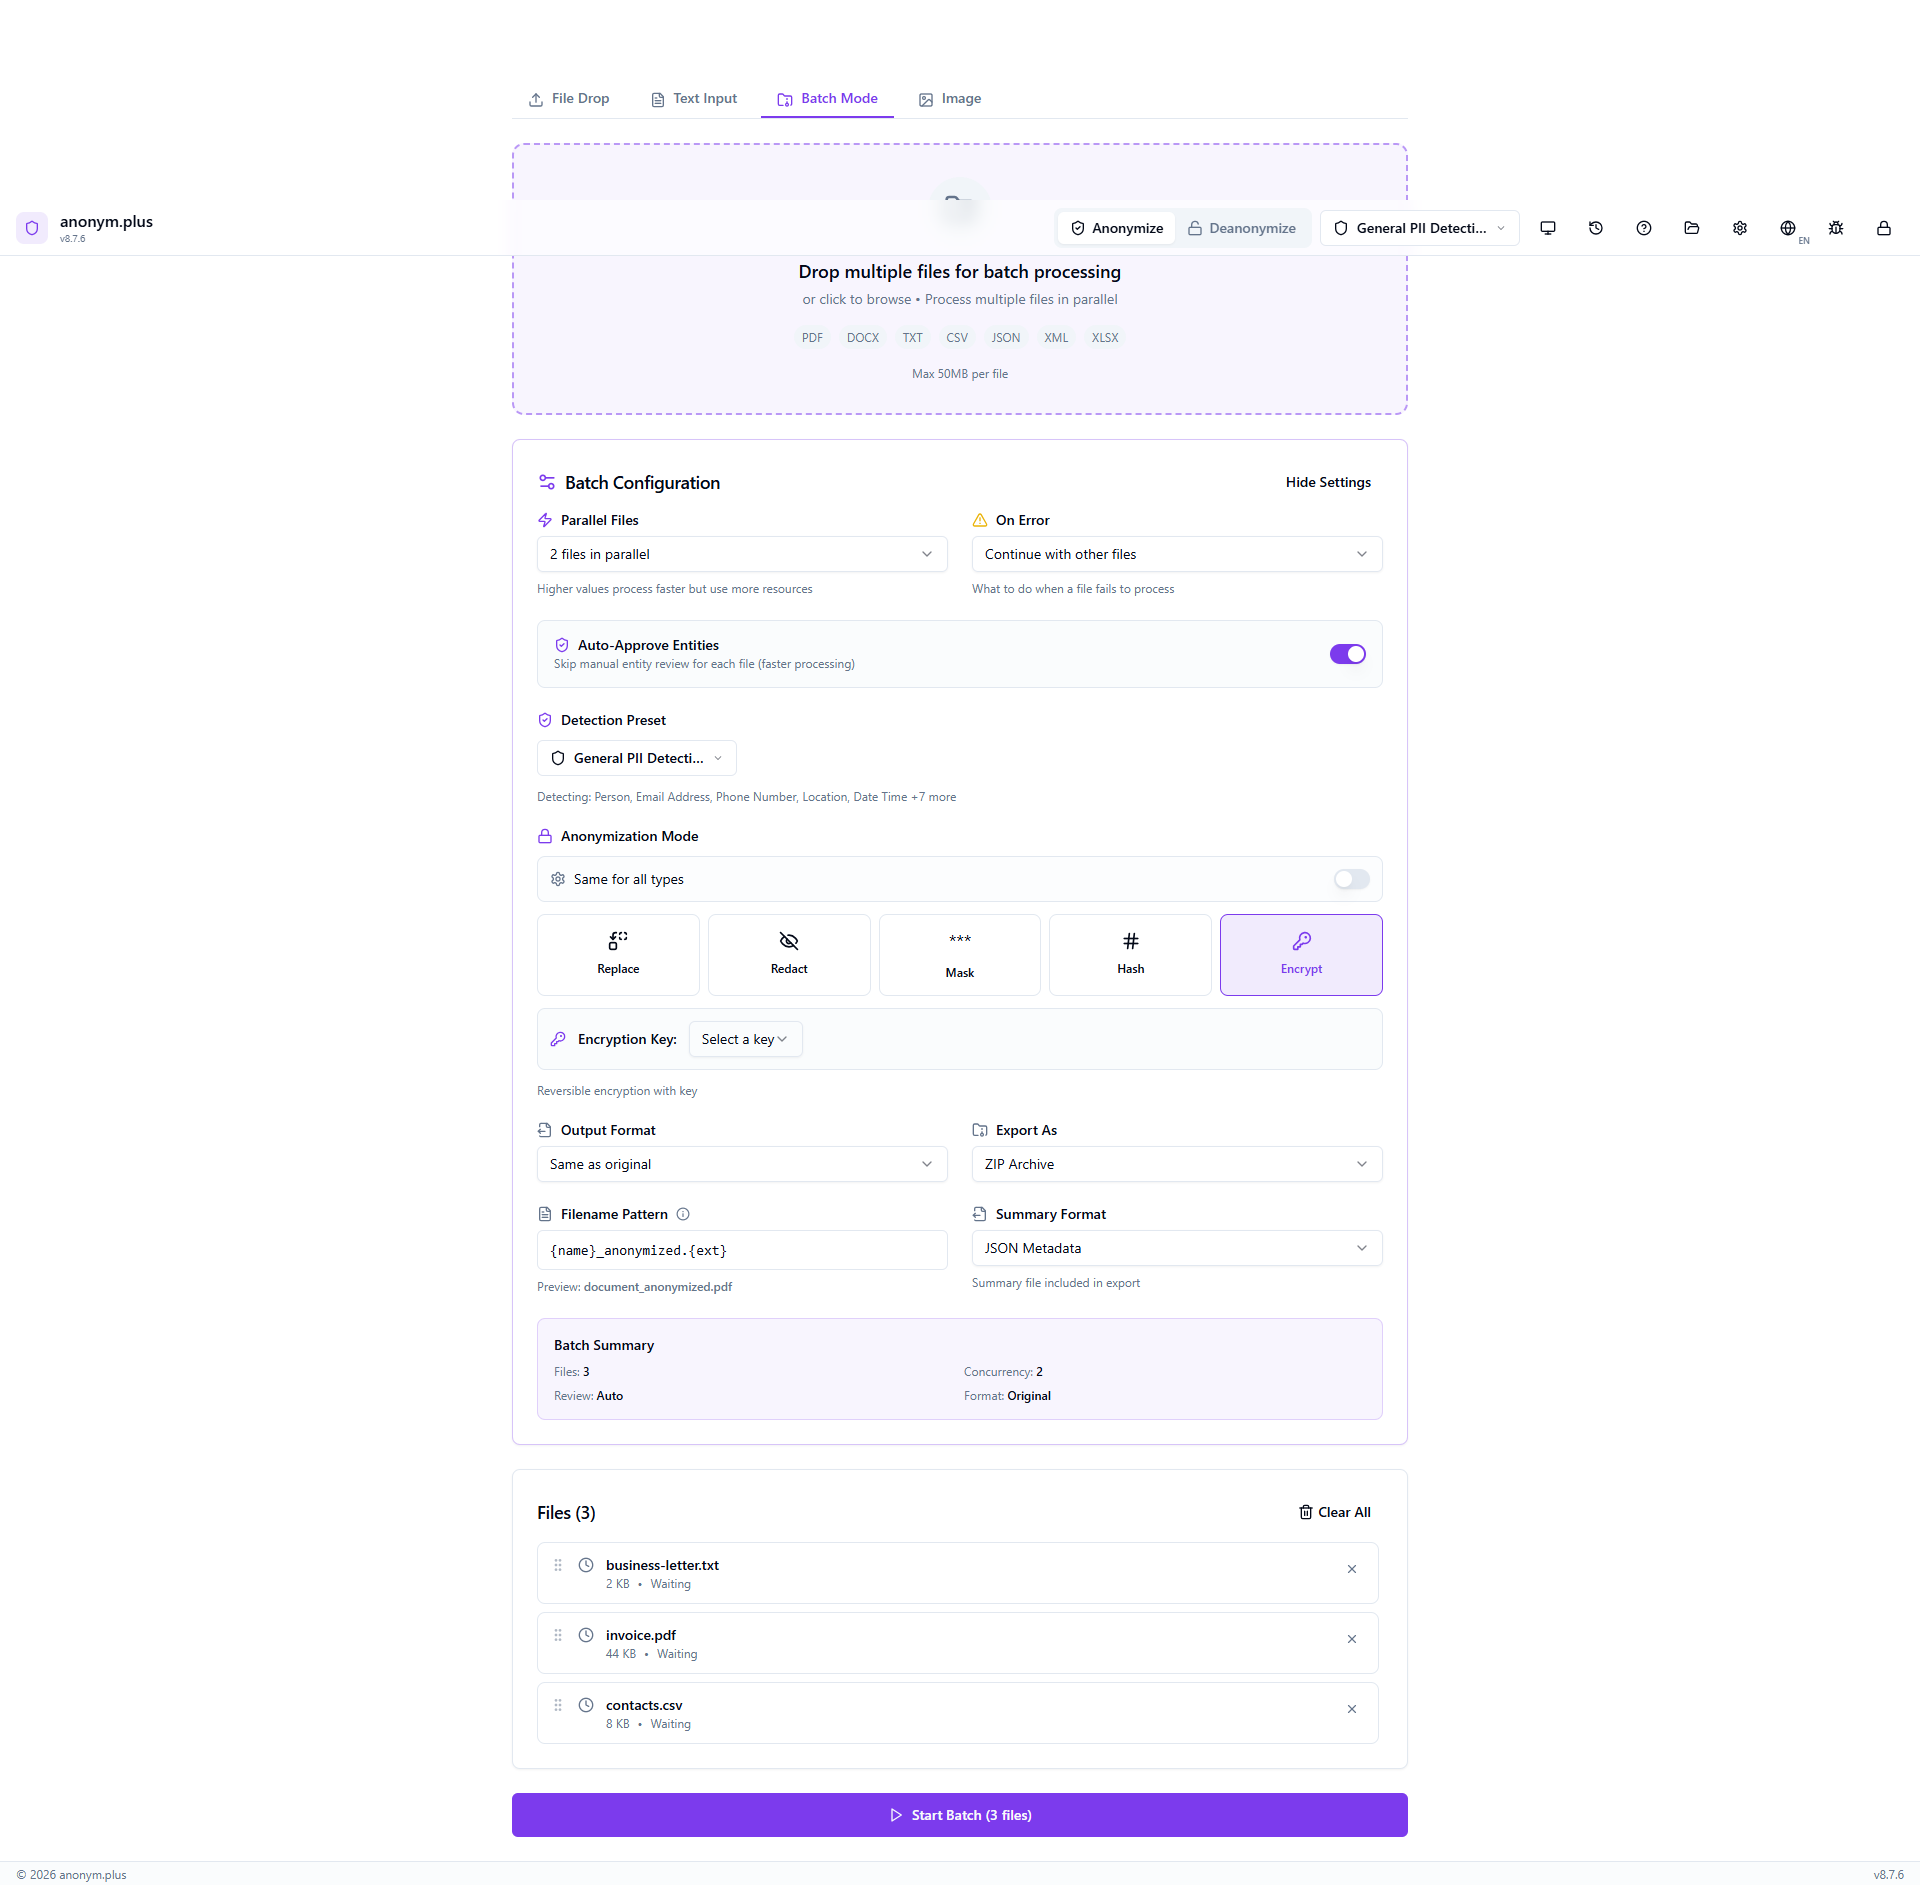
General PII Detection preset, Replace operator, 2 parallel files, Auto-Approve Entities ON (skips manual review for faster processing), Continue on error, output format “Same as original”, export as ZIP Archive, filename pattern {name}_anonymized.{ext}. Click “Start Batch (3 files)”.

Progress bar at 33% — 1/3 completed. Live stats show elapsed time, estimated remaining time, and 10 entities found so far. File statuses: business-letter.txt Done (10 entities), invoice.pdf Analyzing (45%), contacts.csv Waiting. Pause and Cancel buttons available.
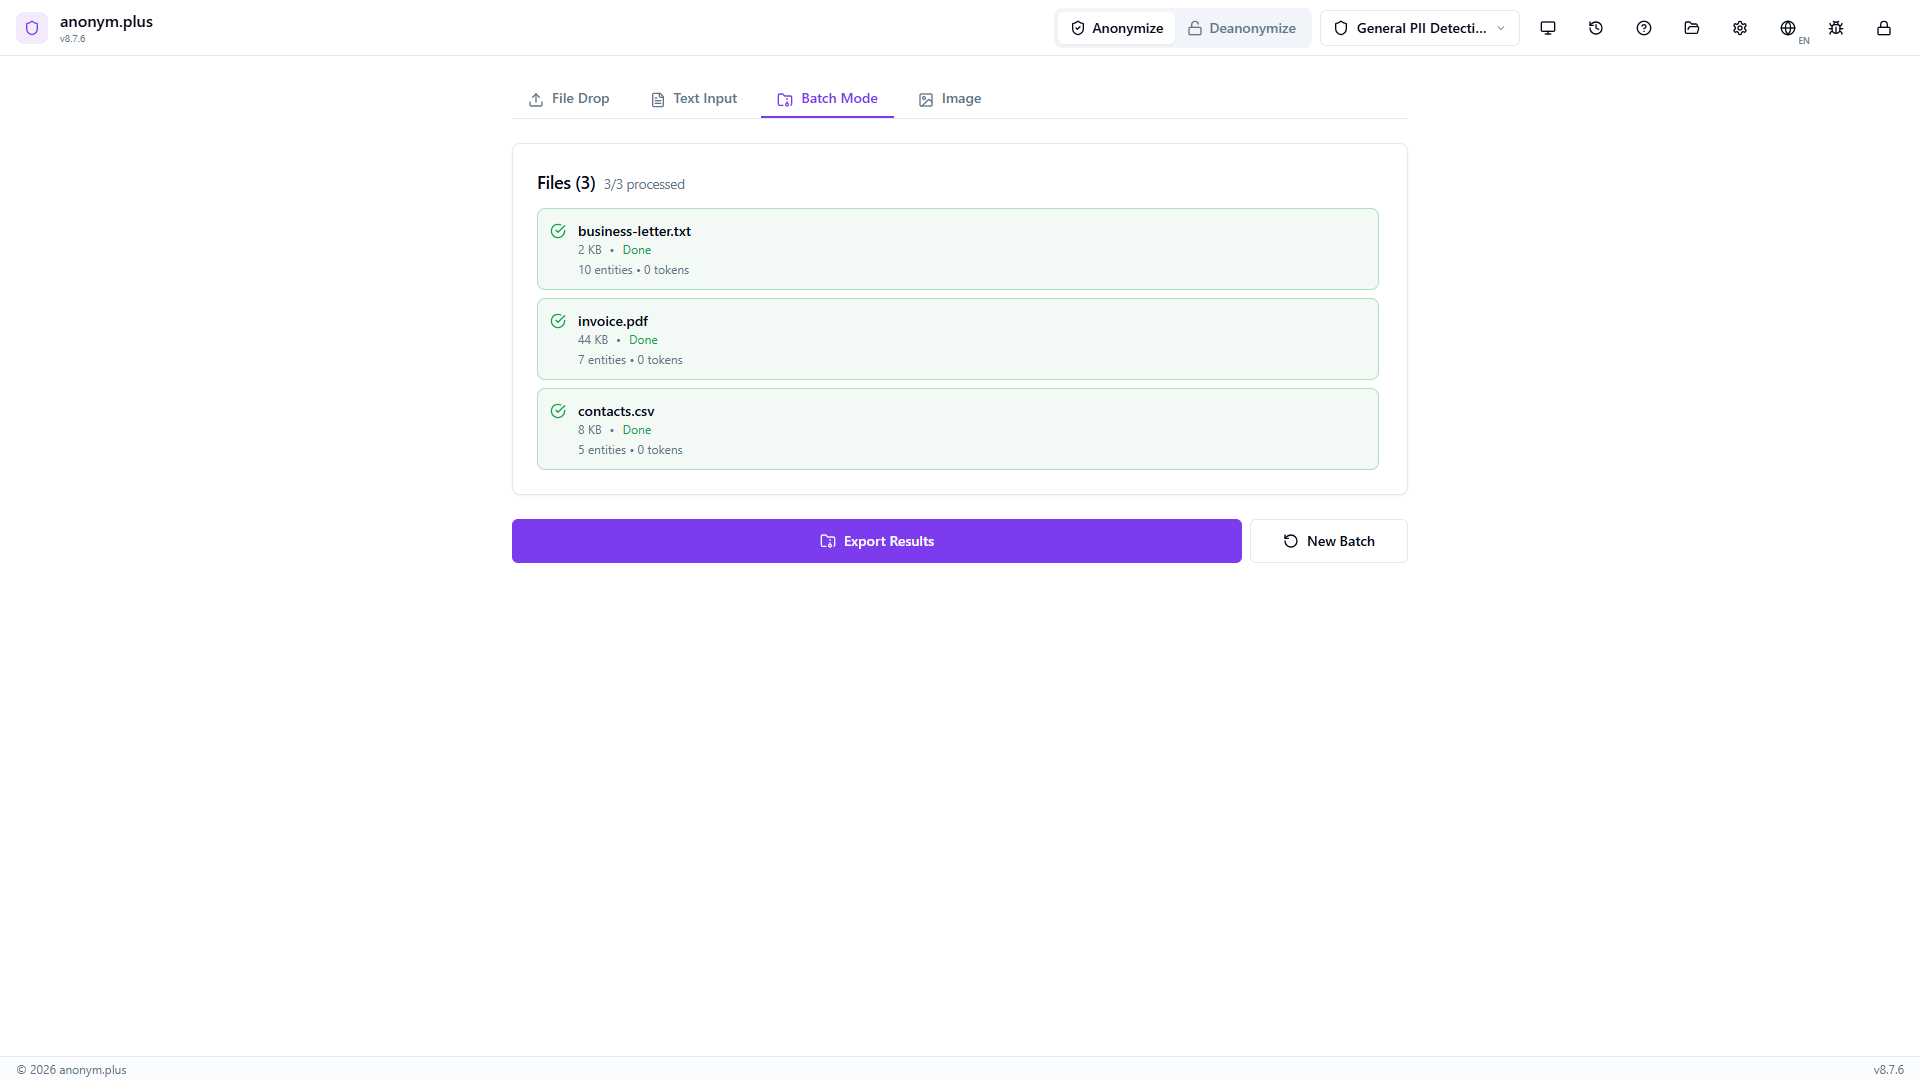
All 3 files show green checkmarks with individual entity counts (10, 7, 5). Total: 22 entities found, 0 errors. Export Results and New Batch buttons ready.

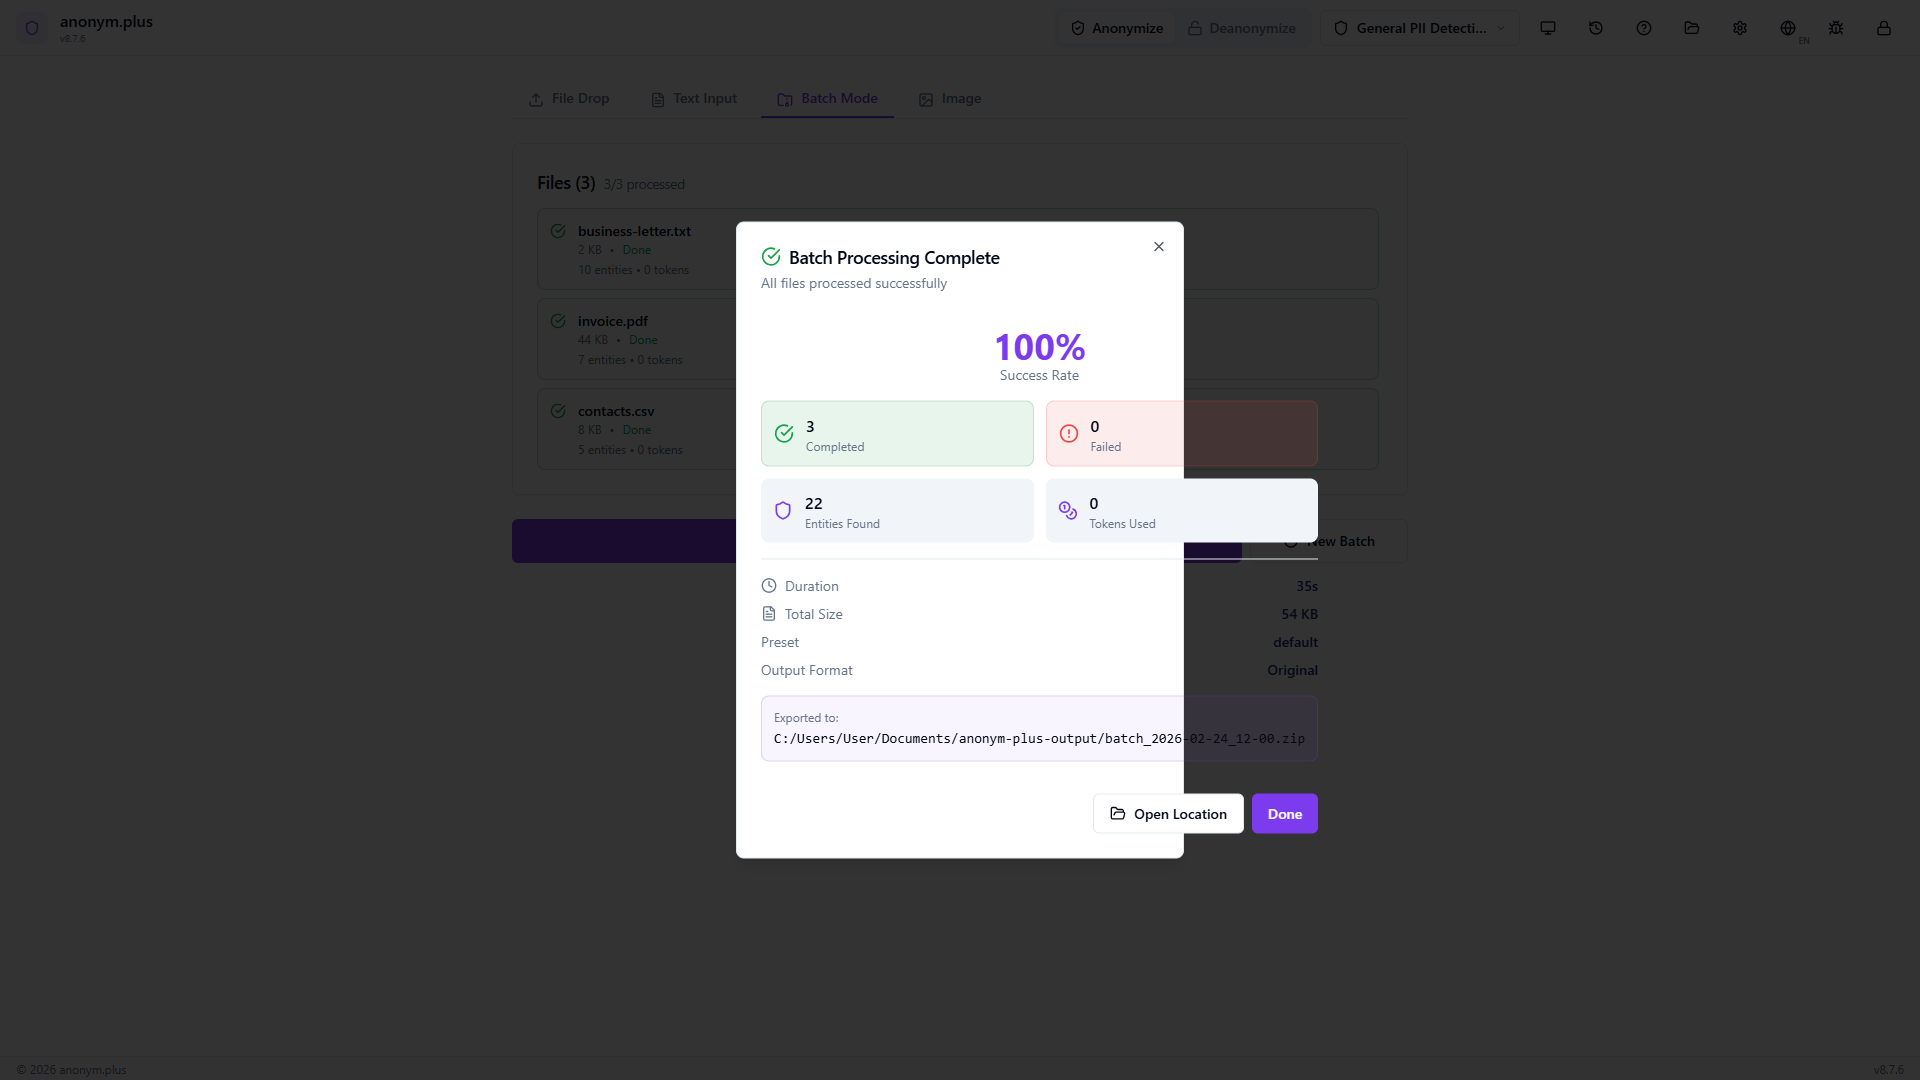
Modal showing 100% success rate, stats grid (3 completed, 0 failed, 22 entities, 0 tokens), preset “default”, output format “Original”. ZIP archive exported with “Open Location” button.

Schritt für Schritt: Batch-Verarbeitung with Encrypt
Process multiple files with reversible encryption — output files contain encrypted tokens that can be decrypted later.
Same multi-file dropzone as Replace mode.
Three files added. The operator mode shows Encrypt with encryption key dropdown visible.
Full config: Encrypt operator highlighted, “Encryption Key: Select a key” dropdown, “Reversible encryption with key” hint. Other settings: 2 parallel files, auto-approve ON, ZIP archive export. Click “Start Batch (3 files)”.
Progress bar with mixed file statuses — same layout as Replace but processing with encrypt operators.

All 3 files complete with green checkmarks and entity counts. Output files contain reversible encrypted tokens.
100% success modal with encrypted output in ZIP archive.
Limits
| Parameter | Limit |
|---|---|
| Files per batch | 20 |
| Total batch size | Combined file size limits apply per format (see Dokumentanonymisierung) |
| Parallel processing | Files analyzed concurrently for speed |
Progress Tracking
During batch processing, each file shows its own progress indicator with status (queued, extracting, analyzing, complete). Files that fail are flagged individually without stopping the rest of the batch.
Deanonymisierung (Decrypt)
Restore original PII values from anonymized documents using your encryption keys. Works with any document that was anonymized using the 'encrypt' operator.
Input Modes
Drop an anonymized document (PDF, DOCX, TXT, CSV, JSON, XML, XLSX). Text is extracted and automatically matched against your history to load the correct encryption keys.
Paste anonymized text directly. The app automatically searches your history for matching encrypted chunks and loads the correct keys — even if the surrounding text was edited.
Select a previous anonymization entry. All entity positions and key mappings are loaded instantly.
Schritt für Schritt: Deanonymize from History
Restore original PII from a previously encrypted anonymization by selecting it from your processing history.
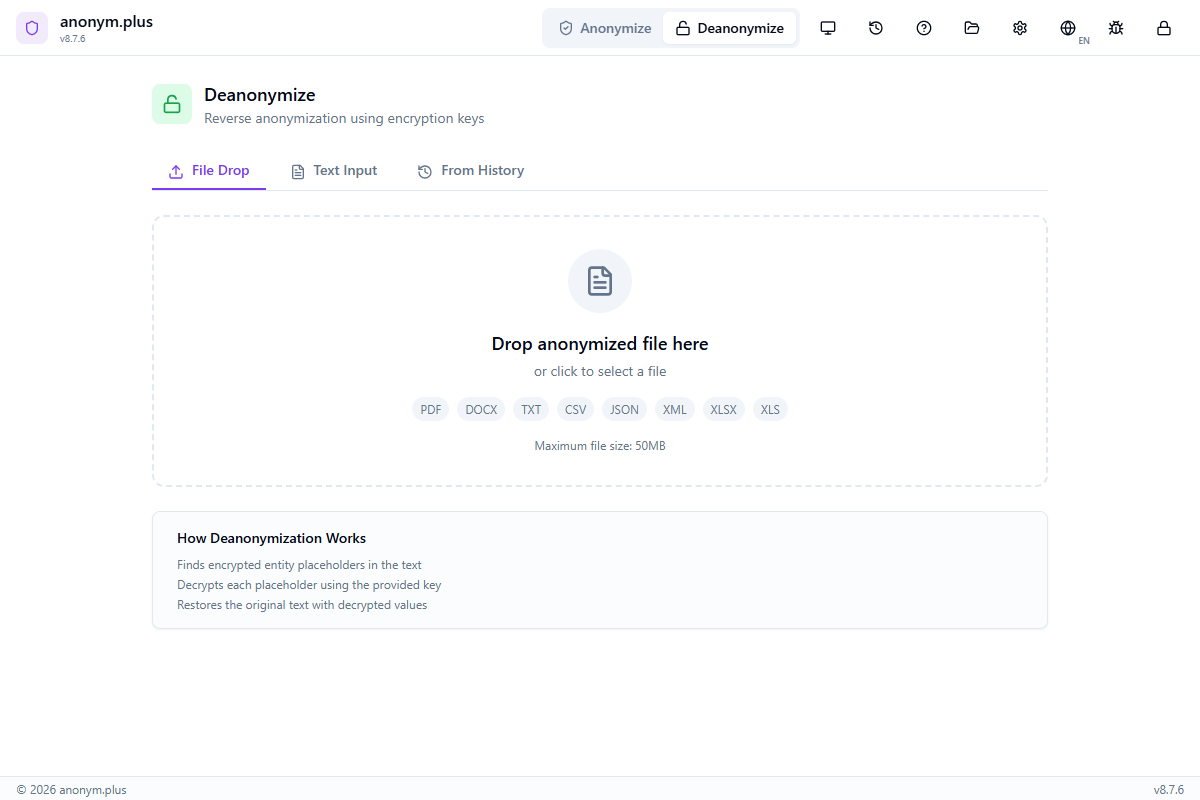
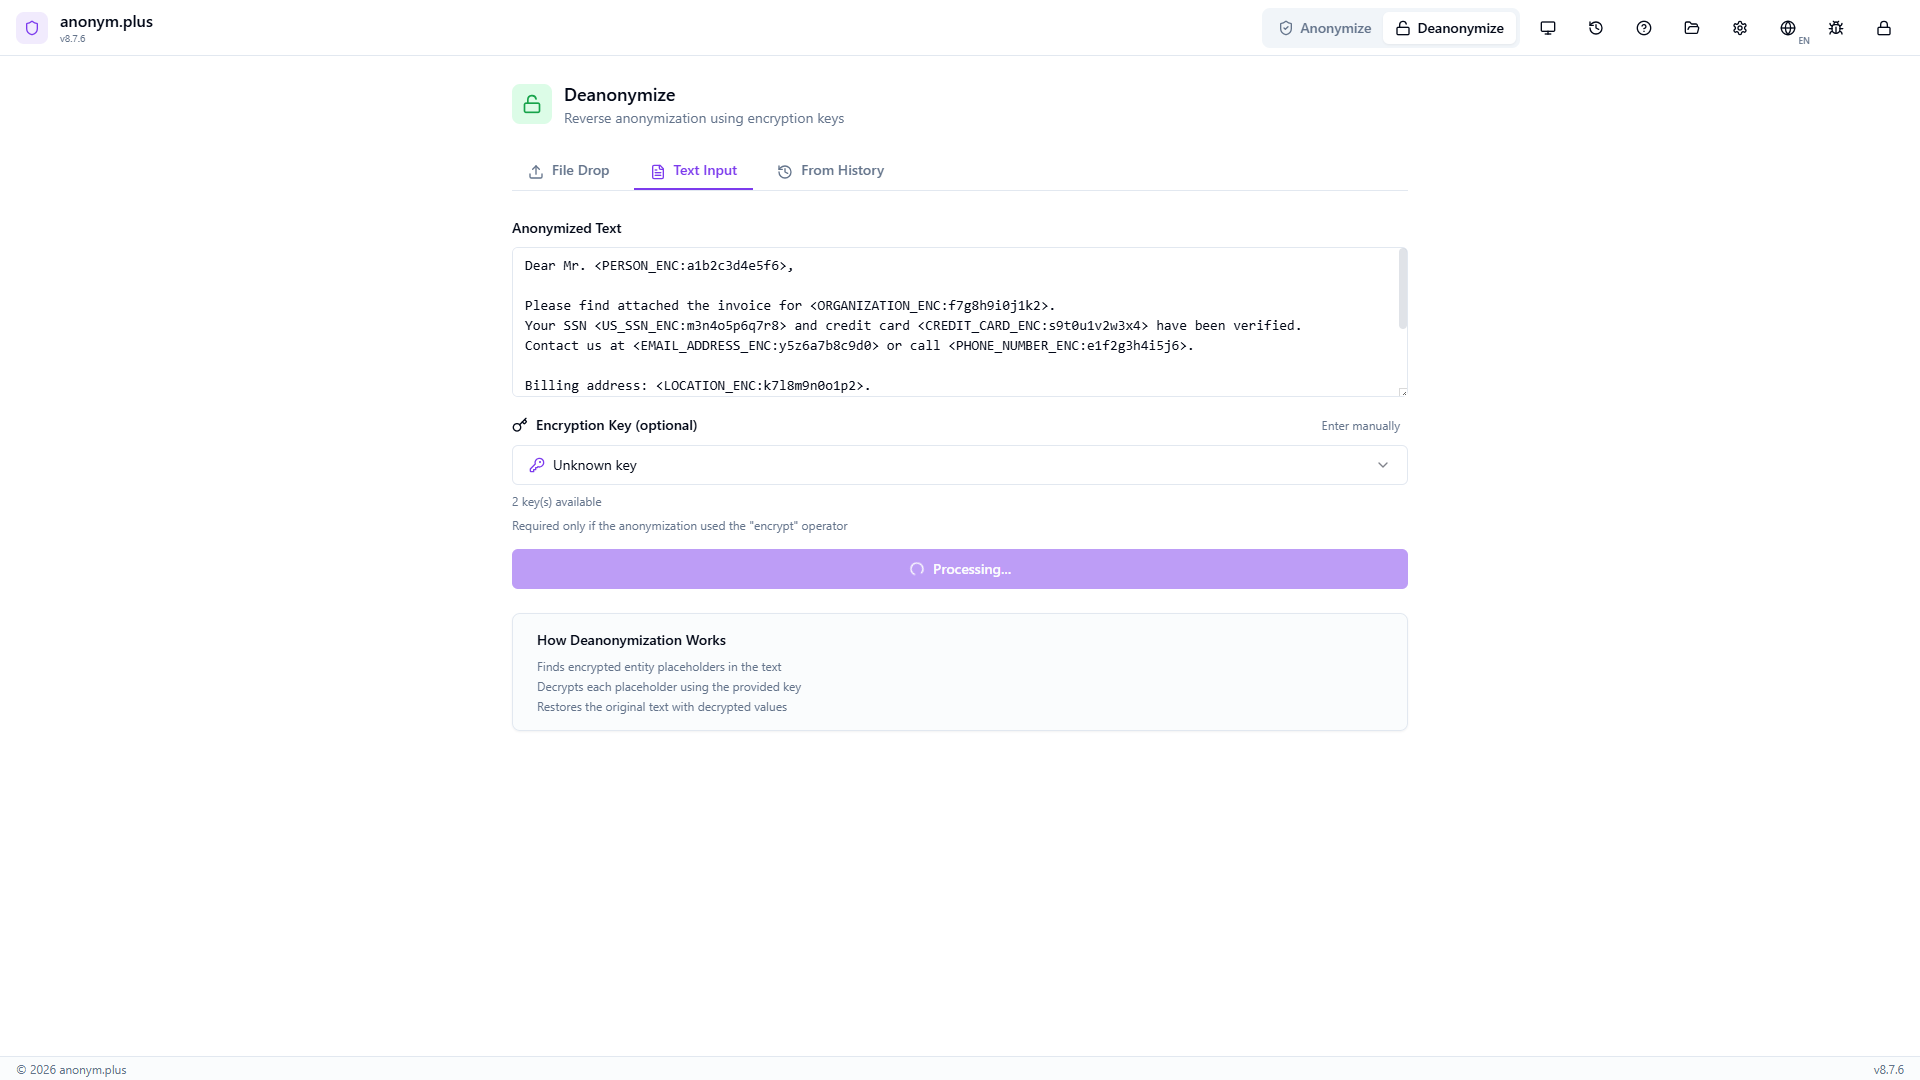
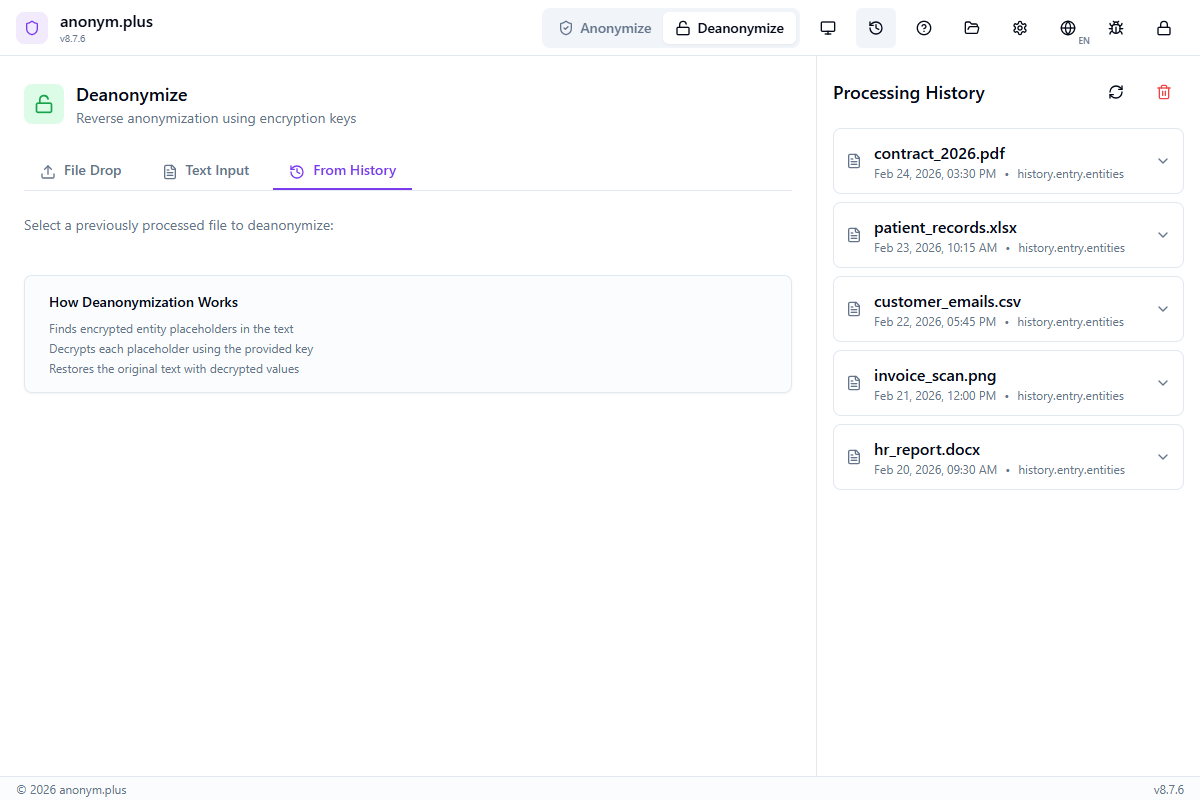
Click “Deanonymize” in the header bar. The panel shows three tabs: Datei-Drop, Text Input, and Aus Verlauf. The Datei-Drop tab is active by default with a dropzone for anonymized files. “How Deanonymisierung Works” info box explains the process.
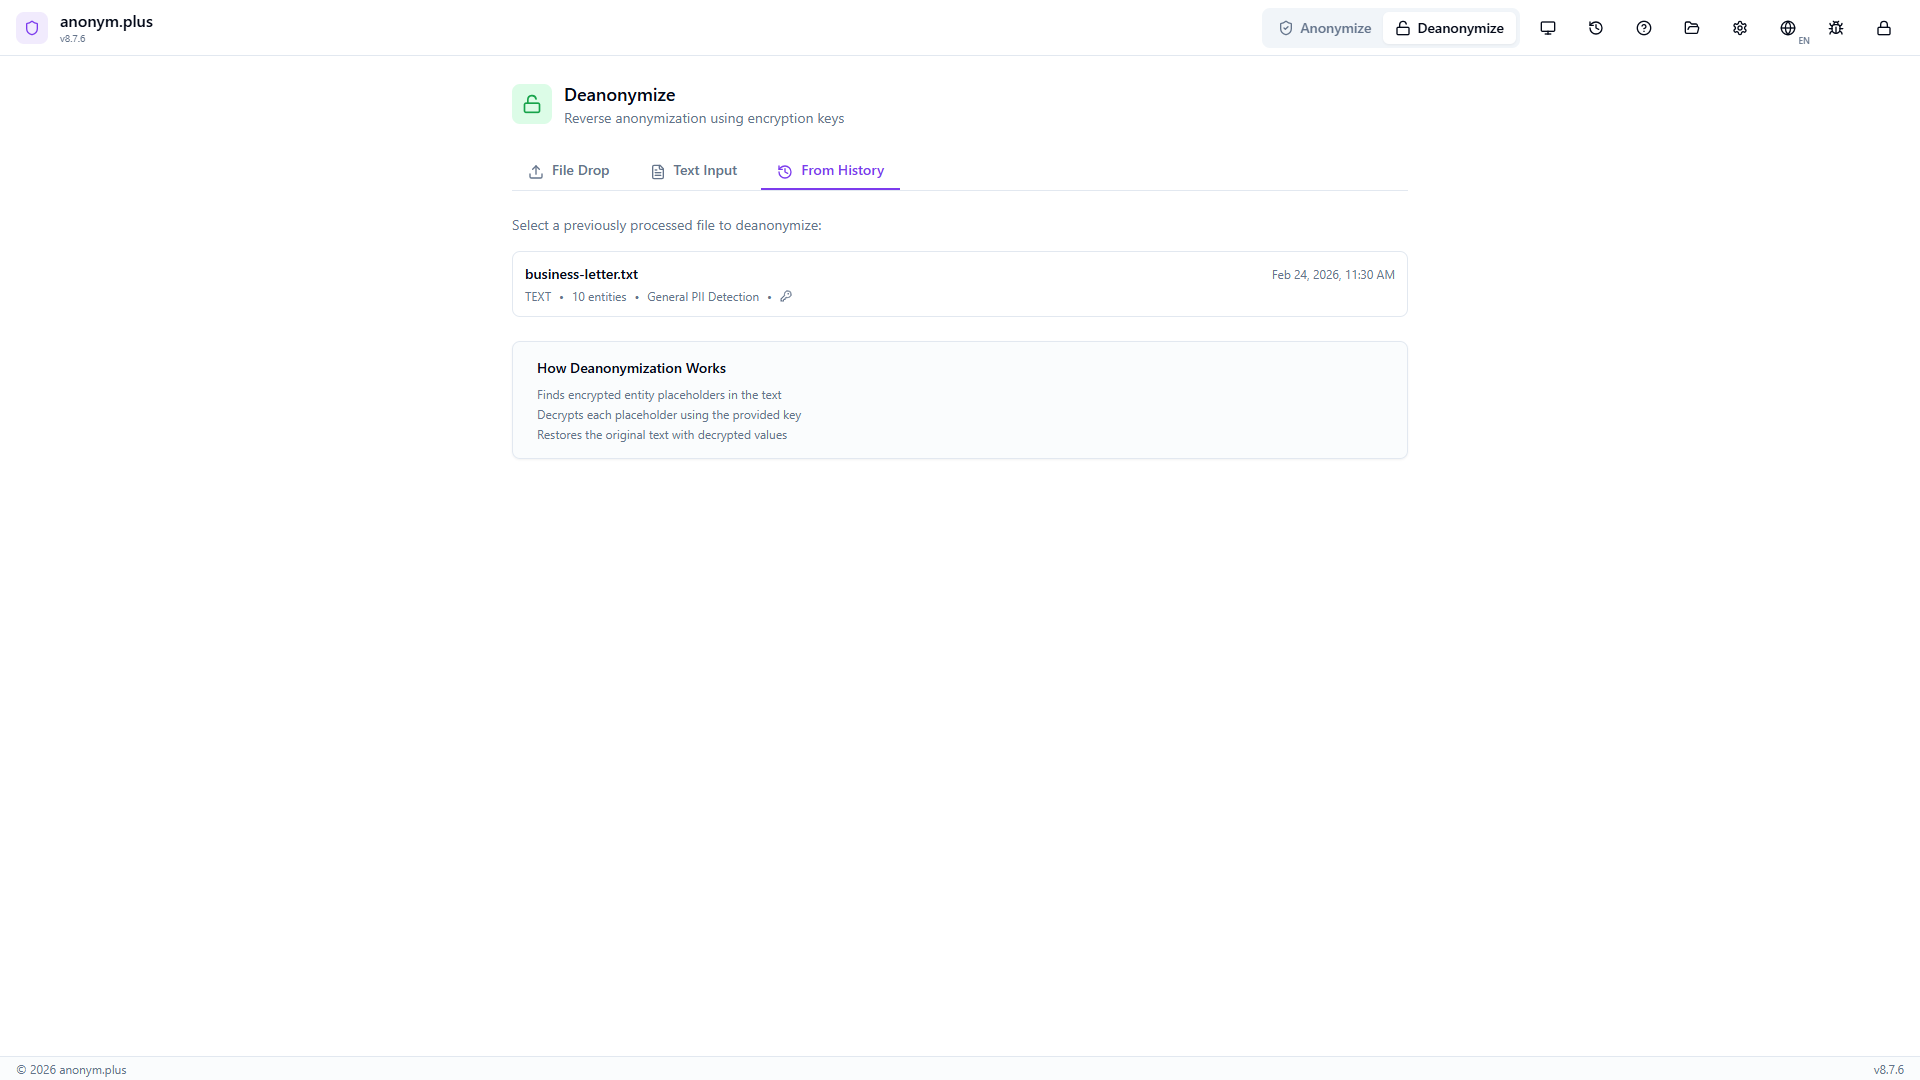
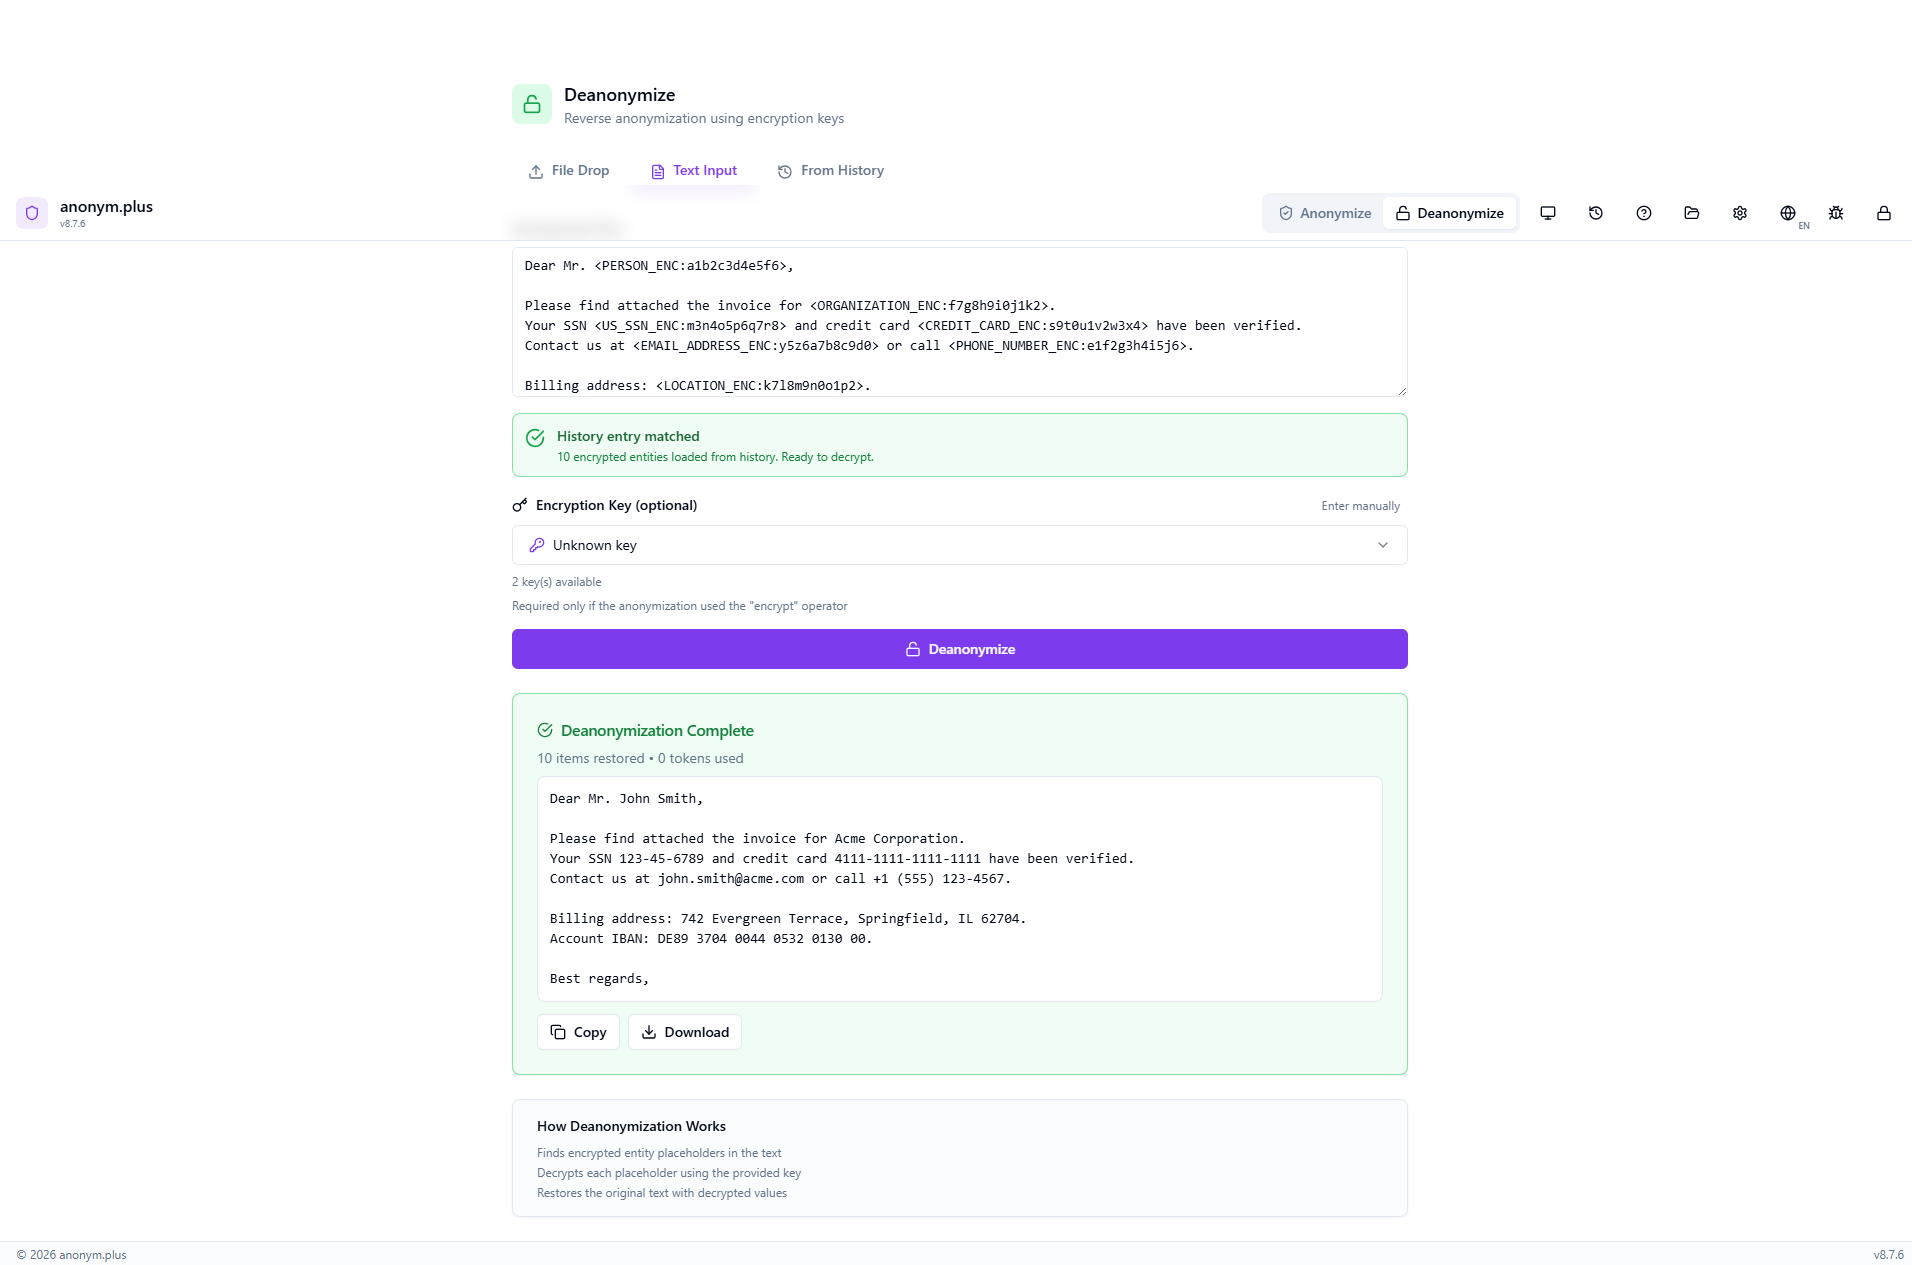
Switch to the “Aus Verlauf” tab. Previously anonymized files are listed with metadata: filename (business-letter.txt), format (TEXT), entity count (10), preset (General PII Detection), and a key icon indicating encryption was used. Click to select.
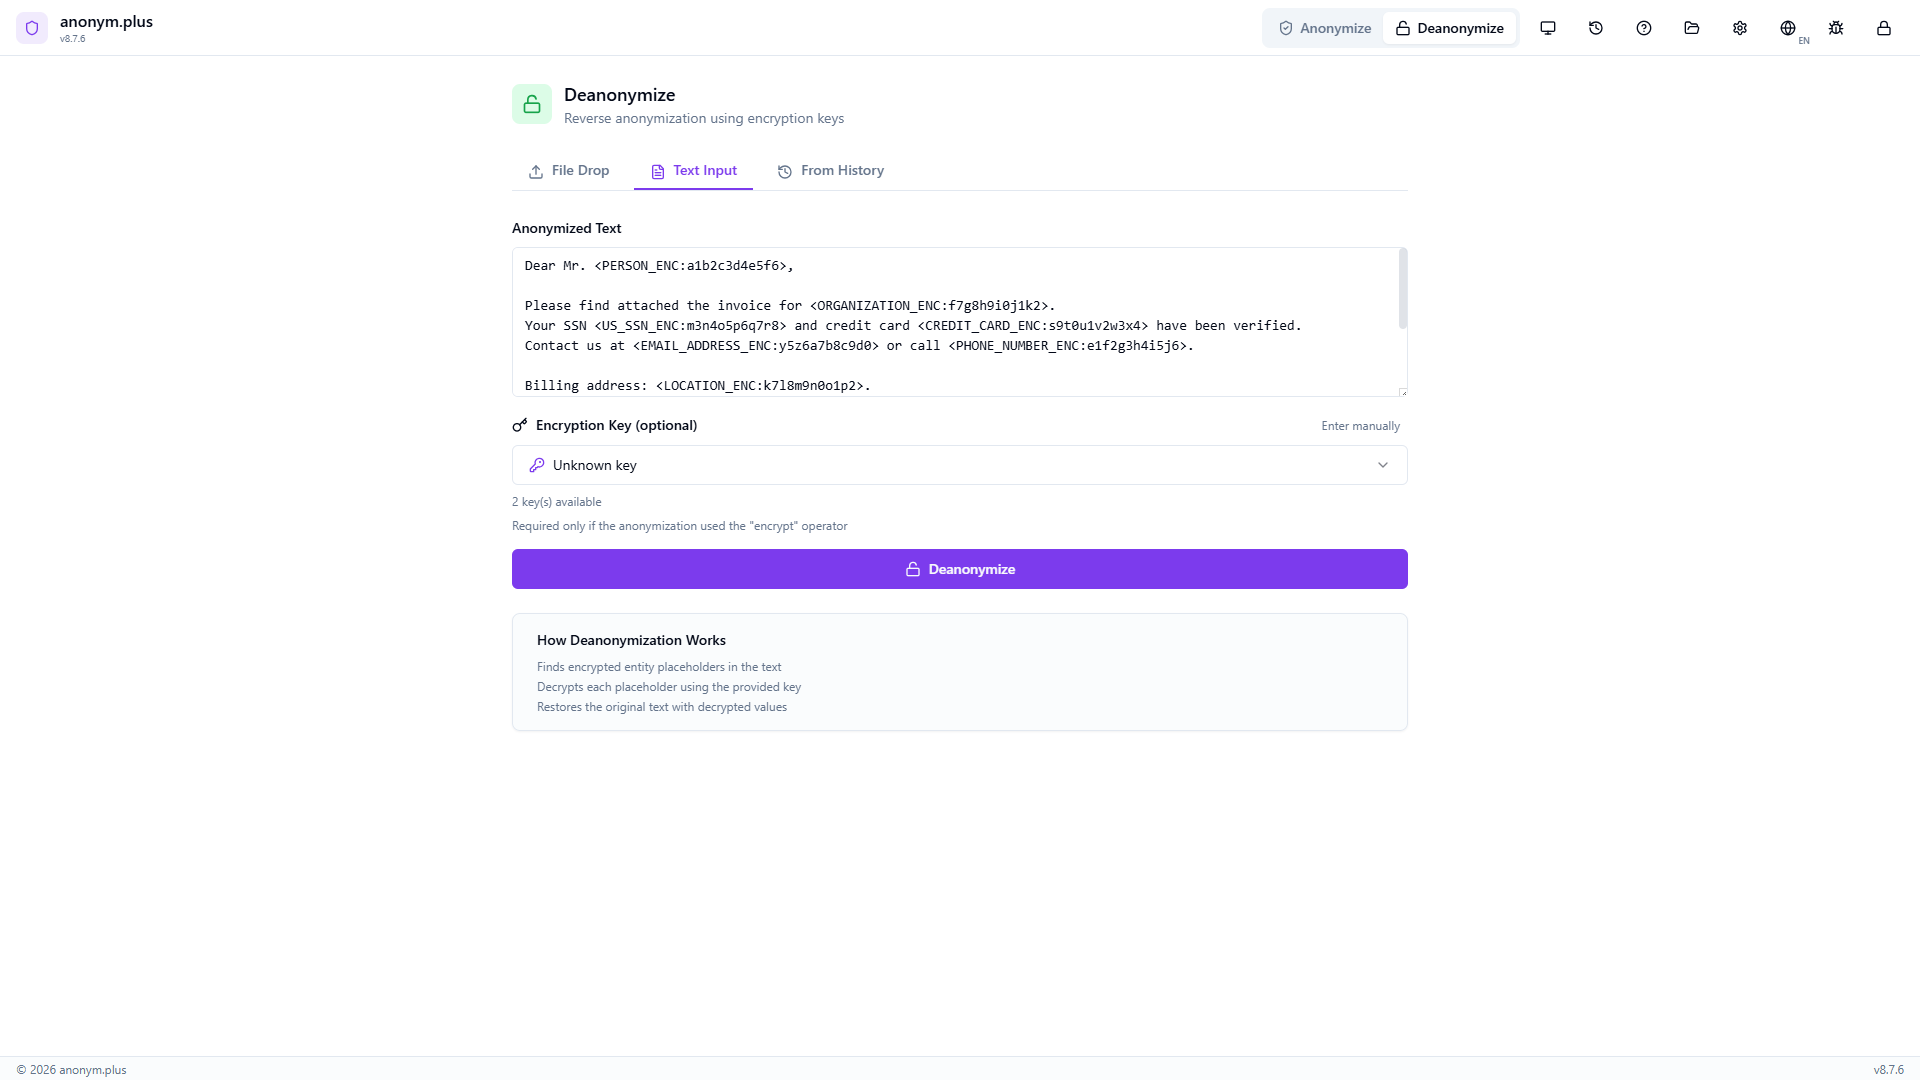
The encrypted text is pre-loaded in the Text Input tab with tokens like <PERSON_ENC:a1b2c3d4e5f6> and <ORGANIZATION_ENC:f7g8h9i0j1k2>. The encryption key selector shows 2 keys available. A green “History entry matched” banner confirms 10 encrypted entities loaded.
Click “Deanonymize” to process each encrypted token. A loading state appears during decryption.
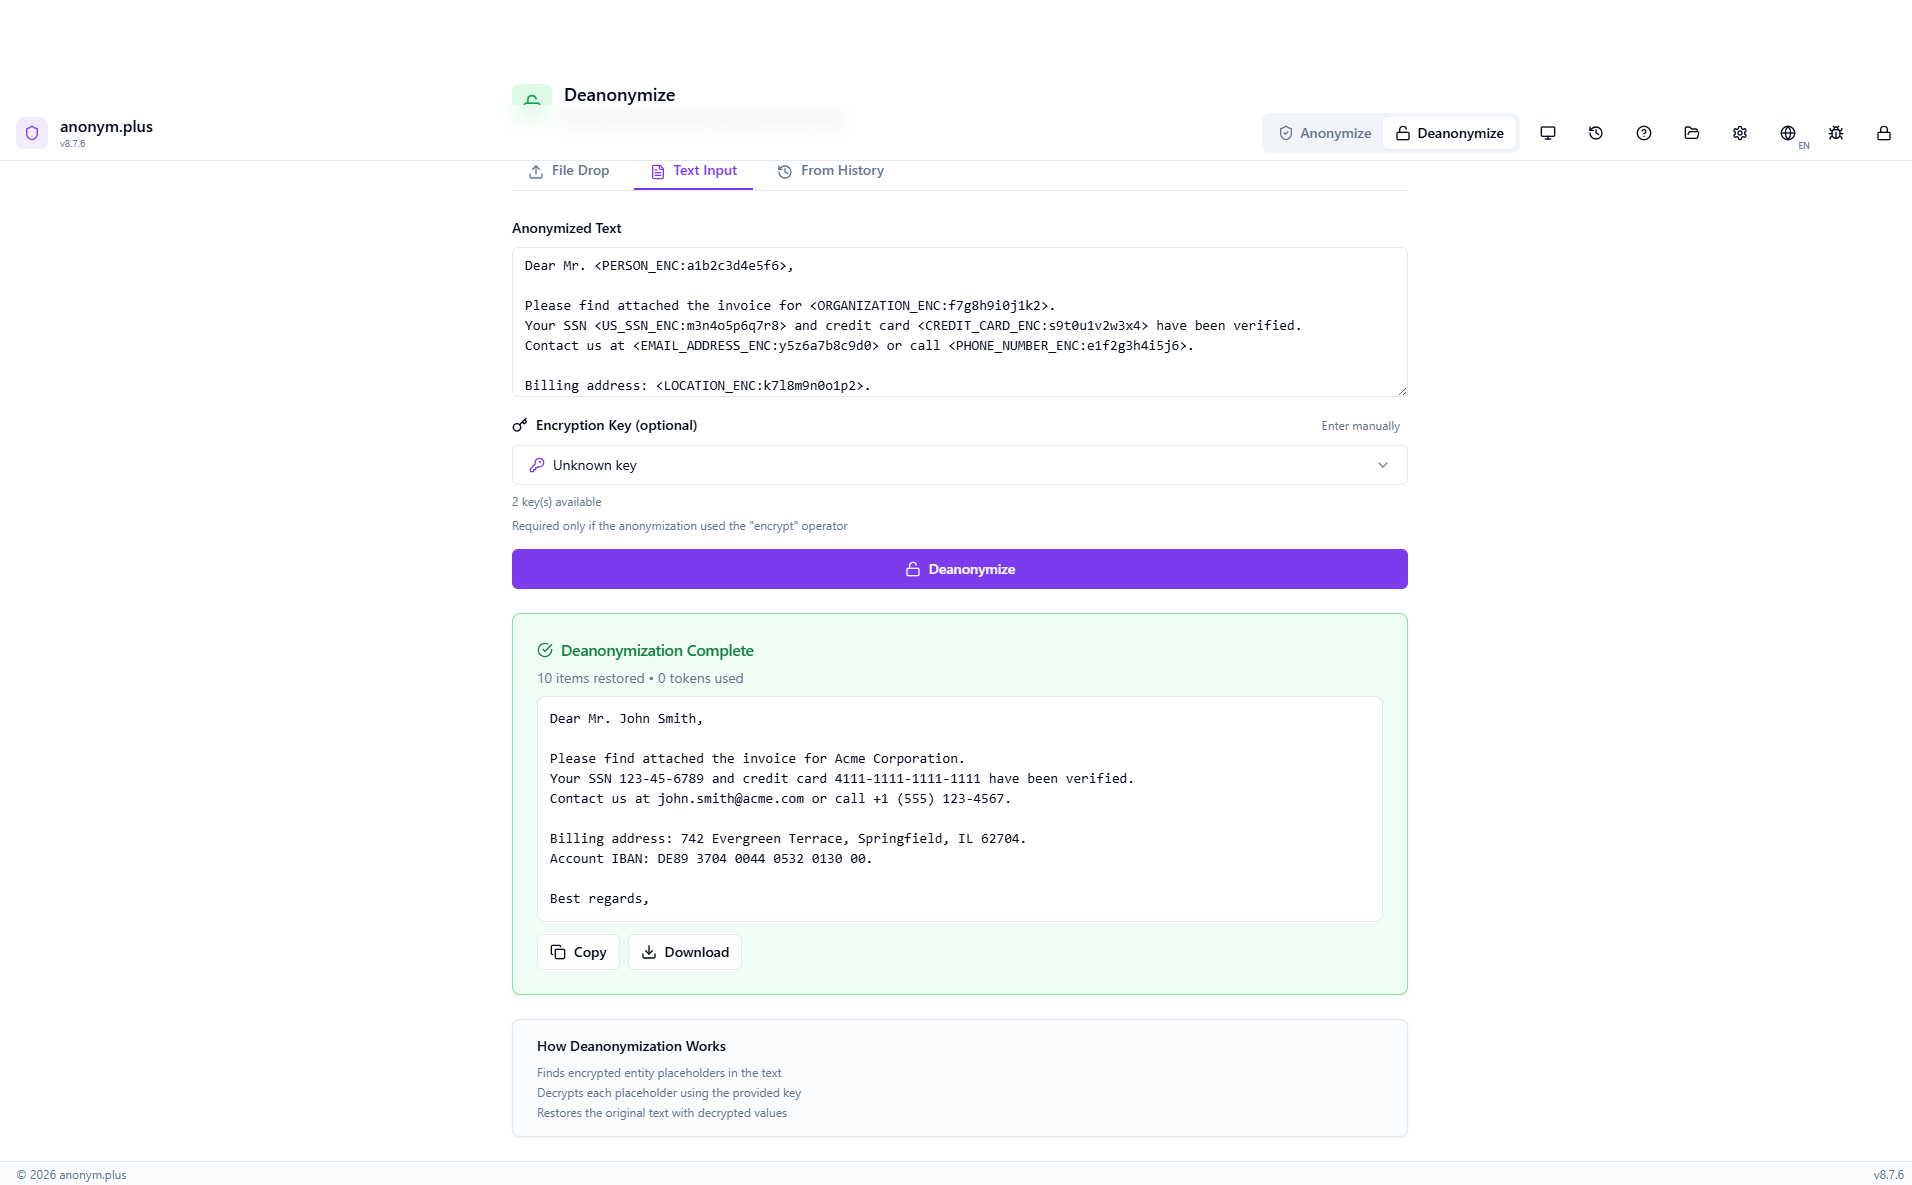
“Deanonymisierung Complete” Karte zeigt “10 items restored, 0 tokens used”. Der vollständig entschlüsselte Text zeigt alle ursprünglichen PII-Daten: John Smith, Acme Corporation, 123-45-6789, 4111-1111-1111-1111, john.smith@acme.com, +1 (555) 123-4567, 742 Evergreen Terrace Springfield IL 62704, and IBAN DE89 3704 0044 0532 0130 00. Kopieren- und Herunterladen-Schaltflächen verfügbar.
Schritt für Schritt: Deanonymize via Datei-Drop
Drop an encrypted file to automatically extract text, match against your history, and decrypt all PII.
The Deanonymize panel shows the Datei-Drop tab with a dropzone accepting anonymized documents (PDF, DOCX, TXT, CSV, JSON, XML, XLSX, XLS up to 50MB). “How Deanonymisierung Works” info box visible below.

Drop business-letter_anonymized.txt. The encrypted text is extracted and displayed in the text area with tokens like <PERSON_ENC:a1b2c3d4e5f6> visible. The encryption key selector shows 2 keys available.
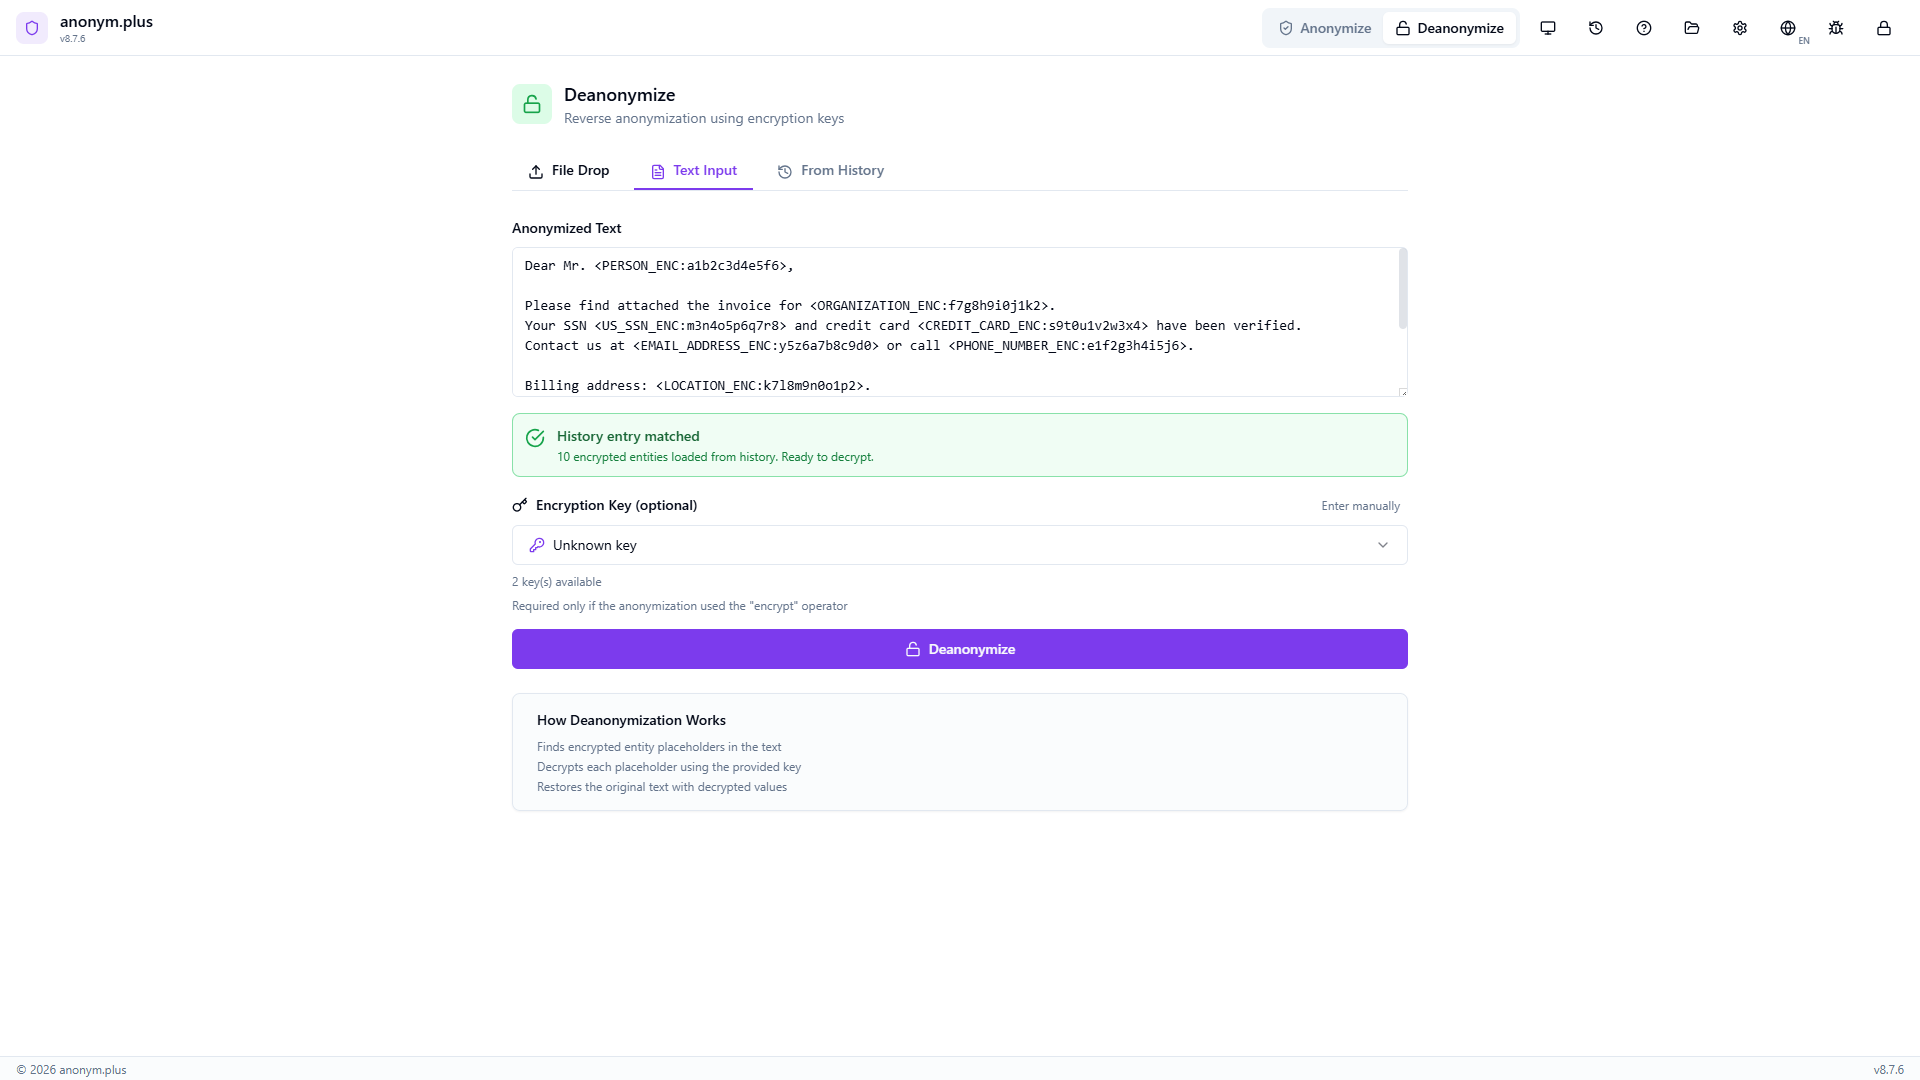
The app automatically searches your processing history and finds a matching entry. A green “History entry matched” banner appears: “10 encrypted entities loaded from history. Ready to decrypt.” The correct encryption key metadata is loaded.

The encryption key is confirmed. The matched history indicator is visible. The “Deanonymize” button is ready.

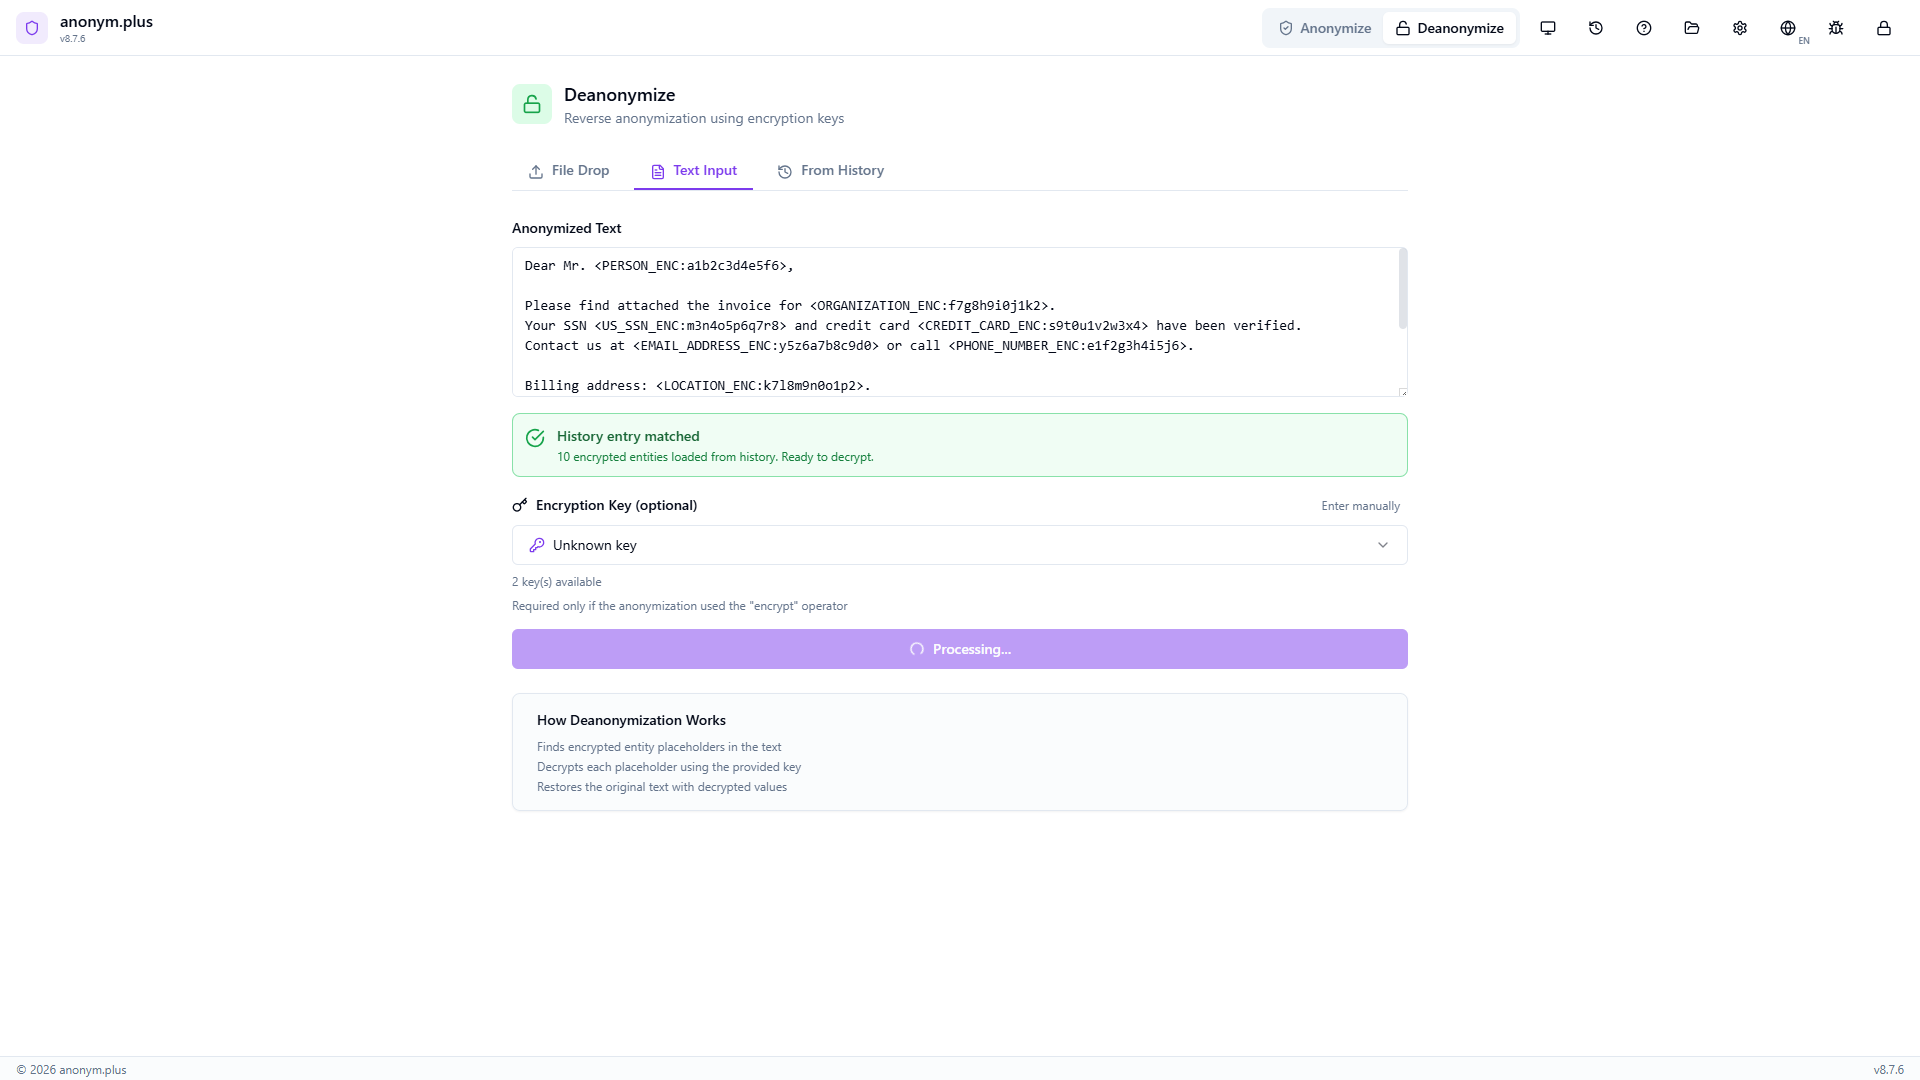
Click “Deanonymize” to decrypt all encrypted tokens using the matched encryption key.
Datei-Deanonymisierung abgeschlossen — alle ursprünglichen PII-Werte wiederhergestellt, einschließlich Namen, SSN, Kreditkarte, E-Mail, Telefon, Adresse und IBAN. Kopieren- und Herunterladen-Schaltflächen verfügbar.
How to Deanonymize
- Switch to 'Deanonymize' mode using the toggle in the header
- Drop a file, paste text, or select from history — keys load automatically
- If auto-match fails, manually select the encryption key
- Click 'Deanonymize' to restore original values
- Kopieren or download the restored text
Encrypt → Share → Edit → Decrypt
You can encrypt a document, share it with collaborators, receive it back with edits, and still decrypt the PII:
Erkennungsvorgaben
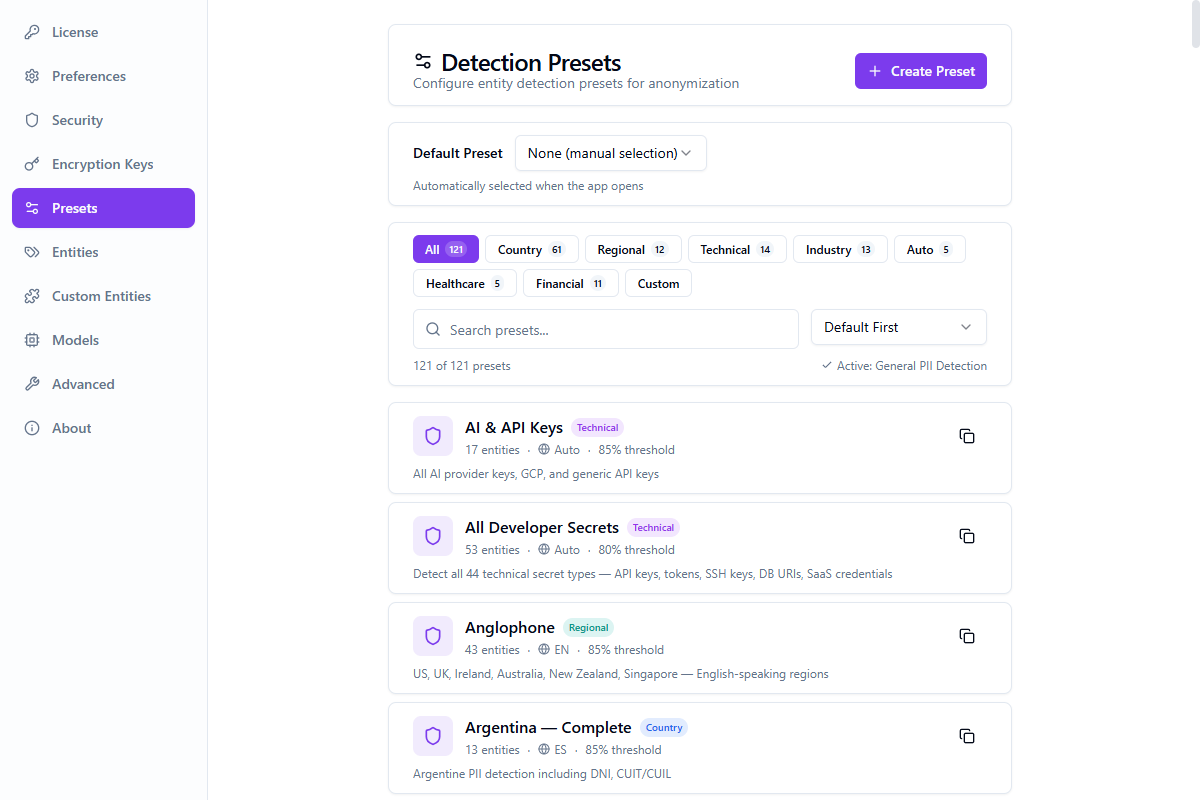
Pre-configured entity detection profiles for different use cases. 121 built-in presets across 7 categories.
| Preset | Beschreibung | Threshold | Entity Types |
|---|---|---|---|
| General PII Detection | Comprehensive detection for common PII types | 0.85 | 10 |
| GDPR Compliance | European data protection requirements | 0.90 | 10 |
| HIPAA Medical | US healthcare PHI protection | 0.90 | 9 |
| Financial Services | Banking and financial data | 0.95 | 10 |
| Development & Testing | Lightweight preset for dev environments | 0.70 | 5 |
| Multi-Language European | Multi-language support for EU markets | 0.85 | 9 |
Custom Presets
Create your own presets in Einstellungen → Presets. Select entity types, set operators, and configure confidence thresholds. Custom presets are stored in your vault.
Benutzerdefinierte Entitäten
Define your own PII entity types using regular expression patterns. Custom entities are detected alongside built-in types during anonymization.

Creating a Custom Entity
Navigate to the Benutzerdefinierte Entitäten tab in Einstellungen
Click "Add Custom Entity" and provide a name and regex pattern
Use the inline pattern tester to verify matches with real-time highlighting
Save the entity — it's now available in all presets and analyses
Pattern Guidelines
- Use standard JavaScript regex syntax (no delimiters needed)
- Patterns are validated for ReDoS safety — catastrophic backtracking patterns are rejected
- Test with real sample data using the inline tester before saving
- Use named groups
(?<value>...)to capture only the relevant part of a match
Import & Export
Custom entity definitions can be exported as JSON and imported on another machine or shared with team members. This makes it easy to standardize detection rules across an organization.
Limits
| Parameter | Limit |
|---|---|
| Maximum custom entities | 50 |
| Pattern length | 500 characters |
| ReDoS protection | Enabled — unsafe patterns are rejected |
Verschlüsselungsschlüssel
Manage encryption keys for reversible anonymization.
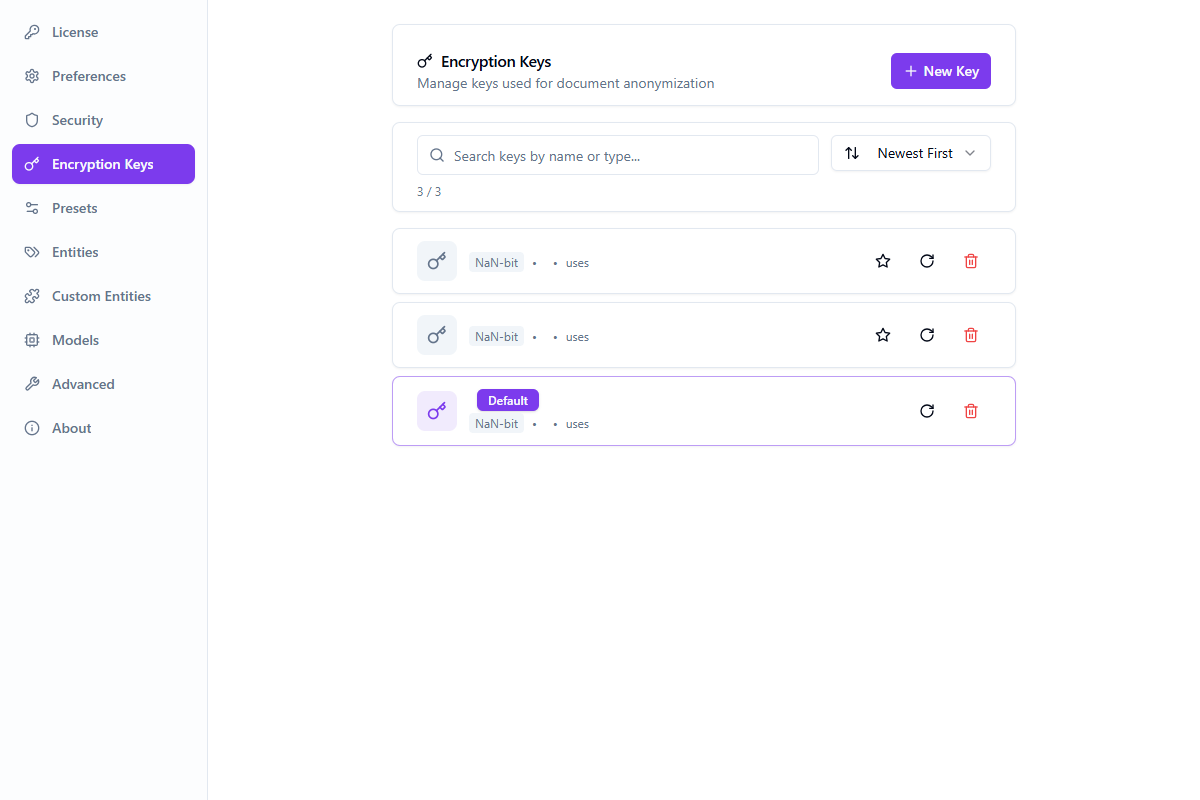
- Create and store encryption keys securely in your vault
- Apply encryption to specific entity types
- Keys are stored locally — only you can decrypt
- Sync keys across devices via your account
How to Use
Verarbeitungsverlauf
View and manage your anonymization history.
- View all processed files with timestamps
- See entity counts and tokens used
- Kopieren original or anonymized text
- Use history entries for deanonymization
- History stored locally in encrypted vault
Einstellungen
Konto
- Sign in with browser or ZK authentication
- View license plan and activation status
- Sync presets and encryption keys
- Sign out
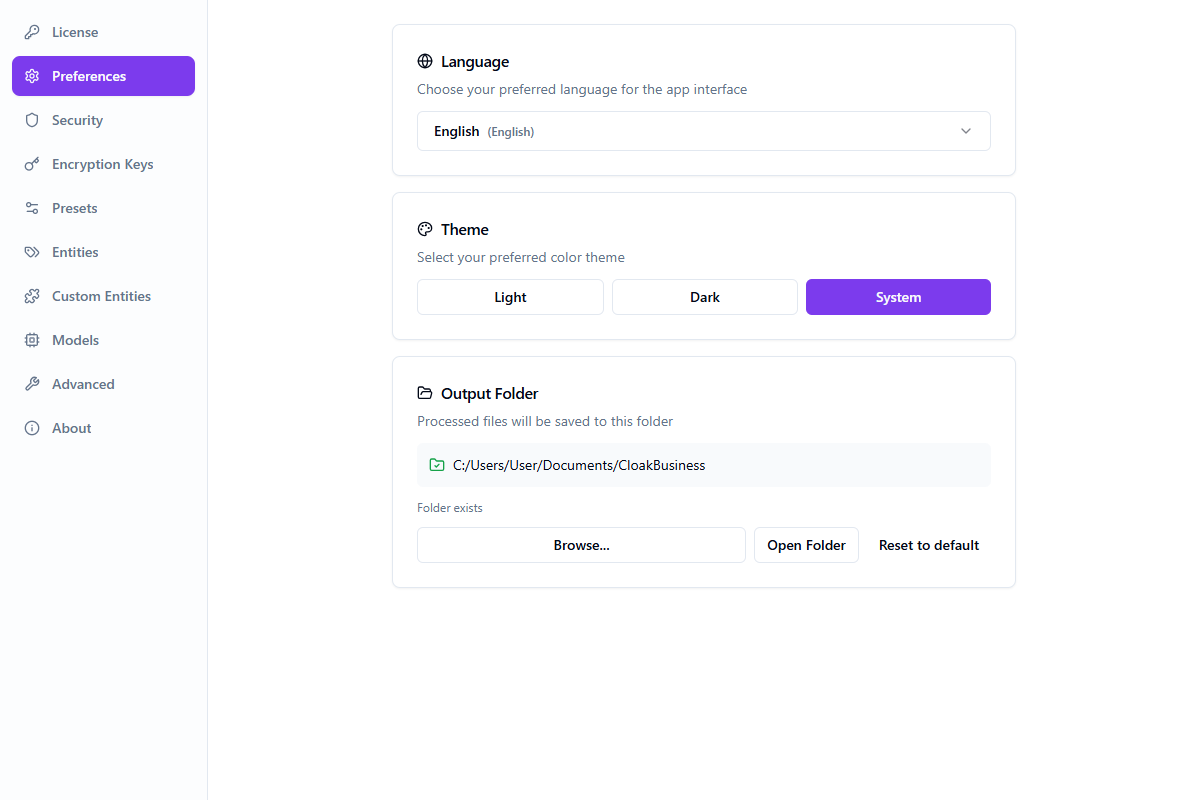
Preferences
- Language selection (48 languages)
- Theme (Light / Dark / System)
- Output folder configuration
- Auto-update settings
Sicherheit
- Change or set PIN (4–8 digits)
- View recovery phrase
- Vault lock settings
- Reset vault
Verschlüsselungsschlüssel
- Create and manage encryption keys
- Set default key and entity type binding
- Rotate key values (one-time display)
- Keys stored locally in encrypted vault — values never leave your machine
Presets
- 121 built-in presets across 7 categories
- Create custom presets with entity selection
- Configure per-entity-type operators
- Set default preset for auto-selection
- Duplicate built-in presets as custom
Entities
- Enable/disable 200+ PII entity types globally
- Search and filter by entity group
- Per-group and global Enable All / Disable All
Benutzerdefinierte Entitäten
- Define custom PII types with regex patterns
- Inline pattern tester with real-time highlighting
- Import/export custom entity definitions
- Max 50 custom entities, ReDoS-safe validation
Models
- Download additional language models for PII detection
- 23 spaCy-based languages available
- Check for model updates
- Delete unused models to save disk space
Advanced
- Embedded debug log viewer with cross-window log broadcasting
- Log level configuration
- Data management: export, import, delete, move vault data
About
- App version and build info
- Engine status (PII detection engine)
- Download and install updates
- Links to documentation and support
Tastenkombinationen
| Shortcut | Action |
|---|---|
| F1 | Open help panel |
| Ctrl + , | Open settings |
| Ctrl + O | Open file |
| Ctrl + H | Toggle history panel |
| Ctrl + Shift + D | Toggle debug log window |
| Escape | Close panels |
Sicherheit
Vault Encryption
Your sensitive data is protected with military-grade encryption.
- AES-256-GCM encryption for all stored data
- Argon2id key derivation (64 MB memory, 3 iterations)
- BIP39 24-word recovery phrase
- PIN-based quick unlock for daily use
- Sensitive data zeroized from memory when locked
How Your Data is Processed
What We Never Store
Fehlerbehebung
| Issue | Solution |
|---|---|
| App shows white screen | Try restarting the app. If persists, reset vault in Einstellungen > Sicherheit. |
| Forgot PIN | Use your 24-word recovery phrase to reset the vault. |
| Lost recovery phrase | If vault is unlocked, view it in Einstellungen > Sicherheit. Otherwise, data cannot be recovered. |
| Files not processing | Check file size limits. Ensure the correct file format is used. |
| Sign in with Browser not working | Ensure your default browser allows the anonym-plus:// protocol. |
| Presets not loading | Check internet connection. App will use offline fallback presets. |
| Image analysis returns no entities | Verify the correct OCR language is selected. Ensure clear, readable text at 300+ DPI. Use screenshots instead of photos of screens. |
| Image redaction misses some text | OCR may struggle with handwritten text, very small fonts, skewed text, or complex backgrounds. Straighten the image and increase contrast. |
| Image upload fails | Check: supported format (PNG, JPG, BMP, TIFF), under 10 MB, under 25 megapixels. |
| 'No anonymized entities found' | The text doesn't contain entity markers. Auto-match against history or select from the 'Aus Verlauf' tab. |
| 'Decryption failed' | Ensure you're using the same encryption key from anonymization. Verify in Einstellungen → Verschlüsselungsschlüssel. |
| PII detection engine not running | Check engine status in Einstellungen → About. Click restart. Check debug log (Ctrl+Shift+D). |
| Custom entities not detected | Ensure the entity is enabled in Einstellungen → Benutzerdefinierte Entitäten and the regex pattern matches. |
Fehlermeldungen
| Message | Meaning |
|---|---|
No text content found | The file appears to be empty or contains only images. |
Analysis failed | Ensure the PII detection engine is running. Check Einstellungen → About. |
Extraction data not found | The file needs to be re-analyzed. |
Image too large | Exceeds 10 MB size or 25 megapixel limit. Resize before uploading. |
No text detected in image | OCR could not extract text. Ensure readable printed text with sufficient contrast. |
No anonymized entities found | Text doesn't contain entity placeholders or encrypted chunks. Select from History tab. |
Decryption failed | Encryption key mismatch. Verify the correct key in the dropdown. |
Encryption keys not found | Keys need re-importing. Go to Einstellungen → Verschlüsselungsschlüssel. |
Frequently Asked Questions
Jump to: Sicherheit · Anonymization · Deanonymisierung · Verschlüsselungsschlüssel · Batch · Presets · Benutzerdefinierte Entitäten · Images · Models · History · Licensing · Updates · Fehlerbehebung
Unterstützung
Need help? Reach out through any of these channels:
- Dokumentation — this page
- Contact Unterstützung — submit a support request
- In-app bug reporting — use the bug icon in the app header to report issues with diagnostic information